Showing posts with label Disordered. Show all posts

Tuesday, January 6, 2015

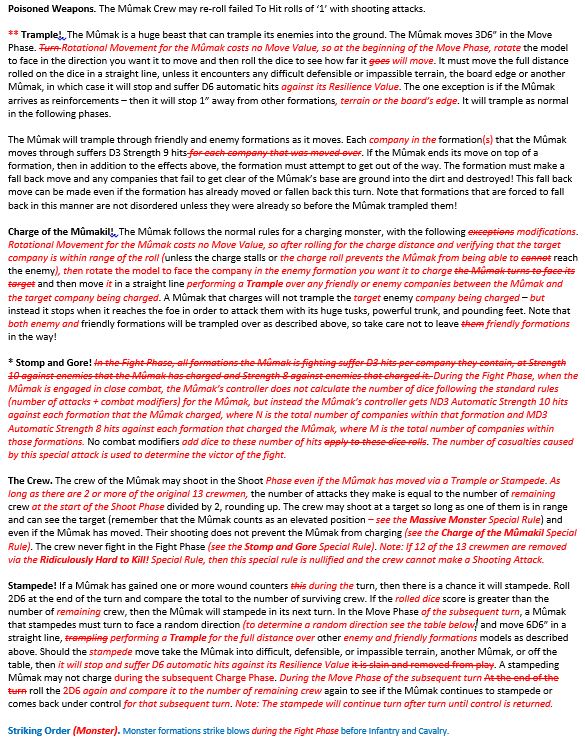
Ridiculously Hard to Kill! The Mumak's Special Rule [Part 5/5 of the Hard to Kill Series]

This is the end of the Series for the Hard to Kill Special Rules. This post will cover the Ridiculously Hard to Kill! Special Rule and provide an example of how one may go about fighting this thing in a game.

The Mumakil in The Fallen Realms Army is the only formation that has this special rule. Once again, the good armies do not get any equivalent characters with it, unfortunately.


The first thing to notice is that it has the same ranges as the Extremely Hard to Kill! rule, it just has the additional effect of removing crew members (thusly reducing its capability to Shoot during the Shoot Phase and increasing its probability of Stampeding) as wound counters are applied to the Mumakil.


Let's go through an example and have Legolas (in the Front left company of Formation 1 - marked with an "L") and some Minas Tirith Warriors go to town on a Mumakil!


STEP-BY-STEP EXAMPLE OF THE FIGHT

Round 1:

Priority Phase

Gondor rolls a 1 and the Mumak rolls a 2. The Mumak Wins Priority for the Round.

Move Phase

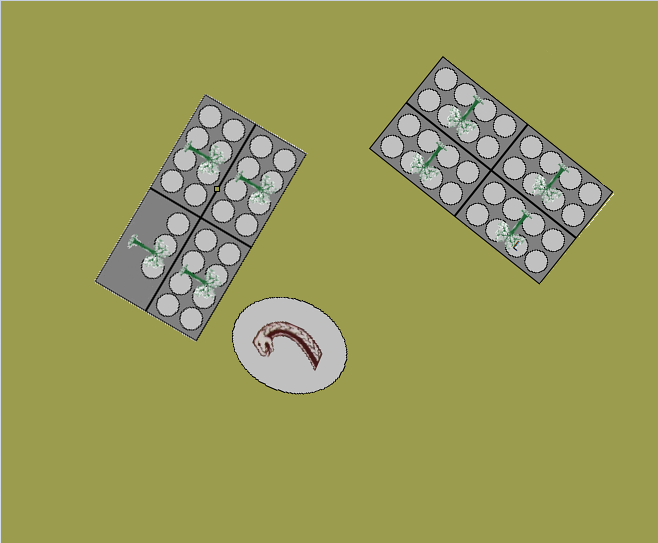
The Mumak rotates Counter-clock-wise to aim toward Formation 2 of the Minas Tirith Warriors (recall that this rotation move cost is free under the Trample rule). For the Trample distance the Mumak rolls a 5, 3, & 6. Totaling 14" for the Move. The front two companies of Formation 2 are trampled, this means that the Mumak deals 2D3 Strength 9 hits to Formation 2. For the two dice that he rolls he gets a 5 & a 5 - that means 6 Strength 9 hits to Formation 2. Strength 9 versus Defense 7 means that he needs 3's to Wound. The six dice he rolls results in a 1, 3, 3, 3, 4, & 3 - thus 5 wounds on the Minas Tirith Warriors Formation 2. Formation 2 has to take a Fall Back! roll and rolls a 1 ... meaning that they fall back 3" (that wasn't a very good roll - but at least enough to get clear of the Mumak).

It is now Good's turn to move. Formation 2 decides that they want to expand their frontage so that the inevitable charge from the Mumak will not be as devastating - however since the Mumak is within 6" of Formation 2, they have their Move Value halved and can only move 3". To reconfigure to a 3x2 configuration from the 2x2 would require a move of 4.93" ... so that's not possible; and to go to a 4x1 configuration from the 2x2 would also require a move of 4.93", so that's not possible, either. Guess they have to stay the way they are configured ... As for rotating ... as a 2x2 configuration with a 3" Move value, we could rotate clock-wise or counter-clock-wise 37.45-degrees - maybe a counter-clock-wise rotation would be the best move. Here's hoping! Formation 1 decided to rotate 45-degrees clock-wise so that Legolas can have Line-of-Sight to the Mumak. This uses up 3.49" of their movement value - so they have 2.51" left for translational movement. They move forward toward the  Mumak the remaining distance.

Shoot Phase

The Mumak has priority, so gets to shoot first. According to The Crew rule, the Mumak gets 13/2 = 6.5 Shots, rounded up to 7. The crewmembers are armed with Bows, so have a 24" Range and a Strength of 2. They decide to continue to barrage Formation 2 - since it is already a little depleted (and no matter which formation they target they will be attacking the front, so they will have Defense 7). For Strength 2 against the front of Formation 2's Defense 7 means they need 6/4's to wound. For the 7 dice, they roll: 3, 5, 5, 1, 1, 1, & 5. Due to the Poisoned Weapons special rule, they get to re-roll the 1's ... so they pick up the three 1's and get: 4, 4, & 2. No 6's - so all the shots miss. Good's turn for the Shoot Phase. Since Formation 2 has no ballistic capabilities, they cannot do anything - but Formation 1 has Legolas in it - and he decides to use his Crippling Shot special rule on the Monster. Legolas rolls a 6 for Crippling Shot - meaning that the Mumak's Resilience Value is reduced by 1 (from 2 down to 1) for the remainder of the turn. Now's the chance to go crazy! Legolas also expends a point of Might (down from 3 to 2) and calls an Epic Shot. He nominates the Mumak and deals 1D6 automatic hits to the Mumak. He rolls a 3 - meaning 3 hits against the Mumak's Resilience of 1 ... 3 rolls on the Ridiculously Hard to Kill! table. The First roll of the dice produces a die value of 2 - No Effect. The Second roll on the table produces a die value of 6 - Flesh Wound: Slay one crewman and gain 1 counter (now down to 12 crewmen) and a natural 6 gives a re-roll! The re-roll die value is 5 ... adding the one counter produces a critical value of 6 - Flesh Wound: Slaying an additional crewman and gaining another 1 counter (now down to 11 crewmen and 2 counters on the Mumak). The Third roll on the table produces a die value of 3 ... adding the 2 counters gives an attack value of 5 - Another Flesh Wound: Slaying another crewman and adding another counter (remaining crew = 10; counters = 3). Not too shabby, Mr. Legolas!

Charge Phase

The Mumak decides it is going to charge Formation 2. He rolls a 5 for the Charge - so the charge is successful. Having been charged by a Monster with Terror, Formation 2 rolls their courage test: 1 & 3. Adding their courage of 3 gives 7 ... not enough - so Formation 2 is reduced to Fight 0 for the remainder of the turn. Formation 1 nominates the Command Company with Legolas as the Spearhead and measures the distance to the Mumak - 7.57" ... meaning they will need to roll a 6 to reach him. They roll for the Mumak's Terror: 2 & 4. Adding Legolas' Courage of 6 gives 12 ... so that's a Pass. For the charge they roll a 5 ... Legolas uses another point of Might to adjust it up to a 6 (plus now it's an Unstoppable Charge!)... Legolas is now at 1 Might Point remaining, and the charge is successful - hopefully it will be enough with the Mumak's Resilience still reduced during the Fight Phase. Since the Mumak is being charged by a company with Terror (due to Legolas providing it via the Bestow Terror Special Rule) the Mumak rolls its Courage Test: 4 & 1 ... adding the Mumak's Courage Value gives 9 ... LOL ... the Mumak is Fight 0 for the turn, too! (Bad day Mr. Mumak!)

Fight Phase

The Mumak has priority - but even if he didn't he would still get to attack first (because of Striking Order [pg 46] and he is Type: Monster - and Legolas' Swift Strike only gives the Infantry Formation Striking Order (Cavalry) - so they get to go second and finally Formation 2 last ...). According to the Stomp and Gore special rule, Formation 2 (charged by the Mumak) has 4 companies in it so they suffer 4D3 hits at Strength 10. Formation 1 (charged the Mumak) has 4 companies in it so they suffer 4D3 hits at Strength 8. For the Number of hits against Formation 2, the Mumak rolls: 6, 3, 4, & 5. This totals: 3+2+2+3 = 10 Strength 10 hits against Formation 2. Strength 10 against Defense 7 needs 3's to wound. Rolling the 10 dice gives: 6, 3, 4, 5, 4, 4, 3, 2, 4, & 6. That means 9 Wounds against Formation 2! Now, against Formation 1 .... rolling the 4D3 for the number of Hits gives: 1, 6, 5, & 5. This totals: 1+3+3+3 = 10 Strength 8 hits against Formation 1. This also needs 3's to wound. Rolling the 10 dice gives: 1, 4, 1, 6, 6, 4, 5, 6, 3, & 2. That is 7 wounds against Formation 1 - ouch! Looks like with the 16 Wounds from the Fight Phase and the 5 from the Trample, that's 21 wounded warriors from the Mumak!!

OK, Good's turn to Fight ... Formation 1 has Striking Order (Cavalry) so they get to attack next. The Command Company has a Fight of 6 from Legolas - so against the Fight of 0 that the Mumak has this turn that means that they get 8 dice for Attack Value (fighting directly) + 6 for the difference in Fight Value (Battle Skill) + 1 for Charging + D3 (rolled a 3 ... therefore +2) for the Unstoppable Charge. That is 17 dice from Company 1 ... Company 2 is also fighting directly so they give 8 dice for their Attack Value (fighting directly) + 3 for the difference in Fight Value (Battle Skill) + 1 for Charging + D3 (roll a 2 ... therefore +1) for the Unstoppable Charge. That's 13 dice from Company 2. Companies 3 and 4 are support - so they provide 1 die each and 2D3 dice for their Unstoppable Charge. Company 3 gets a 4 ... so +2 more dice and Company 4 gets a 1 ... so +1 more dice. So, the grand total of dice from Formation 1 is: 17+13+3+2= 35 dice. Strength 3 against Defense 8 needs 6/4's to Hit. Let's see what the 35 dice produce: 6, 1, 6, 3, 4, 4, 1, 6, 1, 1, 5, 4, 6, 5, 4, 3, 1, 2, 1, 6, 1, 5, 5, 6, 1, 6, 6, 5, 5, 5, 1, 3, 4, 3, & 2. There are eight 6's - rerolling them (needing 4+'s) gives: 6, 5, 2, 2, 5, 1, 4, & 6) - that's 5 rolls on the Ridiculously Hard to Kill! table (since the Mumak has a Resilience of 1 still due to Legolas' Crippling Shot during the Shoot Phase). Here we go ... First roll on the table is a 4 - adding the 3 counters gives a 7: Flesh Wound (another dead crewman and another counter - 9 crew remaining and 4 counters, so far). Second roll on the table is a 3 - adding the 4 counters gives a 7, again: Flesh Wound (another dead crewman and another counter - 8 crew remaining and 5 counters, so far). Third roll is a 1 - adding the 5 counters gives a 6: Flesh Wound (dead crewman and another counter - 7 crew remaining and 6 counters, so far). Fourth roll is a 1 - adding the 6 counters is a 7: Flesh Wound (dead crewman and another counter - 6 crew remaining and 7 counters). Fifth roll is a 3 - adding the 7 counters gives 10: Debilitating Strike (2 crew are slain and 2 more wound counters - 4 crew remaining and 9 counters, now). Fifth, and final, roll is 4 - adding the 9 counters is 13: Devastating Wound (3 crew dead and 3 counters - 1 crew remains ...so much for the Shooting capability of The Crew special rule for the Mumak, now ... and he has 12 counters on him, now). Holy Cow! Go Crippling Shot!


Now for Formation 2's turn. Formation 2 has one company this is fighting directly and 2 support. That 8 dice (for Attack Value) + 0 (for Battle Skill) + 1 (for support from company 2) + 1 (for support from company 3) = 10 dice. They also need 6/4's to Hit: 4, 2, 1, 5, 2, 2, 4, 5, 3, & 6. They got one 6 - re-rolling the 6 (needing 4+) they roll a 5. One roll on the Mumak's table. They roll a 4 adding the 12 counters gives 16: Devastating Wound (3 crew dead and 3 counters - 0 crew remains and that gives 15 total counters on the Mumak).

Fight Results

[** Recall that we modified the Determine Victor Rule back in Part 2/5 **] The Mumak inflicted 21 wounds. Good added 15 counters to the Mumak. This means that the Mumak wins the fight and both Good Formations have to fall back 1" and take a Panic Test.

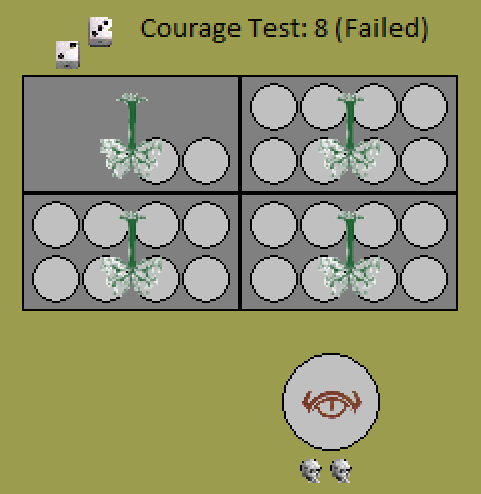
Formation 2 rolls a 1 and experience an Onset of Dismay - rolling for the Courage Test: 2 & 2 - adding their Courage Value of 3 gives 7 (Failed by 3 ... 3 more additional casualties to Formation 2) and they are also Disordered.

Formation 1 rolls a 1 (son-of-a-!) and experience an Onset of Dismay - rolling for the Courage Test: 1 & 1 (are you kidding me?) adding their Courage Value of 6 (from Legolas) gives 8 (Failed by 2 ... 2 more additional casualties to Formation 1) and they are also Disordered.

So, this is what we have at the end of Round 1 - that was rather bloody! Three full companies of Minas Tirith Warriors are gone and the Mumak barely survives with 15 Wound Counters on him.


Also, since the Mumak received 1+ wound counters this turn and since he has no crew members alive, this means that during Round 2+ he is going to Stampede! This should be interesting ... I suspect that Legolas is going to do another Epic Shot - so it's going to be lights out for the Mumak in Round 2.

Round 2:

Priority Phase

Gondor rolls a 3 and the Mumak rolls a 3. It is a tie, so both sides re-roll. Gondor rolls a 5 and the Mumak rolls a 2, so Gondor wins Priority for the Round.

Move Phase

Both Gondor Formations are Disordered, so they need to pass a Courage Test (with -1 since The Mumak is within 6") in order to move, shoot, charge and get more than a single die per company for the Fight Phase. Formation 1 rolls a 4 & 2 - adding 6 for Legolas' Courage Value and subtracting 1 for the Mumak being within 6", giving 11 - so they are no longer Disordered; Isengard Formation 2 rolls a 2 & 6 - adding 3 for their Courage Value and subtracting 1 for the Mumak within 6", giving 10 - so Formation 2 is no longer Disordered, either.

Gondor decides that they don't want to move. The Mumak was wounded during the previous round, and since there are no more crew members no matter what the 2D6 roll is, the Mumak is going to Stampede! Let's roll anyway just for good measure. The roll produces a 5 and a 2. 7 > 0 so the result is of course a Stampede! The next roll will be to determine the random direction that the Mumak is going to move. The Mumak rolls a 5 - which means diagonally away from the original deployment zone for the Mumak. The second roll after the 5 is a 6 - which means that the Mumak rotates to the heading right toward Formation 1. The Stampede! distance is 6D6". The roll produces: 6, 2, 3, 3, 5, & 4 = 23". The formation in the front left of Formation1 takes D3 Strength 9 hits. The D3 die roll a 5 which means 3 Strength 9 hits. Those his need 3's to hit, rolling the 3 dice give: 5, 4, & 5  - all three hit.

Shoot Phase

Now that the Mumak has run off Legolas cannot do an About Face! to shoot the Mumak. Also, since all the crewmen of the Mumak are dead, there is no Shoot Phase.

Charge Phase

No one is within charge range distance, so there is no Charge Phase for Round 2.

Fight Phase

No one is in contact, so there is no Fight Phase for Round 2.

Round 3:

Priority Phase

Gondor rolls a 4 and the Mumak rolls a 2, so Gondor wins Priority for the Round.

Move Phase

Gondor Formation 1 (with Legolas) does an About Face! and rotates 45-degrees counter-clock-wise and moves forward the remaining 2.5". Formation 2 rotates 45-degree counter-clock-wise. The Mumak's turn - they roll 2D6: 1 & 5 = 6 > 0 so it is still Stampede!-ing. The random direction roll gives a 3. The 6D6 distance that it will Stampede! gives: 5, 3, 2, 2, 3, & 3 = 18".

Shoot Phase

Legolas measures the distance to the Mumak ... 11.4" - just within the 12" range of Epic Shot ... Perfect! Legolas is going to use his Crippling Shot again (just to make sure that his Epic Shot doesn't get a 1 on the D6 against the Mumak's Resilience of 2). He rolls a 5, reducing the Mumak's Resilience to 1 and expends his last point of Might to perform an Epic Shot. Rolling the D6 for the number of hits gives a 5 - which means 5 automatic rolls against the Ridiculously Hard to Kill! table. For the first roll, Gondor rolls a 5 - adding the 15 wound counters gives 20 … delivering the final Death Blow to the Mumak.


FINAL ANALYSIS

Whew, what a fight! Legolas really was the key to the downfall of the Mumak - especially with the Crippling Shot special rule. Dropping the Mumak's Resilience Value to 1 really accelerated the number of wounds that the Mumak received. It would have taken twice as long to get through the 2 Resilience points if the Crippling Shot didn't stick or wasn't available. Also, having the Epic Shot special rule and letting the Minas Tirith Warriors attack during the Shoot Phase really made the final difference - otherwise, the Mumak would have continued to run amuck around the board round-after-round, and possibly Trample over the formations several more times. In fact, it would be very hard to "catch" the Stampede!-ing Mumak after it is running around 6D6" every turn in a random direction.

The Mumak took out a total of 29 Warriors in just the one Round that it was fighting (that's 45% of the total) - so if Legolas wasn't there to cause so much damage with the Crippling Shot, he could have taken out the 2 formations in possibly 2-3 Rounds. Maybe it would have been wiser to initially have the Mumak attack Legolas' Formation (not the command company directly since they have Terror, but the company to the left of the command company). But then would Legolas just react to that by simply jumping to the other formation and rinse-and-repeat what happened above... Interesting!

That was fun!

Hopefully you can see that even though a Monster is Ridiculously Hard to Kill does not mean that it is not able to be destroyed - and proper army participation of heroes, engagement, and a little bit luck help a lot!


LINKS TO OTHER PARTS OF THE HARD TO KILL SERIES

  1. Overview of the Problem [Part 1/5]
  2. Hard to Kill! Rule [Part 2/5]
  3. Very Hard to Kill! Rule [Part 3/5]
  4. Extremely Hard to Kill! Rule [Part 4/5]
  5. Ridiculously Hard to Kill! Rule [Part 5/5]

Sunday, November 30, 2014

Very Hard to Kill Should be More than -1 to Roll … [Part 3/5: Analyzing the "Very Hard to Kill" Special Rule]

** PART 3/5 in the Hard to Kill Analysis Series **

The next rule up in the queue for the Hard to Kill series is the "Very Hard to Kill!" special rule. Under the basic rule set this one takes the "Hard to Kill!" rule and deducts 1 from the dice roll on the Hard to Kill table. This means that you could effectively never roll a natural 6 on turn one resulting in an insta-kill and rolling a 1 or 2 would result in effectively No Effect on the table. Ironically, this doesn't really increase the difficulty of killing the monster by very much. In fact, the average number of rounds to kill a "Very Hard to Kill!" monster over multiple runs using the simulator provided 3.6 rounds. Again, not very impressive for a monster that should be very hard to kill.

From part 2/5 of this series of posts, we found that a monster with the "Hard to Kill!" rule should need about 5-6 rounds to be killed. That would mean that the target for the "Very Hard to Kill!" should take more rounds than that … maybe something like 8 rounds would be about right. We updated the rule as follows and re-ran the simulator with these values:


The simulator provides 8.6 rounds for the average of this new table. That seems a lot better.


Now, the next question is … should this new version of the "Very Hard to Kill!" rule cost more than the base 10 points for a special rule? And if "yes", how much more exactly? Let's face off a monster with the "Very Hard to Kill!" rule against a large formation of infantry again to see how they both fare. I suggest a fight between Treebeard (230 Points) and two formations of 4 companies of Uruk-hai Warband (35 points per company = 280 Points).


STEP-BY-STEP EXAMPLE OF THE FIGHT

Round 1:

Priority Phase

Treebeard rolls a 1 and Isengard rolls a 2. Isengard Wins Priority for the Round.

Move Phase

Isengard stays where they are for the Move Phase, as does Treebeard.

Charge Phase

Isengard decides they want to charge, and takes their Courage Tests for Treebeard's Terror special rule. The first formation rolls a 2 and a 2. Adding their Courage Value (3) it totals 7, so the test is failed and the charge is stalled for Formation 1. The second formation rolls a 5 and a 6. Adding their Courage Value (3) it totals 14, so the test is passed.

Since the first Isengard formation failed its courage test, it cannot charge ... the charge is stalled!

The second Isengard formation rolls for their charge and rolls a 3, so the charge is successful.

Fight Phase

Treebeard gets to attack first (even though he doesn't have priority because of Striking Order [pg 46] and he is Type: Monster). He rolls 3 dice for his Attack Value and 5 additional dice for his Battle Skill bonus (Treebeard's Fight - Uruk-hai's Fight = 9-4 = 5). He needs 3+'s To Hit (S:9 vs D:7 - 66% chance To Hit) and since the warriors have only 1 Resilience, each hit ends up wounding a warrior. This means he gets 8 dice to roll: 1, 6, 4, 4, 2, 4, 5, & 3. This kills 6 Isengard Warriors.

Isengard now gets to attack. Formation #1 stalled and they are out of range. Formation #2, they roll 8 dice for the direct company and then 3 more dice for the three supporting companies and then they get a extra die for Charging. They need 6/2+'s To Hit (S:4 vs D:10). Rolling their 12 dice, they get: 4, 1, 6, 6, 3, 2, 2, 5, 6, 3, 5, & 1. Since they need 6/2's they pick up the three 6's that they rolled and re-roll them needing 2+'s, they get: 3, 2, & 1. So that means 2 hits (6/2's). Since Treebeard has 2 Resilience, these 2 hits are reduced to a single wound on Treebeard - This means one roll on the Very Hard to Kill table.

Rolling on the Very Hard to Kill table, Isengard Formation #2 rolls a 5. This adds one counters to Treebeard.

Fight Results

[** Recall that we modified the Determine Victor Rule back in Part 2/5 **] Treebeard inflicted 6 wounds. Isengard added 1 counter. This means that Treebeard wins the fight and Isengard Formation #2 has to fall back 1" and take a Panic Test. Formation #2 rolls a 6 and they remain Steadfast.

Round 2:

Priority Phase

Treebeard rolls a 5 and Isengard rolls a 4. Treebeard wins Priority for Round 2.

Move Phase

Treebeard stays where he is for the Move Phase, as do the Isengard Formations.

Charge Phase

Treebeard decides he want to charge, and rolls to charge Formation #2. He rolls a 3 - good. Formation #2 takes their Courage Test for Treebeard's Terror special rule. They roll a 1 and a 3. Adding their Courage Value (3) it totals 7, so the test is failed - this means that their Fight Value is reduced to 0 for Round 2.

Isengard Formation #1 is going to attempt to charge Treebeard, again. They take their Courage Test for Treebeard's Terror special rule, rolling: 5 & 5. Adding their Courage Value (3) it totals 13, so they pass - then they roll for their charge distance: 5, so it's good - both formations are in the fray this time!

Fight Phase

Treebeard gets to attack first (he has priority and Striking Order). He decides he is going to continue to attack Formation #2 (they are Fight 0 for the round … so, of course) - so he rolls 3 dice for his Attack Value, an additional die for Charging, and 9 additional dice for his Battle Skill bonus (Treebeard's Fight - Uruk-hai's Fight = 9-0 = 9). He still needs 3+'s To Hit. This means he gets 13 dice to roll: 5, 1, 2, 3, 5, 2, 5, 1, 3, 3, 5, 4, & 2. This kills 8 Isengard Warriors - there goes the first company and only 2 remaining in the second supporting company.

Isengard now gets to attack. Formation #1 rolls 8 dice for the direct company and 3 more for the three supporting companies and then they get a extra die for Charging. They need 6/2+'s To Hit (S:4 vs D:10). Rolling their 12 dice, they get: 4, 3, 3, 2, 1, 4, 3, 5, 4, 6, 3, & 3. Since they need 6/2's they pick up the one 6 that they rolled and re-roll them needing 2+, they get: 4. So that means 1 hit (so far). Formation #2 rolls 8 dice for the direct company and 2 more for the two remaining support companies. Rolling their 10 dice, they get: 6, 5, 1, 2, 2, 4, 6, 6, 3, & 1. They pick up the three 6's they rolled and re-rolling them needing 2+'s, they get 3, 6, & 2. So 3 more hits. That means that Isengard got 4 total hits on Treebeard - and due to his Resilience of 2 they get to roll twice on the Very Hard to Kill table.

Rolling on the Very Hard to Kill table for the first wound, Isengard rolls a 6! Adding the one counter that is already on Treebeard means that they score an attack value of 7 on the table … this adds two more wound counters to Treebeard (now he has 3) - and since they rolled a 6, they get to re-roll!! They roll a 3 … adding the 3 counters on Treebeard give an attack value of 6 on the table … this adds one more wound counter to Treebeard (now he has 4). Now, for the second wound, the roll … ANOTHER 6 - wow! OK, adding the 4 wound counters - they have an attack value of 10 on the table … two more wound counters (now he has 6). They get to re-roll for the natural 6 … and they roll a 1. Again, adding the existing counters gives an attack value of 7 on the table … this adds two more counters to Treebeard - so he ends up with 8 counters on him at the end of Round 2.

Nice job Isengard dice rollers! [Just as a note … Under the old Very Hard to Kill rule - Treebeard would have already been dead …]

Fight Results

Well, that was a pretty bloody Round … Treebeard inflicted 8 wounds. Isengard added 7 counters. This means that Treebeard wins the fight (barely) and both Isengard Formations have to fall back 1" and take a Panic Test. Formation #1 rolls a 6 for their Panic Test and they remain Steadfast. Formation #2 rolls a 4 for their Panic Test - so all 3 companies in Formation #2 become Disordered. They then take their Courage Test to determine if they take additional casualties … they roll a 6 and a 6. Adding their Courage Value (3) they get a 15 … so the test is passed and no additional casualties.

Round 3:

Priority Phase

Treebeard rolls a 4 and Isengard rolls a 2. Treebeard wins Priority for Round 3.

Move Phase

Treebeard stays where he is for the Move Phase.

Isengard Formation #2 is Disordered, so they need to pass a Courage Test (with -1 since Treebeard is within 6" [pg 35]) in order to move, shoot, charge and get more than a single die per company for the Fight Phase. They roll a 3 & 6 - adding 3 for their Courage Value and subtracting 1 for Treebeard within 6", giving 11; (barely a pass) so Isengard Formation #2's companies are no longer Disordered. They choose to stay where they are for the Move Phase.

Charge Phase

Treebeard decides he want to charge, and rolls to charge Formation #2. He rolls a 4 - so good to go. Formation #2 takes their Courage Test for Treebeard's Terror special rule. They roll a 4 and a 6. Adding their Courage Value (3) it totals 13, so the test is passed.

Isengard Formation #1 is going to attempt to charge Treebeard, again. They take their Courage Test for Treebeard's Terror special rule, rolling: 2 & 6. Adding their Courage Value (3) it totals 11, so they pass - then they roll for their charge distance: 6, Unstoppable Charge!

Fight Phase

Treebeard gets to attack first (he has priority and Striking Order). He decides he is going to continue to attack Formation #2 - so he rolls 3 dice for his Attack Value, an additional die for Charging, and 5 additional dice for his Battle Skill bonus. He still needs 3+'s To Hit. This means he gets 9 dice to roll: 3, 5, 4, 4, 6, 6, 2, 4, & 5. This kills 8 Isengard Warriors - there goes the second company and only 2 remaining in the third supporting company - six more wounds and Formation #2 is done for.

Isengard now gets to attack. Formation #1 rolls 8 dice for the direct company and 3 more for the three supporting companies and then they get a 1+D3 extra die for Charging with an Unstoppable Charge (1 for Charging and D3 for Unstoppable). They roll a 2 for the Unstoppable charge - meaning they get one additional die for the charge. They need 6/2+'s To Hit (S:4 vs D:10). Rolling their 13 dice, they get: 1, 6, 3, 1, 5, 5, 1, 5, 3, 1, 1, 3, & 1. Since they need 6/2's they pick up the one 6 that they rolled and re-roll them needing 2+, they get: 3. So that means 1 hit (so far). Formation #2 rolls 8 dice for the direct company and 1 more for the remaining support company. Rolling their 9 dice, they get: 5, 5, 6, 1, 6, 3, 3, 4, & 6. They pick up the three 6's they rolled and re-rolling them needing 2+'s, they get 5, 5, & 1. So 2 more hits. That means that Isengard got 3 total hits on Treebeard - and due to his Resilience of 2 they get to roll once on the Very Hard to Kill table.

Rolling on the Very Hard to Kill table, Isengard rolls a 4! Adding the one counter that is already on Treebeard means that they score an attack value of 12 on the table … this adds three more wound counters to Treebeard (now he has 11 at the end of Round 3). This means that the next time that Isengard rolls on the Very Hard to Kill table, they need a 3 or more to get the required 14 to kill Treebeard … that's a 66.7% chance that he will die on the next table roll.

Fight Results

Treebeard inflicted 8 wounds. Isengard added 3 counters. This means that Treebeard wins the fight, again, and both Isengard Formations have to fall back 1" and take a Panic Test. Formation #1 rolls a 1 for their Panic Test and the experience an Onset of Dismay! [a banner would have been really useful right now …]. However, they have not taken any casualties yet, so they don't run away but simply become Disordered. They then take their Courage Test to determine if they take additional casualties … they roll a 1 and a 2. Adding their Courage Value (3) they get a 6 - meaning that they lose 4 warriors. Formation #2 rolls a 2 for their Panic Test and they become Disordered. They then take their Courage Test to determine if they take additional casualties … they roll a 6 and a 3. Adding their Courage Value (3) they get a 12 - meaning no more additional casualties for Formation #2 … that's good, they could not afford to lose anymore, really.

Round 4:

Priority Phase

Treebeard rolls a 6 and Isengard rolls a 6. Draw, so they need to re-roll. Treebeard rolls a 3 and Isengard rolls a 2. Treebeard wins Priority for Round 4.

Move Phase

Treebeard stays where he is for the Move Phase.

Both Isengard Formations are Disordered, so they need to pass a Courage Test (with -1 since Treebeard is within 6") in order to move, shoot, charge and get more than a single die per company for the Fight Phase. Isengard Formation #1 rolls a 4 & 6 - adding 3 for their Courage Value and subtracting 1 for Treebeard within 6", giving 12 - so they are no longer Disordered; Isengard Formation #2 rolls a 3 & 2 - adding 3 for their Courage Value and subtracting 1 for Treebeard within 6", giving 7 - so the two companies in Formation #2 remain Disordered - and they cannot move, shoot, or charge - and they will only get 2 dice total during the Fight Phase if engaged in hand-to-hand. Isengard Formation #1 chooses to stay where they are for the Move Phase and Formation #2 can't move since they are Disordered.

Charge Phase

Treebeard decides he want to charge, and rolls to charge Formation #2. He rolls a 5 - good. Formation #2 takes their Courage Test for Treebeard's Terror special rule. They roll a 4 and a 1. Adding their Courage Value (3) it totals 8, so the test is failed - this means that their Fight Value is reduced to 0 for Round 2. It looks like Formation #2 is in for it this round.

Isengard Formation #1 is going to attempt to charge Treebeard, again. They take their Courage Test for Treebeard's Terror special rule, rolling: 4 & 4. Adding their Courage Value (3) it totals 11, so they pass - then they roll for their charge distance: 1, STALLED CHARGE! I can hear Treebeard virtually laughing!

Fight Phase

Treebeard gets to attack first (he has priority and Striking Order). He lays into Formation #2 - so he rolls 3 dice for his Attack Value, an additional die for Charging, and 9 additional dice for his Battle Skill bonus. He still needs 3+'s To Hit. This means he gets 13 dice to roll: 5, 3, 4, 2, 4, 2, 3, 4, 5, 2, 5, 1, & 1. This kills 8 Isengard Warriors - there goes Formation #2 … the remaining 2 warriors run for the hills!

Isengard has no one in contact with Treebeard, now, so there is no retaliation!

Fight Results

Treebeard wins - no need to check for Fight Results.

Round 5:

Priority Phase

Treebeard rolls a 3 and Isengard rolls a 3. Draw, so they need to re-roll. Treebeard rolls a 2 and Isengard rolls a 5. Isengard wins Priority for Round 5.

Move Phase

Isengard stays where they are for the Move Phase, as does Treebeard.

Charge Phase

Isengard decides they want to charge, and takes their Courage Tests for Treebeard's Terror special rule. The first formation rolls a 1 and a 1. Adding their Courage Value (3) it totals 5, so the test is failed and the charge is stalled for Formation 1. (LOL! - My Gondor Bias is chuckling at the random number generator … ha ha ha!) Stalled charge.

Treebeard charges, and rolls to charge Formation #1. He rolls a 4 - good. Formation #1 takes their Courage Test for Treebeard's Terror special rule. They roll a 3 and a 4. Adding their Courage Value (3) it totals 10, so the test is passed (again barely).

Fight Phase

Treebeard gets to attack first (even though he does not have priority - due to Striking Order). He rolls 3 dice for his Attack Value, an additional die for Charging, and 5 additional dice for his Battle Skill bonus. He needs 3+'s To Hit. This means he gets 9 dice to roll: 3, 3, 4, 3, 5, 3, 1, 5, & 5. This kills 8 Isengard Warriors - there goes the first company from Formation #1.

Isengard now gets to attack. Formation #1 rolls 8 dice for the direct company and only 2 more for the two remaining supporting companies (since Striking Order claimed its casualties already). They need 6/2+'s To Hit (S:4 vs D:10). Rolling their 10 dice, they get: 2, 2, 1, 6, 2, 6, 2, 1, 6, & 1. Since they need 6/2's they pick up the three 6's that they rolled and re-roll them needing 2+, they get:  6, 6, & 1. So 2 hits. That means due to Treebeard's Resilience of 2 they get to roll once on the Very Hard to Kill table.

Rolling on the Very Hard to Kill table, Isengard rolls a 6! Adding the 11 counters that are already on Treebeard means that Treebeard is slain on Round 5!!

Fight Results

Isengard wins - no need to check for Fight Results.

POST MORTEM ANALYSIS

Isengard is left with 105 Points worth of models after the fight (that is one formation comprised of three companies). And it looks like they good really lucky with their rolls on the Very Hard to Kill table (getting multiple 6's giving them the extra re-rolls). Looking at Treebeard's run … he was killing an entire company's worth of models each round … so he really only needed 2.5 more rounds to win … and if the extra rolls on the Very Hard to Kill table weren't there - or weren't as good - that could totally have panned out that way! Treebeard got to dish out 175 Points worth of damage before he was killed … still not too bad. As I mentioned above, if we had used the old version of the Very Hard to Kill Table, during Round 1 Isengard would have rolled their 5 … making it a 4 … giving Treebeard 2 counters right out the gate. Then on Round 2, Isengard would have rolled their 6 … making it a 5 … adding the 2 existing counter would be enough to kill Treebeard - and he would have only killed 14 warriors (only a single company from Formation #2) - effectively dealing only 35 Points worth of damage before he was killed.

It looks to me like we've got a pretty good balance with this new variation of the Very Hard to Kill Rule. What does everyone else think?


LINKS TO OTHER PARTS OF THE HARD TO KILL SERIES

  1. Overview of the Problem [Part 1/5]
  2. Hard to Kill! Rule [Part 2/5]
  3. Very Hard to Kill! Rule [Part 3/5]
  4. Extremely Hard to Kill! Rule [Part 4/5]
  5. Ridiculously Hard to Kill! Rule [Part 5/5]

Wednesday, November 19, 2014

Yeah, Not Really that "Hard to Kill" Series [Part 2/5: Analyzing the "Hard to Kill" Special Rule]

** PART 2/5 in the Hard to Kill Analysis Series **

I was curious if the poor Mordor Troll from the previous post had any chance what-so-ever to win the fight. The points have been normalized based upon the template to make sure that they are evenly priced, and since the Mordor Troll is just a single Monster the only things that could be adjusted to "fix" the imbalance between the two formations would be the following: 1) Increase the number of Attacks that the Mordor Troll has - this would allow him to kill more Warriors each Fight Phase. 2) Increase the number of Resilience Points that the Mordor Troll has - this would discount more hits from the Warriors during the Fight Phase. 3) Adjust the "Hard to Kill!" special rule to eliminate the one-shot-kill capability and actually make the rule live up to its "advertised name".
 The problem with the first 2 options is that making these changes would impact the point cost of the model, since upping either the attacks or the resilience would effectively add 5 points for each increase - so it seems like the logical change would be to re-baseline the "Hard to Kill!" special rule to balance it with the Gondor Warriors to bring it more in line with probability of winning/losing 50%.

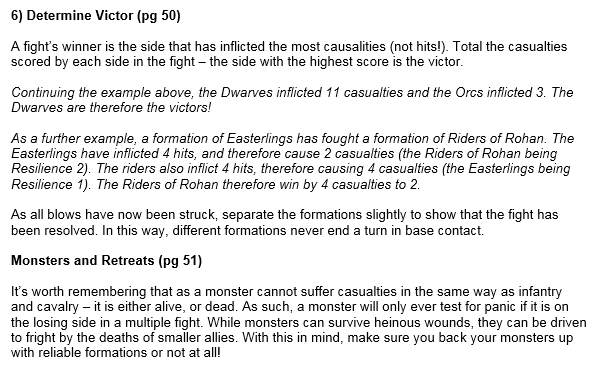
Secondly, there is a problem with a few particular rules in the Fight Phase - "Determine Victor" and "Monsters and Retreats" (see pages 50 & 51). The way the rules are currently written would imply that a Formation with the "Hard to Kill!" special rule would always automatically be the victor of a fight and only need to test for Panic if in a multiple fight.


Here is the recommended changes that we have proposed:


By adjusting the rules above, this ensures that a Monster can still "lose a Fight" and as such move back 1" from the victor, but it will never become Disordered unless participating in a Multiple Fight with other formations in the Army.

I wrote up a simulator in Xcode using Objective-C (included below at the end of the post) to attempt to model several rolls on the Hard to Kill Table in order to see how long it would take on average to obtain the kill result for a Monster.


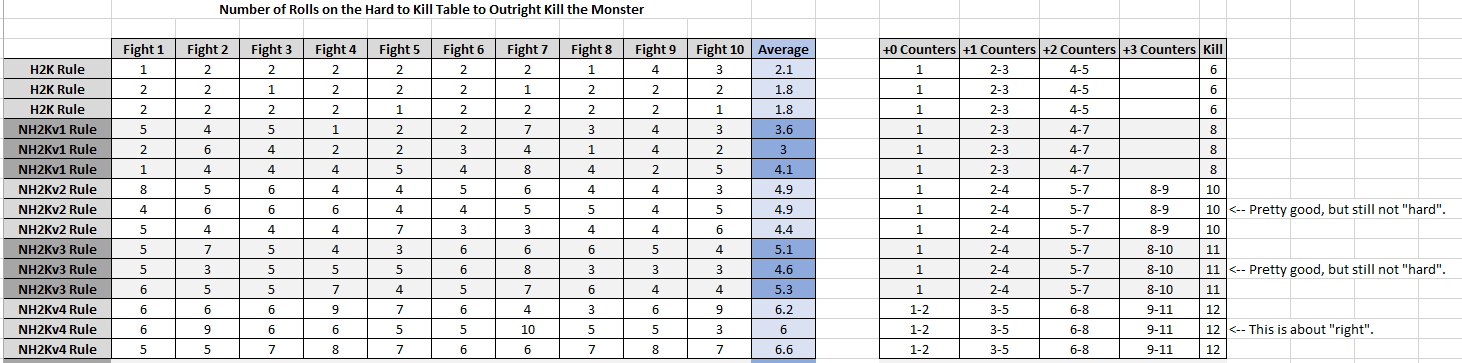
I was actually surprised when after 10 runs on the table it was taking on average only 2.1 rolls on the table to kill via "Death Blow" the model. After going through the output, the "best" (longest living) run that the Troll had was 4 rolls on the table (during Fight 9).

I also wanted to see what would happen taking into consideration the other rule of Terror, just to make sure that that wasn't a swaying factor; but that will require coding up more of the Fight Phase into the simulator than just the roll on the Hard to Kill table ... I think that may have to wait for a future post. Here's an idea - let's use code to generate random numbers (simulating un-biased dice rolls) - and we can for now manually step through the example to see what is going on ...

STEP-BY-STEP EXAMPLE OF THE FIGHT

Round 1:


Priority Phase

Gondor rolls a 5 and Mordor rolls a 4. Gondor Wins Priority for the Round.

Move Phase

Gondor stays where they are for the Move Phase, as does the Mordor Troll.


Charge Phase

Gondor decides they want to charge, and takes their Courage Test for the Troll's Terror special rule. They roll a 3 and a 5. Adding their Courage Value they total 11, so the test is passed.


Gondor rolls for the charge and rolls a 1 ... the charge is stalled!


Mordor rolls for their charge and rolls a 5, so the charge is successful.


Gondor takes another Courage Test for the Troll's Terror special rule, since they are being charged. They roll a 4 and a 6. Adding their Courage Value they total 13, the test is passed again.


Fight Phase

The Mordor Troll gets to attack first (even through he doesn't have priority - but because of Striking Order (pg 46) and he is Type: Monster). He rolls 3 dice for his Attack Value, rolls an additional die for Charging, and 4 additional dice for his Battle Skill bonus. He needs 4+'s To Hit and since the warriors have only 1 Resilience, each hit ends up wounding a warrior. This kills 6 Gondor Warriors.


Gondor now gets to attack. They roll 8 dice for the direct company and then 3 more dice for the three supporting companies. They need 6's To Hit and get 2x 6's. Since the Troll has 2 Resilience, these 2 hits are reduced to a single wound on the Troll - This means one roll on the Hard to Kill table.


Rolling on the Hard to Kill table, Gondor rolls a 5. This adds two counters to the Troll. [Note: If the Gondor Formation would have had a Hero with a single point of Might - this could have been adjusted to a 6 ... killing the Troll.]


Fight Results

[** See the note above on the Determine Victor Rule **] Mordor inflicted 6 wounds. Gondor added 2 counters. Mordor wins the fight. Gondor has to fall back 1" and take a Panic Test. They roll a 2 and each company becomes Disordered. They take their Courage Test to determine if there will be additional casualties, they roll a 7 and adding their Courage Value means that they lose no additional warriors. [Note: The Gondor Formation is 18.7% depleted - at this rate it'll take 5 Rounds to destroy the Formation; also the Troll has a 50% chance of dying on the next roll on the Hard to Kill table.]

Round 2:


Priority Phase

Gondor rolls a 6 and Mordor rolls a 3. Gondor Wins Priority again for the Round.


 Move Phase

Gondor is Disordered, so they need to pass a Courage Test (with -1 since the Troll is within 6" [pg 35]) in order to move, shoot, charge and get more than a single die per company for the Fight Phase (this could be detrimental against the Resilience 2 of the Troll, since if they don't get more than one 6 the hit will be absorbed). They roll an 8 on the dice adding 3 for their Courage Value and subtracting 1 for the Troll within 6", giving 10; (barely a pass) so the Formation is no longer disordered.

Gondor stays where they are for the Move Phase, as does the Mordor Troll.


Charge Phase

Gondor decides they want to charge, and takes their Courage Test for the Troll's Terror special rule, again. They roll a 2 and a 3. Adding their Courage Value they total 8, so the test is failed and the charge is stalled.


Mordor rolls for their charge and rolls a 5, so the charge is successful.


Gondor takes another Courage Test for the Troll's Terror special rule, since they are being charged. They roll a 4 and a 2. Adding their Courage Value they total 9, the test is failed again. Their Fight Value is reduced to 0 for the turn.


Fight Phase

The Mordor Troll gets to attack first (even through he doesn't have priority - but because of Striking Order and he is Type: Monster). He rolls 3 dice for his Attack Value, rolls an additional die for Charging, and 7 additional dice for his Battle Skill bonus (that is 11 total dice). He needs 4+'s To Hit and since the warriors have only 1 Resilience, each hit ends up wounding a warrior. This kills 4 Gondor Warriors (and finally gets rid of the first company).


Gondor now gets to attack. They roll 8 dice for the direct company and then 2 more dice for the two supporting companies. They need 6's To Hit and get 3x 6's. Since the Troll has 2 Resilience, these 3 hits are reduced to a single wound on the Troll - This means one roll on the Hard to Kill table.


Rolling on the Hard to Kill table, Gondor rolls a 4. Adding the two counters that are already on the Troll gives a result of 6 on the table - killing the Troll, delivering the "Death Blow".

Well - it was consistent ... it took 2 Rounds for the Troll to be killed. That is well within the one standard deviation of the 2.1 statistical average. Furthermore, Gondor took 31.2% damage to the Formation; so just under a third - which would imply it would take 5 turns still to destroy the Formation for the Troll ...

So, long-story-short, something needs to be done to adjust the Hard to Kill! special rule of the Troll to increase his survivability and make the fight a little more even (45%/55% in favor of the Troll - that's pretty "hard").

Honestly, I am somewhat surprised the level of change that the Terror rule brought into the fight ... even though I have fought against terror causing formations in the past, I guess I never really thought about the number of Courage Test rolls I was required to make until I saw it laid out sequentially.

Using the H2K simulator to run the average number of turns to kill the Troll we should be targeting it right around the 6.0 turn mark. That will make it difficult (hence the hard part of Hard to Kill!) to kill the Troll. Having it average at about the 5.0 turn mark should result in the 50/50 distribution that should already exist (without the special rule) and having it average at about the 7.0 turn mark would sway it too much in favor of the Troll ... making the Troll too hard to kill (basically "Very Hard to Kill!" ... but I think that's probably another post [see Part 3/5]).


After trying several different combinations of dice ranges for adding counters and target for the Death Blow result, we came up with the following variation of the Hard to Kill! special rule:


This change will increase the survivability of the Troll ... and even out the fight between the Warriors and the Monster - and more importantly, give the Troll an actual chance to win the fight and not just be slaughtered.


Let's run through how this would play out for several fights for the Troll against the Minas Tirith Warriors again with several rolls on the table:

EXAMPLE #1

Round 1:

Gondor scores 2 hits on the Troll and rolls once on the table.

Gondor gets a dice roll of 4. Since there are not any counters on the troll yet this gives a value of 4 on the New Hard to Kill Table - this gives 1 wound counter to the Troll.

Round 2:

Gondor scores 4 hits on the Troll so gets to roll twice on the table.

First roll on the table gives a dice roll of 2. Adding the 1 existing wound counter give a value of 3 on the table ... adding 1 more wound counter ... there are now 2 total counters on the Troll.

Second roll on the table gives a dice roll of 5. Adding the 2 existing wound counters gives a value of 7 on the table ... adding 2 more wound counters ... there are now 4 total counters on the Troll.

Round 3:

Gondor scores 3 hits on the Troll so gets to roll once on the table.

Gondor gets a dice roll of 2. Adding the 4 existing wound counters give a value of 6 on the table ... adding 2 more wound counters ... there are now 6 total counters on the Troll.

Round 4:

Gondor scores 2 hits on the Troll so gets to roll once on the table.

Gondor gets a dice roll of 3. Adding the 6 existing wound counters give a value of 9 on the table ... adding 3 more wound counters ... there are now 9 total counters on the Troll.

Round 5:

Gondor scores 3 hits on the Troll so gets to roll once on the table.

Gondor gets a dice roll of 6. Adding the 9 existing wound counters give a value of 15 on the table ... delivering the "Death Blow" to the Troll.

EXAMPLE #2

Round 1:

Gondor scores 5 hits on the Troll and rolls twice on the table.

First roll on the table gives a dice roll of 5. Since there are not any counters on the troll yet this gives a value of 5 on the New Hard to Kill Table - this gives 1 wound counter to the Troll.

Second roll on the table gives a dice roll of 1. Adding the 1 existing wound counter gives a value of 2 on the table ... this adds no new wound counters ... there are still only 1 counter on the Troll.

Round 2:

Gondor scores 1 hit on the Troll so doesn't gets to roll on the table.

Round 3:

Gondor scores 3 hits on the Troll so gets to roll once on the table.

Gondor gets a dice roll of 4. Adding the 1 existing wound counter gives a value of 5 on the table ... adding 1 more wound counter ... there are now 2 total counters on the Troll.

Round 4:

Gondor scores 2 hits on the Troll so gets to roll once on the table.

Gondor gets a dice roll of 6. Adding the 2 existing wound counters gives a value of 8 on the table ... adding 2 more wound counters ... there are now 4 total counters on the Troll.

Since a natural 6 was rolled, Gondor gets to roll again.

Second roll on the table gives a dice roll of 6. Adding the 4 existing wound counter gives a value of 10 on the table ... this adds 3 more wound counters ... there are now 7 total counters on the Troll.

Round 5:

Gondor scores 2 hits on the Troll so gets to roll once on the table.

Gondor gets a dice roll of 5. Adding the 7 existing wound counters gives a value of 12 on the table ... delivering the "Death Blow" to the Troll.

There we have it ... Hopefully this will clear up a lot of the confusion on how the table works and also increase the longevity of the Troll to make the 100 Points that are spent on the Troll more useful.


LINKS TO OTHER PARTS OF THE HARD TO KILL SERIES

  1. Overview of the Problem [Part 1/5]
  2. Hard to Kill! Rule [Part 2/5]
  3. Very Hard to Kill! Rule [Part 3/5]
  4. Extremely Hard to Kill! Rule [Part 4/5]
  5. Ridiculously Hard to Kill! Rule [Part 5/5]

POST APPENDIX: WotR H2K Simulator Code - Objective-C


//
//  main.m
//  WotR H2K Simulator
//
//  Created by Bairchoro on 11/15/14.
//  Copyright (c) 2014 Ursa Systems Corportation. All rights reserved.
//
#import <Cocoa/Cocoa.h>
int main(int argc, char *argv[])
{
    intwoundIterator = 0;
    intnumNewCounters = 0;
    intnumCritCounters = 0;
    inttotalNumCounters = 0;
    intattackScore = 0;
    booldead = false;
    intdiceRoll = 0;
    // H2K Old = 1; VH2K Old = 2; EH2K Old = 3; H2K New = 4; VH2K New = 5; EH2K New = 6;
    inth2kType = 4;

    
    // This sets a seed based on system clock time "pseudorandom".
    longseed = time(NULL);
    srand(seed);
    intquestion[21];

    for(int i=0; i<20; i++) {
        question[i] = rand();
    }
    // End of Seed.

    while(dead == false) {

        // each time a wound is scored, roll a die (1-6) to see the result for the wound
        woundIterator = woundIterator + 1;
        NSLog(@" ");
        NSLog(@"Current woundIterator = %i", woundIterator);
        numNewCounters = 0;
        numCritCounters = 0;
        diceRoll = ((rand()/100%6)+1);
        NSLog(@"Current diceRoll = %i",diceRoll);
        attackScore = diceRoll + totalNumCounters;
        NSLog(@"Attack Score: %i",attackScore);
        // add the number of existing wound counters to the value of the die to get the result

        // CASE 1: Old H2K
        if(h2kType == 1) {
            if (attackScore <= 1) {
            }
            else if (attackScore > 1 && attackScore <= 3) {
                NSLog(@"gain 1 counter");
                numNewCounters = 1;
            }
            else if (attackScore > 3 && attackScore <= 7) {
                NSLog(@"gain 2 counters");
                numNewCounters = 2;
            }
            else if (attackScore >= 8) {
                dead = true;
                NSLog(@"Model has died!");
                numNewCounters = diceRoll;

            }
        }

         // CASE 4: New H2K
        if(h2kType == 4) {
            if (attackScore <= 2) {
            }
            else if (attackScore > 2 && attackScore <= 5) {
                NSLog(@"gain 1 counter");
                numNewCounters = 1;
            }
            else if (attackScore > 5 && attackScore <= 8) {
                NSLog(@"gain 2 counters");
                numNewCounters = 2;
            }
            else if (attackScore > 8 && attackScore <= 11) {
                NSLog(@"gain 3 counters");
                numNewCounters = 3;
            }
            else if (attackScore >=12) {
                dead = true;
                NSLog(@"Model has died!");
                numNewCounters = diceRoll;

            }
        }

        if(diceRoll == 6 && dead == false) {
            // cout<<"You rolled a natural 6 ... you get to re-roll this turn!"<<endl;
            NSLog(@"You rolled a natural 6 ... you get to re-roll this turn!");
            int totalCritCounters = totalNumCounters + numNewCounters;
            //cout<<"Current totalNumCounters = "<<totalNumCounters<<endl;
            NSLog(@"Current totalNumCounters = %i", totalCritCounters);
            diceRoll = ((rand()/100%6)+1);
            //cout<<"Current diceRoll = "<<diceRoll<<endl;
            NSLog(@"Crit diceRoll = %i", diceRoll);
            attackScore = diceRoll + totalCritCounters;
            NSLog(@"Crit Attack Score: %i", attackScore);
            // add the number of existing wound counters to the value of the die to get the result

            // CASE 1: Old H2K
            if (h2kType == 1) {
                if (attackScore <= 1) {
                }
                else if (attackScore > 1 && attackScore <= 3) {
                    numCritCounters = 1;
                }
                else if (attackScore > 3 && attackScore <= 7) {
                    numCritCounters = 2;
                }
                else if (attackScore >= 8) {
                    dead = true;
                    // cout<<"Model has died!"<<endl;
                    NSLog(@"Model has died!");
                    numCritCounters = diceRoll;
                }
            }

            // CASE 4: New H2K
            if (h2kType == 4) {
                if (attackScore <= 2) {
                }
                else if (attackScore > 2 && attackScore <= 5) {
                    NSLog(@"gain 1 counter");
                    numCritCounters = 1;
                }
                else if (attackScore > 5 && attackScore <= 8) {
                    NSLog(@"gain 2 counters");
                    numCritCounters = 2;
                }
                else if (attackScore > 8 && attackScore <= 11) {
                    NSLog(@"gain 3 counters");
                    numCritCounters = 3;
                }
                else if (attackScore >=12) {
                    dead = true;
                    // cout<<"Model has died!"<<endl;
                    NSLog(@"Model has died!");
                    numCritCounters = diceRoll;

                    
                }
            }
        }

        numNewCounters = numNewCounters + numCritCounters;

        // cout<<"Current numNewCounters = "<<numNewCounters<<endl;
        NSLog(@"Current numNewCounters = %i", numNewCounters);

        // add the number of new counters to the total number of counters on the model
        totalNumCounters = totalNumCounters + numNewCounters;
        //cout<<"Current totalNumCounters = "<<totalNumCounters<<endl;
        NSLog(@"Current totalNumCounters = %i", totalNumCounters);
        // if the original roll of the die was a natural 6, then roll again
        // if the total number of counters is 15 or more - flip dead to true, else continue

    }

    NSLog(@"Number of wounds to kill = %i", woundIterator);
    return0;

    
}