** PART 2/5 in the Hard to Kill Analysis Series **
I was curious if the poor Mordor Troll from the previous post had any chance what-so-ever to win the fight. The points have been normalized based upon the template to make sure that they are evenly priced, and since the Mordor Troll is just a single Monster the only things that could be adjusted to "fix" the imbalance between the two formations would be the following: 1) Increase the number of Attacks that the Mordor Troll has - this would allow him to kill more Warriors each Fight Phase. 2) Increase the number of Resilience Points that the Mordor Troll has - this would discount more hits from the Warriors during the Fight Phase. 3) Adjust the "Hard to Kill!" special rule to eliminate the one-shot-kill capability and actually make the rule live up to its "advertised name".
The problem with the first 2 options is that making these changes would impact the point cost of the model, since upping either the attacks or the resilience would effectively add 5 points for each increase - so it seems like the logical change would be to re-baseline the "Hard to Kill!" special rule to balance it with the Gondor Warriors to bring it more in line with probability of winning/losing 50%.
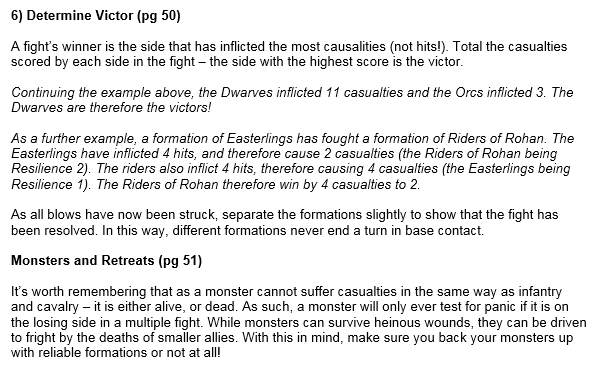
Secondly, there is a problem with a few particular rules in the Fight Phase - "
Determine Victor" and "
Monsters and Retreats" (see pages 50 & 51). The way the rules are currently written would imply that a Formation with the "Hard to Kill!" special rule would always automatically be the victor of a fight and only need to test for Panic if in a multiple fight.
Here is the recommended changes that we have proposed:
By adjusting the rules above, this ensures that a Monster can still "lose a Fight" and as such move back 1" from the victor, but it will never become
Disordered unless participating in a Multiple Fight with other formations in the Army.
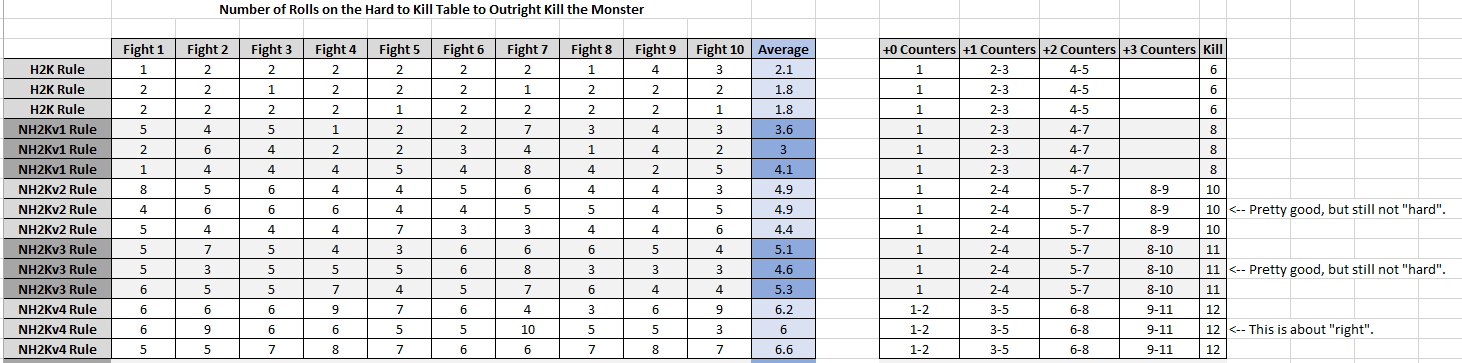
I wrote up a simulator in Xcode using Objective-C (included below at the end of the post) to attempt to model several rolls on the Hard to Kill Table in order to see how long it would take on average to obtain the kill result for a Monster.
I was actually surprised when after 10 runs on the table it was taking on average only 2.1 rolls on the table to kill via "Death Blow" the model. After going through the output, the "best" (longest living) run that the Troll had was 4 rolls on the table (during Fight 9).
I also wanted to see what would happen taking into consideration the other rule of
Terror, just to make sure that that wasn't a swaying factor; but that will require coding up more of the Fight Phase into the simulator than just the roll on the Hard to Kill table ... I think that may have to wait for a future post. Here's an idea - let's use code to generate random numbers (simulating un-biased dice rolls) - and we can for now manually step through the example to see what is going on ...
STEP-BY-STEP EXAMPLE OF THE FIGHT
Round 1:
 Priority Phase
Gondor rolls a 5 and Mordor rolls a 4. Gondor Wins Priority for the Round.
Move Phase

Gondor stays where they are for the Move Phase, as does the Mordor Troll.
 Charge Phase
Gondor decides they want to charge, and takes their Courage Test for the Troll's
Terror special rule. They roll a 3 and a 5. Adding their Courage Value they total 11, so the test is passed.

Gondor rolls for the charge and rolls a 1 ... the charge is stalled!

Mordor rolls for their charge and rolls a 5, so the charge is successful.

Gondor takes another Courage Test for the Troll's
Terror special rule, since they are being charged. They roll a 4 and a 6. Adding their Courage Value they total 13, the test is passed again.
Fight Phase
The Mordor Troll gets to attack first (even through he doesn't have priority - but because of
Striking Order (pg 46) and he is Type: Monster). He rolls 3 dice for his Attack Value, rolls an additional die for
Charging, and 4 additional dice for his
Battle Skill bonus. He needs 4+'s To Hit and since the warriors have only 1 Resilience, each hit ends up wounding a warrior. This kills 6 Gondor Warriors.

Gondor now gets to attack. They roll 8 dice for the direct company and then 3 more dice for the three supporting companies. They need 6's To Hit and get 2x 6's. Since the Troll has 2 Resilience, these 2 hits are reduced to a single wound on the Troll - This means one roll on the Hard to Kill table.

Rolling on the Hard to Kill table, Gondor rolls a 5. This adds two counters to the Troll.
[Note: If the Gondor Formation would have had a Hero with a single point of Might - this could have been adjusted to a 6 ... killing the Troll.]
 Fight Results
[** See the note above on the Determine Victor Rule **]
Fight Results
[** See the note above on the Determine Victor Rule **] Mordor inflicted 6 wounds. Gondor added 2 counters. Mordor wins the fight. Gondor has to fall back 1" and take a Panic Test. They roll a 2 and each company becomes
Disordered. They take their Courage Test to determine if there will be additional casualties, they roll a 7 and adding their Courage Value means that they lose no additional warriors.
[Note: The Gondor Formation is 18.7% depleted - at this rate it'll take 5 Rounds to destroy the Formation; also the Troll has a 50% chance of dying on the next roll on the Hard to Kill table.]
Round 2:
 Priority Phase
Gondor rolls a 6 and Mordor rolls a 3. Gondor Wins Priority again for the Round.
 Move Phase
Gondor is
Disordered, so they need to pass a Courage Test (with -1 since the Troll is within 6" [pg 35]) in order to move, shoot, charge and get more than a single die per company for the Fight Phase (
this could be detrimental against the Resilience 2 of the Troll, since if they don't get more than one 6 the hit will be absorbed). They roll an 8 on the dice adding 3 for their Courage Value and subtracting 1 for the Troll within 6", giving 10; (barely a pass) so the Formation is no longer disordered.
Gondor stays where they are for the Move Phase, as does the Mordor Troll.
 Charge Phase
Gondor decides they want to charge, and takes their Courage Test for the Troll's
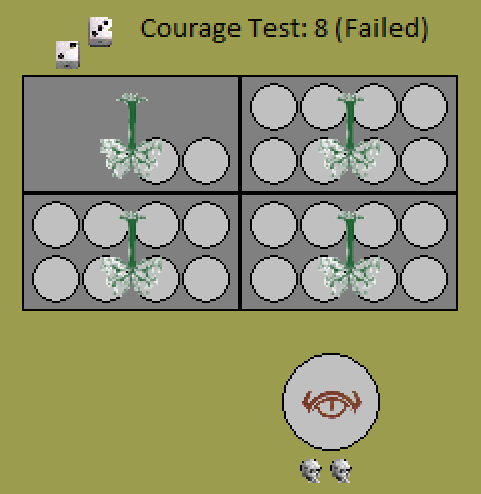
Terror special rule, again. They roll a 2 and a 3. Adding their Courage Value they total 8, so the test is failed and the charge is stalled.

Mordor rolls for their charge and rolls a 5, so the charge is successful.

Gondor takes another Courage Test for the Troll's
Terror special rule, since they are being charged. They roll a 4 and a 2. Adding their Courage Value they total 9, the test is failed again. Their Fight Value is reduced to 0 for the turn.
 Fight Phase
The Mordor Troll gets to attack first (even through he doesn't have priority - but because of
Striking Order and he is Type: Monster). He rolls 3 dice for his Attack Value, rolls an additional die for
Charging, and 7 additional dice for his
Battle Skill bonus (that is 11 total dice). He needs 4+'s To Hit and since the warriors have only 1 Resilience, each hit ends up wounding a warrior. This kills 4 Gondor Warriors (and finally gets rid of the first company).

Gondor now gets to attack. They roll 8 dice for the direct company and then 2 more dice for the two supporting companies. They need 6's To Hit and get 3x 6's. Since the Troll has 2 Resilience, these 3 hits are reduced to a single wound on the Troll - This means one roll on the Hard to Kill table.

Rolling on the Hard to Kill table, Gondor rolls a 4. Adding the two counters that are already on the Troll gives a result of 6 on the table - killing the Troll, delivering the "
Death Blow".
Well - it was consistent ... it took 2 Rounds for the Troll to be killed. That is well within the one standard deviation of the 2.1 statistical average. Furthermore, Gondor took 31.2% damage to the Formation; so just under a third - which would imply it would take 5 turns still to destroy the Formation for the Troll ...
So, long-story-short, something needs to be done to adjust the
Hard to Kill! special rule of the Troll to increase his survivability and make the fight a little more even (45%/55% in favor of the Troll - that's pretty "hard").
Honestly, I am somewhat surprised the level of change that the
Terror rule brought into the fight ... even though I have fought against terror causing formations in the past, I guess I never really thought about the number of Courage Test rolls I was required to make until I saw it laid out sequentially.
Using the H2K simulator to run the average number of turns to kill the Troll we should be targeting it right around the 6.0 turn mark. That will make it difficult (hence the
hard part of
Hard to Kill!) to kill the Troll. Having it average at about the 5.0 turn mark should result in the 50/50 distribution that
should already exist (without the special rule) and having it average at about the 7.0 turn mark would sway it too much in favor of the Troll ... making the Troll too
hard to kill (basically "Very Hard to Kill!" ... but I think that's probably another post [see Part 3/5]).
After trying several different combinations of dice ranges for adding counters and target for the
Death Blow result, we came up with the following variation of the
Hard to Kill! special rule:
This change will increase the survivability of the Troll ... and even out the fight between the Warriors and the Monster - and more importantly, give the Troll an actual chance to win the fight and not just be slaughtered.
Let's run through how this would play out for several fights for the Troll against the Minas Tirith Warriors again with several rolls on the table:
EXAMPLE #1
Round 1:
Gondor scores 2 hits on the Troll and rolls once on the table.
Gondor gets a dice roll of 4. Since there are not any counters on the troll yet this gives a value of 4 on the New Hard to Kill Table - this gives 1 wound counter to the Troll.
Round 2:
Gondor scores 4 hits on the Troll so gets to roll twice on the table.
First roll on the table gives a dice roll of 2. Adding the 1 existing wound counter give a value of 3 on the table ... adding 1 more wound counter ... there are now 2 total counters on the Troll.
Second roll on the table gives a dice roll of 5. Adding the 2 existing wound counters gives a value of 7 on the table ... adding 2 more wound counters ... there are now 4 total counters on the Troll.
Round 3:
Gondor scores 3 hits on the Troll so gets to roll once on the table.
Gondor gets a dice roll of 2. Adding the 4 existing wound counters give a value of 6 on the table ... adding 2 more wound counters ... there are now 6 total counters on the Troll.
Round 4:
Gondor scores 2 hits on the Troll so gets to roll once on the table.
Gondor gets a dice roll of 3. Adding the 6 existing wound counters give a value of 9 on the table ... adding 3 more wound counters ... there are now 9 total counters on the Troll.
Round 5:
Gondor scores 3 hits on the Troll so gets to roll once on the table.
Gondor gets a dice roll of 6. Adding the 9 existing wound counters give a value of 15 on the table ... delivering the "
Death Blow" to the Troll.
EXAMPLE #2
Round 1:
Gondor scores 5 hits on the Troll and rolls twice on the table.
First roll on the table gives a dice roll of 5. Since there are not any counters on the troll yet this gives a value of 5 on the New Hard to Kill Table - this gives 1 wound counter to the Troll.
Second roll on the table gives a dice roll of 1. Adding the 1 existing wound counter gives a value of 2 on the table ... this adds no new wound counters ... there are still only 1 counter on the Troll.
Round 2:
Gondor scores 1 hit on the Troll so doesn't gets to roll on the table.
Round 3:
Gondor scores 3 hits on the Troll so gets to roll once on the table.
Gondor gets a dice roll of 4. Adding the 1 existing wound counter gives a value of 5 on the table ... adding 1 more wound counter ... there are now 2 total counters on the Troll.
Round 4:
Gondor scores 2 hits on the Troll so gets to roll once on the table.
Gondor gets a dice roll of 6. Adding the 2 existing wound counters gives a value of 8 on the table ... adding 2 more wound counters ... there are now 4 total counters on the Troll.
Since a natural 6 was rolled, Gondor gets to roll again.
Second roll on the table gives a dice roll of 6. Adding the 4 existing wound counter gives a value of 10 on the table ... this adds 3 more wound counters ... there are now 7 total counters on the Troll.
Round 5:
Gondor scores 2 hits on the Troll so gets to roll once on the table.
Gondor gets a dice roll of 5. Adding the 7 existing wound counters gives a value of 12 on the table ... delivering the "
Death Blow" to the Troll.
There we have it ... Hopefully this will clear up a lot of the confusion on how the table works and also increase the longevity of the Troll to make the 100 Points that are spent on the Troll more useful.
LINKS TO OTHER PARTS OF THE HARD TO KILL SERIES
- Overview of the Problem [Part 1/5]
- Hard to Kill! Rule [Part 2/5]
- Very Hard to Kill! Rule [Part 3/5]
- Extremely Hard to Kill! Rule [Part 4/5]
- Ridiculously Hard to Kill! Rule [Part 5/5]
POST APPENDIX: WotR H2K Simulator Code - Objective-C
//
// main.m
// WotR H2K Simulator
//
// Created by Bairchoro on 11/15/14.
// Copyright (c) 2014 Ursa Systems Corportation. All rights reserved.
//
#import <Cocoa/Cocoa.h>
int main(int argc, char *argv[])
{
intwoundIterator = 0;
intnumNewCounters = 0;
intnumCritCounters = 0;
inttotalNumCounters = 0;
intattackScore = 0;
booldead = false;
intdiceRoll = 0;
// H2K Old = 1; VH2K Old = 2; EH2K Old = 3; H2K New = 4; VH2K New = 5; EH2K New = 6;
inth2kType = 4;
// This sets a seed based on system clock time "pseudorandom".
longseed = time(NULL);
srand(seed);
intquestion[21];
for(int i=0; i<20; i++) {
question[i] = rand();
}
// End of Seed.
while(dead == false) {
// each time a wound is scored, roll a die (1-6) to see the result for the wound
woundIterator = woundIterator + 1;
NSLog(@" ");
NSLog(@"Current woundIterator = %i", woundIterator);
numNewCounters = 0;
numCritCounters = 0;
diceRoll = ((rand()/100%6)+1);
NSLog(@"Current diceRoll = %i",diceRoll);
attackScore = diceRoll + totalNumCounters;
NSLog(@"Attack Score: %i",attackScore);
// add the number of existing wound counters to the value of the die to get the result
// CASE 1: Old H2K
if(h2kType == 1) {
if (attackScore <= 1) {
}
else if (attackScore > 1 && attackScore <= 3) {
NSLog(@"gain 1 counter");
numNewCounters = 1;
}
else if (attackScore > 3 && attackScore <= 7) {
NSLog(@"gain 2 counters");
numNewCounters = 2;
}
else if (attackScore >= 8) {
dead = true;
NSLog(@"Model has died!");
numNewCounters = diceRoll;
}
}
// CASE 4: New H2K
if(h2kType == 4) {
if (attackScore <= 2) {
}
else if (attackScore > 2 && attackScore <= 5) {
NSLog(@"gain 1 counter");
numNewCounters = 1;
}
else if (attackScore > 5 && attackScore <= 8) {
NSLog(@"gain 2 counters");
numNewCounters = 2;
}
else if (attackScore > 8 && attackScore <= 11) {
NSLog(@"gain 3 counters");
numNewCounters = 3;
}
else if (attackScore >=12) {
dead = true;
NSLog(@"Model has died!");
numNewCounters = diceRoll;
}
}
if(diceRoll == 6 && dead == false) {
// cout<<"You rolled a natural 6 ... you get to re-roll this turn!"<<endl;
NSLog(@"You rolled a natural 6 ... you get to re-roll this turn!");
int totalCritCounters = totalNumCounters + numNewCounters;
//cout<<"Current totalNumCounters = "<<totalNumCounters<<endl;
NSLog(@"Current totalNumCounters = %i", totalCritCounters);
diceRoll = ((rand()/100%6)+1);
//cout<<"Current diceRoll = "<<diceRoll<<endl;
NSLog(@"Crit diceRoll = %i", diceRoll);
attackScore = diceRoll + totalCritCounters;
NSLog(@"Crit Attack Score: %i", attackScore);
// add the number of existing wound counters to the value of the die to get the result
// CASE 1: Old H2K
if (h2kType == 1) {
if (attackScore <= 1) {
}
else if (attackScore > 1 && attackScore <= 3) {
numCritCounters = 1;
}
else if (attackScore > 3 && attackScore <= 7) {
numCritCounters = 2;
}
else if (attackScore >= 8) {
dead = true;
// cout<<"Model has died!"<<endl;
NSLog(@"Model has died!");
numCritCounters = diceRoll;
}
}
// CASE 4: New H2K
if (h2kType == 4) {
if (attackScore <= 2) {
}
else if (attackScore > 2 && attackScore <= 5) {
NSLog(@"gain 1 counter");
numCritCounters = 1;
}
else if (attackScore > 5 && attackScore <= 8) {
NSLog(@"gain 2 counters");
numCritCounters = 2;
}
else if (attackScore > 8 && attackScore <= 11) {
NSLog(@"gain 3 counters");
numCritCounters = 3;
}
else if (attackScore >=12) {
dead = true;
// cout<<"Model has died!"<<endl;
NSLog(@"Model has died!");
numCritCounters = diceRoll;
}
}
}
numNewCounters = numNewCounters + numCritCounters;
// cout<<"Current numNewCounters = "<<numNewCounters<<endl;
NSLog(@"Current numNewCounters = %i", numNewCounters);
// add the number of new counters to the total number of counters on the model
totalNumCounters = totalNumCounters + numNewCounters;
//cout<<"Current totalNumCounters = "<<totalNumCounters<<endl;
NSLog(@"Current totalNumCounters = %i", totalNumCounters);
// if the original roll of the die was a natural 6, then roll again
// if the total number of counters is 15 or more - flip dead to true, else continue
}
NSLog(@"Number of wounds to kill = %i", woundIterator);
return0;
}