Monday, December 29, 2014

The Elven Kingdoms Unit Cost Analysis

I know that we already covered the Elves a little bit in the post for Warrior Baseline Cost within Gondor & Arnor, but let's give the Elves their own post … it only seems fair for such a pretty army when it is fully painted. Honestly, I think that may be part of the original over-pricing … the jealousy that we all have when an opponent pulls out 2000 points of Elves that are just beautiful!

ELVEN WARRIORS

  • (L) [I] Gildor's Household - Underpriced by 11%
  • (L) [MH] Glorfindel, Lord of the West - Underpriced by 11%
  • (R) [H] Galadhrim Knight Regiment - Underpriced by 9%
  • (C) [I] Galadhrim Regiment - Accurately Priced (0% deviation)
  • (C) [I] Wood Elf Warband - Accurately Priced (0% deviation)
  • (L) [I] Rivendell Guard - Overpriced by 8%
  • (R) [I] High Elf Cohort - Overpriced by 9%
  • (C) [I] High Elf Regiment - Overpriced by 10%
  • (C) [I] Galadhrim Archer Regiment - Overpriced by 11%
  • (R) [I] Mirkwood Sentinels - Overpriced by 11%
  • (L) [I] Haldir's Elves - Overpriced by 11%
  • (L) [I] Guardians of Caras Galadhon - Overpriced by 17%
  • (C) [I] High Elf Archer Regiment - Overpriced by 20%
  • (R) [I] Guards of the Galadhrim Court - Overpriced by 27%
Interesting ... It seems like the complaining about this faction has not been in vain ... Half of the common formations fall in the overpriced range, in fact it is nearly impossible to build a cost effective force of elves with anything other than the common formations of Wood Elf Warband or Galadhrim Regiment; and everyone knows that when you play Elves, you want to have a "shooty" army of High Elf Archers, right?

Sorting the Elves under the template from cheapest (weakest stat-wise) to most expensive (most powerful) gives:
  • 40 Points per Company:
    • (C) [I] Wood Elf Warband
  • 45 Points per Company:
    • (C) [I] Galadhrim Regiment
    • (C) [I] Galadhrim Archer Regiment
    • (R) [I] Mirkwood Sentinels
    • (L) [I] Gildor's Household
    • (L) [I] Haldir's Elves
  • 50 Points per Company:
    • (C) [I] High Elf Regiment
    • (C) [I] High Elf Archer Regiment
  • 55 Points per Company:
    • (R) [H] Galadhrim Knight Regiment
    • (R) [I] Guards of the Galadhrim Court
    • (R) [I] High Elf Cohort
  • 60 Points per Company:
    • (L) [I] Rivendell Guard
    • (L) [I] Guardians of Caras Galadhon
  • 280 Points per Company:
    • (L) [MH] Glorfindel, Lord of the West
NOTE ABOUT GLAIVES & PIKES AND BALLISTIC VALUES FOR NON-BOW ARMED UNITS

It looks like the extra fight value point that is provided by Glaives and Pikes is not reflected in the profiles for the Elves. In fact on the description for Glaives that is given on page 56 of the Rulebook, it gives the example of Galadhrim Regiment within the example saying that it takes their Fight Value of 5 up to 6 (and it is shown on page 120 as being 5). So, this means that the Galadhrim Regiment and the High Elf Regiment both have +1 to all the Fight Values that are displayed.

Furthermore, neither of these profiles have the option for a Longbow, so it doesn't make sense to have them have a Ballistic Value (of 3+, specifically). Since the baseline warrior profile has a Ballistic Value of 4+, it seems silly to charge them the additional cost of an extra 5 points for something that they will never use - so for calculating points for these units, we will assume that they have a Ballistic Value of "-" and equate that to a value of 4+ when entering the numbers into the warrior baseline profile for calculation. All of this has already been taken into account for the point costs and image that are reflected above. 

NOTE ABOUT GLORFINDEL, LORD OF THE WEST

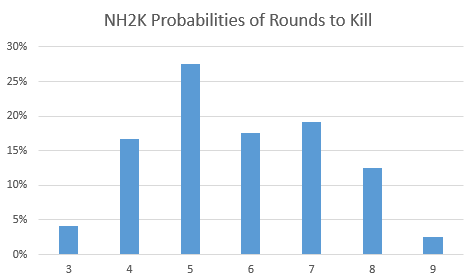
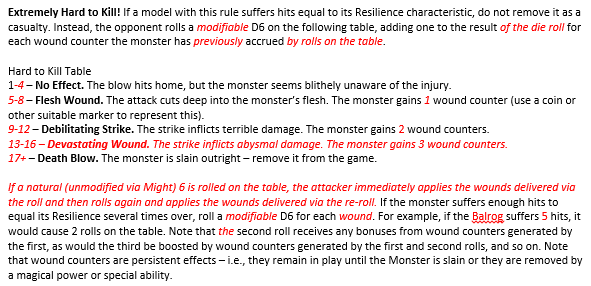
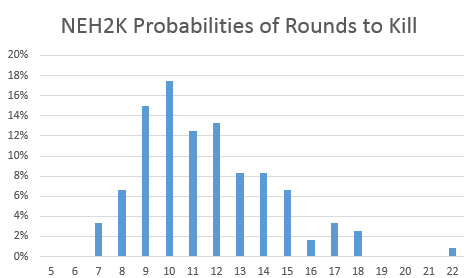
Glorfindel is a Monster Hero (with a Cost Value of 7) that has a special rule that allows him to move and charge like a flying monster. Also, GW released an Errata about him saying that his Move Value should not be 8", but instead 12". Furthermore, he is armed with a Glaive - so his Fight Value should be 7+1=8 and he does not have a range weapon, so his Ballistic Value should be "-" and counted as a 4+ for the Monster Hero calculation. Finally, we have gone back and forth on counting the xxbane special rules as a single special rule or each one individually, and it seems to make more sense to count them each separately. All that being said and done - that is how his calculated points were determined.


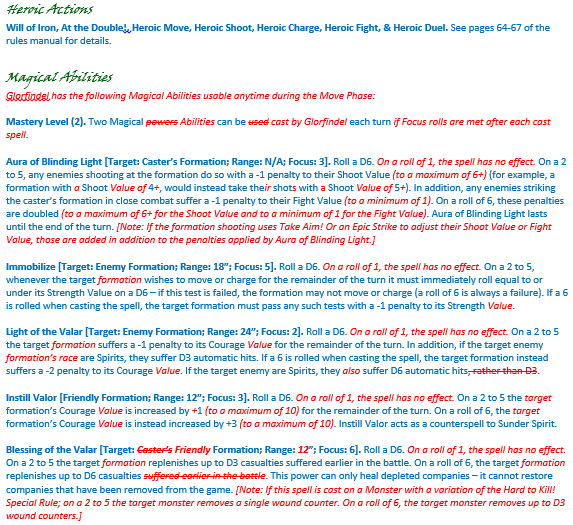
Over at the one-ring.co.uk website, one of the dedicated WotR players mentioned that there was some confusion with the Blessing of the Valar spell above for Glorfindel:

oli-zapp wrote:
One question about the the spell for Glorfindel's ability to cast "Blessing of the Valar" - is Glorfindel able to heal himself with this spell? Or should he only heal other companies or monsters?

Thank you for answering, maybe it will be more clear if you put this information additionally within his profile!

If you look at the target in the spell in question above - I changed it from Caster's Formation (meaning only themselves) to Friendly Formation. I intended this to mean that it could be cast on any target formation within the Army (including oneself); so, yes - to answer Oli's question - he can cast the spell on himself and remove wound counters with the "Blessing of the Valar" spell. In fact this is why the "Note" was added at the end of the text for the spell - it dawned on me that a lot of things within the WotR rules don't take into consideration what effect they have on Monster Formation - since usually the descriptions are targeted at Infantry and Cavalry Formation.

Great question, Oli, and thanks for helping to clarify this for others reading the blog, as well! I appreciate your input!

ELVEN HEROES

  • (E) Elladan - Underpriced by 65%
  • (E) Elrohir- Underpriced by 65%
  • (L) Haldir HE - Underpriced by 55%
  • (C) Guard Captain GotGC - Underpriced by 52%
  • (C) Wood Elf Captain MS - Underpriced by 50%
  • (C) Knight Captain GKR - Underpriced by 50%
  • (C) Commander HEC - Underpriced by 50%
  • (C) High Elf Captain HER - Underpriced by 47%
  • (C) High Elf Captain HEAR - Underpriced by 44%
  • (E) Cirdan of the Havens - Underpriced by 44%
  • (E) Haldir, Guardian of Lorien - Underpriced by 42%
  • (C) Galadhrim Captain GR - Underpriced by 41%
  • (C) Galadhrim Captain GAR - Underpriced by 38%
  • (C) Wood Elf Captain WEW - Underpriced by 38%
  • (E) Thranduil, King of Mirkwood - Underpriced by 34%
  • (E) Galadriel, Lady of Lothlorien - Underpriced by 34%
  • (L) Rumil GoCG - Underpriced by 28%
  • (L) Elven Stormcaller GoCG - Underpriced by 26%
  • (E) Awen Evenstar - Underpriced by 22%
  • (E) Elrond, Master of Rivendell - Underpriced by 22%
  • (C) Elven Stormcaller GotGC - Underpriced by 20%
  • (L) Gildor Inflorion GH - Underpriced by 19%
  • (L) Erestor RG - Underpriced by 18%
  • (E) Celeborn, Lord of Lothlorien - Underpriced by 13%
  • (C) Elven Stormcaller GR - Underpriced by 9%
  • (E) Galadriel, Protectress of Lothlorien - Overpriced by 14%
  • (E) Gil-galad, High King of the Elves - Overpriced by 40%
  • (E) Legolas, Prince of Mirkwood - Overpriced by 43%

Sorting by the cost calculated by the template from cheapest (weakest stat-wise) to most expensive (most powerful):
  • Heroes that should cost 80 Points:
    • (C) Galadhrim Captain GAR
    • (C) Wood Elf Captain WEW
  • Heroes that should cost 85 Points:
    • (C) Galadhrim Captain GR
  • Heroes that should cost 90 Points:
    • (C) High Elf Captain HEAR
  • Heroes that should cost 95 Points:
    • (C) High Elf Captain HER
  • Heroes that should cost 100 Points:
    • (C) Wood Elf Captain MS
    • (C) Knight Captain GKR
    • (C) Commander HEC
    • (L) Haldir HE
    • (E) Elladan
    • (E) Elrohir
  • Heroes that should cost 105 Points:
    • (C) Guard Cptain GotGC
  • Heroes that should cost 110 Points:
    • (C) Elven Stormcaller GR
    • (L) Erestor RG
  • Heroes that should cost 125 Points:
    • (C) Elven Stormcaller GotGC
    • (L) Rumil GoCG
  • Heroes that should cost 130 Points:
    • (E) Haldir, Guardian of Lorien
  • Heroes that should cost 135 Points:
    • (L) Elven Stormcaller GoCG
    • (E) Cirdan of the Havens
  • Heroes that should cost 140 Points:
    • (E) Legolas, Prince of Mirkwood
  • Heroes that should cost 155 Points:
    • (L) Gildor Inglorion GH
  • Heroes that should cost 160 Points:
    • (E) Arwen Evenstar
  • Heroes that should cost 175 Points:
    • (E) Galadriel, Protectress of Lothlorien
  • Heroes that should cost 190 Points:
    • (E) Thranduil, King of Mirkwood
  • Heroes that should cost 200 Points:
    • (E) Celeborn, Lord of Lothlorien
  • Heroes that should cost 215 Points:
    • (E) Gil-galad, High King of the Elves
  • Heroes that should cost 265 Points:
    • (E) Galadriel, Lady of Lothlorien
  • Heroes that should cost 275 Points:
    • (E) Elrond, Master of Rivendell

Shout-out to Elliot! Thanks for suggesting the following post update in your comments - great idea!

WHY DO ALL THE ELF EPIC HEROES HAVE REDUNDANT SPECIAL RULES?

When going through the profiles for the Elf Heroes, all of them have the special rules Pathfinder (Master) and Terror; yet all the companies within the list also have these special rules as well. This would imply that the reason that these rules are included with the Epic Heroes is that they can imbue that ability onto the company or formation of which they are currently included within; however, GW has the rule on page 69 and the Errata which seem to imply otherwise.


OK, GW - that's at least consistently inconsistent! LOL!

I have updated the special rules to exercise the loophole that is contained within the rule on page 69 and to capture the intent of the Errata FAQ question for Terror above. I have changed the rule to explicitly indicate that the special rule is applied to the Epic Hero's company or formation. (Notice that the rule has been pre-appended with the word "Bestow" as well, to emphasize that it is applied to the company/formation as appropriate.) What this means that if I were playing a Gondor & Arnor Army and decided to ally in Legolas, Prince of Mirkwood - and put him within a formation comprised of 6 companies of Minas Tirith Archers he would use his special rules Bestow Pathfinder (Master) and Bestow Terror and that formation would have the special rule Pathfinder (Master) for the entire formation (i.e., Legolas was "helping" them to navigate the terrain that would otherwise be difficult for them to traverse if he were not present) and Terror for the command company in which he was included.

Now, what this means is that we need to look closely at the special rules associated to Epic Heroes and determine which have effect on themselves, their currently residing company or their currently residing formation. This also brings up an interesting sub-feature rule ... Epic Heroes may need to roll their own dice for their attack, separate from those of their company or formation - so it makes it necessary to have several different colored dice when playing the game - and keeping track of who's dice belong to who. [NOTE: We saw this with the post for the modification that was made to the Epic Strike Special rule.]

COMING SOON: I suspect that this will need to be another set of posts per army to discuss each of the special rules owned by Epic Heroes and how they apply to their participating company and/or formation, just to clarify the confusion of whether or not it is a "Bestow" capability or not ... I'll try to get this together for at least the Elves relatively quickly.

Here is a screenshot of the work in progress - just so you all know that it is being worked on!


    Monday, December 22, 2014

    The Misty Mountains (Moria) Unit Cost Analysis

    The Misty Mountains ... (aka Moria) ... swarms and swarms of goblins and gargantuan monsters. It is an army that requires a lot of real world money - because who wants to field a formation of 3 companies? No one, of course - we want to go for the full 9 companies per formation!

    Also, Moria is the only army that has access to the "Extremely Hard to Kill!" monsters. That alone makes it an even more appealing army; and as we see from the previous post, with 11-12 rounds to kill an NEH2K monster makes it a very fun model to field!

    MORIA WARRIORS


    Keys:
    (C) = Common Formation, (R) = Rare Formation, (L) = Legendary Formation
    [I] = Infantry, [H] = Cavalry, [A] = Artillery, [M] = Monster, [MH] = Monster Hero
    • (R) [I] Gundabad Blackshields - Underpriced by 50%
    • (C) [I] Moria Prowler Warband - Underpriced by 33%
    • (C) [I] Moria Goblin Warband - Underpriced by 25%
    • (R) [M] Spider Queen - Accurately Priced (0% deviation)
    • (R) [M] Cave Troll - Overpriced by 7%
    • (C) [H] Giant Spider Brood - Overpriced by 17%
    • (C) [H] Cloud of Bats - Overpriced by 17%
    • (R) [M] Cave Drake - Overpriced by 23%
    • (C) [H] Warg Pack - Overpriced by 33%
    • (R) [MH] Spellcaster Dragon of Ancient Times - Overpriced by 51%
    • (R) [MH] The Balrog of Morgoth - Overpriced by 59%
    • (R) [MH] Dragon of Ancient Times - Overpriced by 63%
    • (R) [M] Stone Giant - Overpriced by 67%
    • (R) [H] Spider Broodling Swarm - Overpriced by 167%
    Applying the template from cheapest (weakest stat-wise) to most expensive (most powerful) gives the following. Of course, the Monster Heroes are at the bottom where they should be.
    • 15 Points per Company:
      • (C) [H] Warg Pack
      • (R) [H] Spider Broodling Swarm
    • 20 Points per Company:
      • (C) [I] Moria Goblin Warband
    • 30 Points per Company:
      • (C) [H] Cloud of Bats
      • (C) [I] Moria Prowler Warband
      • (R) [I] Gundabad Blackshields
    • 70 Points:
      • (R) [M] Cave Troll
    • 130 Points:
      • (R) [M] Cave Drake
    • 145 Points:
      • (R) [M] Spider Queen
    • 150 Points:
      • (R) [M] Stone Giant
    • 245 Points:
      • (R) [MH] Dragon of Ancient Times
    • 315 Points:
      • (R) [MH] Spellcaster Dragon of Ancient Times
      • (R) [MH] The Balrog of Morgoth
    GOBLIN DRUM UPGRADE

    The Goblin Drum is a command upgrade that is available to the Moria Goblin Warband, the Moria Prowler Warband, and the Gundabad Blackshields. This is actually a pretty interesting upgrade since it combines the effects of a Banner, Drummer, and Taskmaster - and gives a little extra bonus, too, for "At the Double!" failed rolls.


    If we consider the individual costs of each of the upgrades that are included in the Goblin Drum Upgrade we can get a pretty good idea of what it should cost:
    1. For a Banner Bearer, we have been using a base of 25 points for that upgrade and it basically  allows re-rolls for charging and panic tests. So basically, it is 5 points for being an "re-roll" upgrade, 10 points for the first re-roll that it allows for charging and 10 point for the second re-roll that it allows for panic tests.
    2. For the Drummer, it works effectively the same as a Hornblower - and we understand fairly well from the post on Hornblowers that it provides an additional inch to the Move Value (which is already 8" ... 2" more than a standard rank-and-file unit - then adding the additional 1" gives 9" for the goblins, meaning that the get effectively 1.5x the amount of move of other units ... not too bad!) Hornblowers and Drummers cost 5 points for each 2 companies in the formation.
    3. For the Taskmaster, it is the same thing as a Hornblower - but instead of Move Value bonus it gives an additional point to the Courage Value. Similarly, that means that that would cost 5 points for each 2 companies in the formation, as well.
    4. For the "At the Double!" re-roll, this would effectively be the same as the Banner Bearer upgrade ... in other words, if it were considered simply by itself it would cost 5 points for being a "re-roll" upgrade and then 10 points for the re-roll it allows for failed "At the Double!" rolls. However, since the Banner Bearer upgrade that is part of the Goblin Drum has effectively already "paid" for the re-roll upgrade 5 point cost - that is done ... so adding it into the combined total would only cost an additional 10 points for the re-roll that it provides.
    Goblin Drum Cost = Banner Bearer Cost + Drummer Cost + Taskmaster Cost + "At the Double!" Re-roll Cost

    Goblin Drum = [(Re-roll Upgrade Cost) + (Charging Re-roll Cost) + (Panic Re-roll Cost)] + [(+1 Move Cost)] + [(+1 Courage Cost)] + [(Re-roll Upgrade Cost) + ("At the Double" Re-roll Cost)]

    {NOTE: Again, notice that since the Re-roll Upgrade Cost is already paid by the Banner, it doesn't need to be re-paid by the "At the Double!" one ...}

    Goblin Drum = [(5 points) + (10 points) + (10 points)] + [2.5 points / company] + [2.5 points / company] + [(5 points) + (10 points)] = 35 points + 5 points / company

    So this means that if there is only 1 Company in the Formation of Moria Goblin Warband, the Goblin Drum Upgrade would cost 35 points + 5 points for the 1 company = 40 Points for the Upgrade! (When I updated the rule for the profiles I wrote it such that it costs 40 Points for the command company - meaning the 1st company in the formation.)


    If we took the entire 9 companies worth of goblins, this would cost:

    Goblin Drum = 35 points + [5 points/company*(9 companies)] = 35 points + 45 points = 80 points

    Let's just spell it out, so there is no confusion:


    THE SPIDER QUEEN & SPIDER CHARGE SPECIAL RULE

    Similar to what we mentioned in the Forgotten Kingdoms Unit Cost Analysis for Gwaihir, It seems like whenever there is a Monster Hero that is worthy of being a "leader of monsters" (e.g., Treebeard or Mordor Troll Chieftain) they come along with a "<Race> Charge" special rule that applies to the race of which they are a member. It would make sense for the Spider Queen to have the "Spider Charge" special rule as well [in fact we have already included that in her cost above].


    CAVE DRAKE'S GAPING MAW SPECIAL RULE

    OK, so this is only useful if it the formation that the Cave Drake is fighting has an enemy Hero? Furthermore, the Cave Drake is not a Monster Hero and has no might - yet we are going to give him a free Heroic Duel ... really?

    I think this is one of the more "broken" and "unused" rules in the game. The rule is very conditional (the target formation must have a Hero in it) and doesn't really make sense for what it is trying to accomplish. I'm not usually for an entire re-write of a rule, I try to keep to the original intent - but this one is just plain "broken". So, here is my suggested update to the rule:


    This change makes the rule a lot more versatile and able to be used regardless of there being a Hero in the target formation or not, but still allows the Drake to be a Hero-killer if the situation presents itself. In fact, now that the Drake has Striking Order (Monster), Terror, Hard to Kill!, and Gaping Maw, he is a lot more of a scary beast to go up against. In fact, any formation that goes up against it will have multiple D3 casualties unless they include a Hero ... but then losing a fight with a Hero in the formation runs the risk of that Hero getting eaten! Now that is an interesting twist of tactics! Since this is an uncommonly powerful special rule - I suggest that it cost 3-times the normal special rule cost for a non-heroic Warrior-Monster ... 15 Points. This cost is included in the Cave Drake's Point Cost listed above.


    DRAGON OF ANCIENT TIMES' BREATHE FIRE SPECIAL RULE

    Within the WotR rulebook (pg 186), they give the Range and the Strength of the Breath Fire special rule, but what about the Movement Penalty Associated (none, half or full) with the attack and what about Long Range rule on pg 39? Also, does it does not mention if it covers a swath or if is it single target ...

    As per pg 37 of the rule manual, dragons have full 360-degree Line of Sight for the shooting attack.

    I think the "right answer" for this special rule is that it has no movement penalty (i.e., the dragon can move its full flying move distance and still use the Breathe Fire special rule during the shoot phase and then can subsequently charge during the charge phase). This makes the rule a lot more "epic", which I think Moria needs that to compensate for its weaker profiles for the rank-and-file troops.

    I suggest that the special rule read as follows:

    FLYING MONSTERS IN MORIA

    Just looking at the models of the various monsters that are included in the Moria Army List, there are several formations where the monster has wings. In fact, I distinctly recall playing against a Balrog and the player insisted that since the Balrog has wings on the model, he has the Flying Monster Movement and Charge - even though his profile only says "Monster". Let's clarify it once and for all.
    • Cloud of Bats = Counts as a Flying Monster for moving and charging (due to its Flock of Doom Special Rule) … It counts as Cavalry for base size (for rotation, translation and reconfiguration Move costs), charging and associated bonuses to charge (+6 dice against Infantry, Artillery & Monsters; +2 dice against Cavalry & Flying Monsters), and Earth-shaking charge.
    • Cave Drake = Not a Flying Monster or Monster Hero ... just a regular Monster. The argument for this one being a Flying Monster always confused me - GW's model doesn't have wings on it, either.
    • Dragon of Ancient Times = Flying Monster Hero. Scary beyond all reason (especially if it has its magic upgrade and uses Breathe Fire! per the change above).
    • The Balrog of Morgoth = Not a Flying Monster, but a Monster Hero. Has magic that can be cast in 360-degree Line of Sight, but CANNOT fly over a formation of Gondor Warriors of Minas Tirith to get a rear attack every turn! (/Exasperated huff!)
    SWOOP ATTACK Special Rule for Flying Monsters

    Just as we talked about the Eagle in the Forgotten Kingdoms army list - it makes sense for any Flying Monster to have the Swoop Attack Special Rule. I have included this in the profile costs that are already provided above. Specifically, the rules for the two Flying Monsters in Moria's Army List should be:
    • Dragon gets D3 Stg 6 Hits


    • Bats get D3 Stg 1 Hits per company in the Cloud of Bats' formation

    MORIA HEROES


    Key: (C) = Command Hero, (L) = Legendary Hero, (E) = Epic Hero
    • (E) Druzhag the Beastcaller - Underpriced by 55%
    • (E) Durburz, Goblin King of Moria - Underpriced by 42%
    • (C) Blackshield Captain GB - Underpriced by 38%
    • (C) Goblin Captain MPW - Underpriced by 29%
    • (C) Goblin Captain MGW - Underpriced by 9%
    • (C) Goblin Shaman GB - Underpriced by 5%
    • (C) Goblin Shaman MPW - Accurately Priced (0% deviation)
    • (C) Goblin Shaman MGW - Overpriced by 18%
    • (C) Warg Chieftain - Overpriced by 43%
    Sorting by the cost calculated by the template from cheapest (weakest stat-wise) to most expensive (most powerful):
    • Heroes that should cost 35 Points:
      • (C) Warg Chieftain
    • Heroes that should cost 55 Points:
      • (C) Goblin Captain MGW
    • Heroes that should cost 70 Points:
      • (C) Goblin Captain MPW
    • Heroes that should cost 80 Points:
      • (C) Blackshield Captain GB
    • Heroes that should cost 85 Points:
      • (C) Goblin Shaman MGW
    • Heroes that should cost 100 Points:
      • (C) Goblin Shaman MPW
    • Heroes that should cost 105 Points:
      • (C) Goblin Shaman GB
    • Heroes that should cost 120 Points:
      • (E) Durburz, Goblin King of Moria
    • Heroes that should cost 220 Points:
      • (E) Durzhag the Beastcaller


      Monday, December 15, 2014

      Extremely Hard to Kill! They were on the Right Path with this One ... [Part 4/5 of the Hard to Kill Series]

      ** PART 4/5 in the Hard to Kill Analysis Series **

      OK, it seems like they were on the right track with this rule - but just didn't take it far enough. In fact, if you look at the rule updates for the "Hard to Kill!" rule and the "Very Hard to Kill!" rule, you should notice that they look very similar to the existing "Extremely Hard to Kill!" rule ... since it was actually one that was relatively "hard" to kill.

      Using the existing EH2K rule and running it through the simulator produced an average of about 9.67 rounds to achieve the "Death Blow" result for the monster.

      From part 2/5 and 3/5 of this series of posts, we found that using the updated rules a monster with the new "Hard to Kill!" rule should need about 5-6 rounds to be killed and for the new "Very Hard to Kill!" it should take like 8-9 rounds. In fact, running these through the simulator 120 times gave the following distributions for the new rules:


      This says that a monster with the new "Hard to Kill!" rule will last anywhere from 3-9 rounds (with the most probable being about 5 rounds). In fact, over 1 out of 4 monsters played will have about 5 rounds of lasting value during a Fight Phase, and less than 10% will be outside of the range of 4-8.


      This says that a monster with the new "Very Hard to Kill!" rule will last anywhere from 4-15 rounds (with the most probable being about 8-9 rounds); and 1 out of every 5 will fall in the 8 to 9 round range - and less than 10% (1 out of every 10) will be outside of the range of 6 to 11 rounds.

      We updated the "Extremely Hard to Kill!" rule as follows and re-ran the simulator with these values:


      The simulator provides 11.6 rounds for the average of this new table. That seems a lot better.


      This says that a monster with the new "Extremely Hard to Kill!" rule will last anywhere from 7-18+ rounds (with the most probable being about 10 rounds); and 3 out of every 5 will fall in the 9 to 12 round range - and less than 20% (1 out of every 5) will be outside of the range of 9 to 15 rounds. The really interesting one is the 22 Rounds to Kill outlier ... looking at the rolls ... the hang-up was getting over the first two hurdles of the 1-4 range and 5-8 range that provide 0 and 1 counters, respectively. Once the compilation of counters starts, though - the progress through the remaining ranges goes relatively quickly.

      Under the modification to the rule, the EH2K monster is now effectively twice as durable as the H2K monster ... we think it makes sense to count the EH2K rule as 30 Points instead of 10 for the Special Rule.

      The only three monsters within the rule book that have the EH2K rule are within The Misty Mountains (Moria) army list:
      1. Stone Giant [Monster]
      2. Dragon of Ancient Times [Monster Hero]
      3. The Balrog of Morgoth [Monster Hero]
      Sorry Good, you don't get any such cool behemoths to play with - I guess that is the price of being the good guys!


      The "take home" message appears to be that the more "hard" to kill the rules become ... the larger the swath of ranges of number of round to kill increases (i.e., the more the dice play a role in the killing of the monster). We have played a game with the Balrog once, using the new rules ... and it was definitely worth the 315 points that were paid to field the Monster Hero. I'm still itching to get him back on the field and have another go at it!


      LINKS TO OTHER PARTS OF THE HARD TO KILL SERIES

      1. Overview of the Problem [Part 1/5]
      2. Hard to Kill! Rule [Part 2/5]
      3. Very Hard to Kill! Rule [Part 3/5]
      4. Extremely Hard to Kill! Rule [Part 4/5]
      5. Ridiculously Hard to Kill! Rule [Part 5/5]

      Tuesday, December 9, 2014

      Movement Types and Limits Series - Reconfiguration Movement of Infantry Formations Comprised of 4 Companies [Part 3/23]

      As per the plan, we will continue with Infantry Formations that are comprised of 4 and 5 Companies and their associated permutations of reconfiguration and the movement cost associated with those reconfigurations.

      Well, let's get right to it!


      This means that in order to reconfigure in this fashion, it would require a move of 8.98". This means it would require an "At the Double!" or Heroic Move to allow this to occur.


      This would require a move distance of 4.93". This could be accomplished with most Formations (baring those that have really small move values [e.g. Hobbit Militia]).


      For Case 4-3 it appears that the worst case movement is Company 4. So reconfiguring in this fashion would require a Move of 6.41".


      For Case 4-4 it appears that the worst case movement is Company 3 or 4. So reconfiguring in this fashion would require a Move of 4.93".


      For Case 4-5 it appears that the worst case movement is Company 4. So reconfiguring in this fashion would require a Move of 8.31".

      For Case 4-6 it appears that the worst case movement is Company 3. So reconfiguring in this fashion would require a Move of 6.41".


      SUMMARIES (for the 4 Company Formation)


      LINKS TO OTHER PARTS OF THE WFMC PROGRESS SERIES


        LINKS TO OTHER PARTS OF MOVEMENT TYPES AND LIMITS SERIES


        • Movement Types and Limits Series - Reconfiguration Movement of Cavalry Formations Comprised of 2-3 Companies [Part 11/23]
        • Movement Types and Limits Series - Reconfiguration Movement of Cavalry Formations Comprised for 4 Companies [Part 12/23]
        • Movement Types and Limits Series - Reconfiguration Movement of Cavalry Formations Comprised of 5 Companies [Part 13/23]
        • Movement Types and Limits Series - Reconfiguration Movement of Cavalry Formations Comprised of 6 Companies [Part 14/23]
        • Movement Types and Limits Series - Reconfiguration Movement of Cavalry Formations Comprised of 7 Companies [Part 15/23]
        • Movement Types and Limits Series - Reconfiguration Movement of Cavalry Formations Comprised of 8 Companies [Part 16/23]
        • Movement Types and Limits Series - Reconfiguration Movement of Infantry Formations Comprised of 9 Companies [Part 17/23]
        • Movement Types and Limits Series - Cavalry Movement Example 1 from Page 33 of WotR Rulebook Analysis [Part 18/23]
        • Movement Types and Limits Series - Cavalry Movement Example 2 from Page 33 of WotR Rulebook Analysis [Part 19/23]
        • Movement Types and Limits Series - Cavalry Movement Example 3 from Page 33 of WotR Rulebook Analysis [Part 20/23]
        • Movement Types and Limits Series - Reconfiguration Summary of Cavalry Formations by Company Size [Part 21/23]
        • Movement Types and Limits Series - Cavalry Restrictions of Reconfiguration by Formation Name Summary [Part 22/23]
        • Using WFMC to Verify Movement Examples [Part 23/23]

        Tuesday, December 2, 2014

        Angmar Unit Cost Analysis

        Angmar is a very interesting army. It almost seems like an afterthought to Mordor and is intended to be a fluff army in order to use models that are already created but didn't fit thematically into the other Evil army lists. I think the equivalent on the Good side would be The Forgotten Kingdoms - but that has a lot more uniqueness to that army - separate from the other Good Armies. In fact, it is curious that 60% of the common formations are basically copies of other army's formations ... and 100% of the Epic Heroes are from Mordor.
        • (C) [I] Ghostly Legion = Warriors of the Dead (Gondor & Arnor)
        • (C) [H] Ghostly Riders =  Riders of the Dead (Gondor & Arnor)
        • (C) [I] Spectral Host [Unique to Angmar]
        • (C) [I] Carn Dum Warband = Dunlending Huscarls (The Fortress of Isengard [Not identical but very similar])
        • (C) [I] Angmar Orc Warband = Mordor Orc Warband = Isengard Orc Warband
        • (C) [I] Court of Fallen Kings [Unique to Angmar]
        Also, why is the Necromancer not part of the Angmar army? Another thing is … almost all the formations have the We Stand Alone special rule - so the Epic Heroes cannot join but only 3/7 formation types! It just seems like a lot is missing a lot. I guess the only option is to use them as an Ally Army (as called out for The Forgotten Kingdoms on pages 85 & 86) for other Evil armies. Enough musing - let's get on with it!

        ANGMAR WARRIORS

        Keys:
        (C) = Common Formation, (R) = Rare Formation, (L) = Legendary Formation
        [I] = Infantry, [H] = Cavalry, [A] = Artillery, [M] = Monster, [MH] = Monster Hero
        • (L) [MH] Buhrdur - Underpriced by 29%
        • (C) [I] Carn Dum Warband - Underpriced by 25%
        • (L) [MH] Gulavhar, the Terror of Arnor - Underpriced by 2%
        • (C) [I] Ghostly Legion - Overpriced by 20%
        • (C) [H] Ghostly Riders - Overpriced by 20%
        • (C) [I] Angmar Orc Warband - Overpriced by 50%
        • (R) [M] Shade - Overpriced by 54%
        • (C) [I] Spectral Host - Overpriced by 78%
        • (R) [I] Court of Fallen Kings - Overpriced by 85%
        • (R) [I] Werewolf Pack - Overpriced by 85%
        Applying the template from cheapest (weakest stat-wise) to most expensive (most powerful) gives the following. Of course, the Legendary Monster Heroes are at the bottom where they should be.
        • 10 Points per Company:
          • (C) [I] Angmar Orc Warband
        • 40 Points per Company:
          • (C) [I] Carn Dum Warband
        • 45 Points per Company:
          • (C) [I] Spectral Host
        • 50 Points per Company:
          • (C) [I] Ghostly Legion
          • (C) [H] Ghostly Riders
        • 65 Points per Company:
          • (R) [I] Court of Fallen Kings
          • (R) [M] Shade
          • (R) [I] Werewolf Pack
        • 175 Points:
          • (L) [MH] Buhrdur
        • 205 Points:
          • (L) [MH] Gulavhar, the Terror of Arnor
        GULAVHAR'S SWOOP ATTACK FOR BEING A FLYING MONSTER HERO

        Just as we talked about the Eagle in the Forgotten Kingdoms army list - it makes sense for any Flying Monster to have the Swoop Attack Special Rule. I have included this in the profile cost for Gulavhar provided above.


        BUHRDUR'S EPIC STRENGTH SPECIAL RULE

        Similar to the Epic Strike special rule that several Epic Heroes have, Buhrdur has the special rule for Epic Strength. As we have shown in previous posts when doing the analysis for Hero profiles:
        • Strength = +/- 5 points per value point
        • Special Rules = +/- 10 points per spell, special rule, or epic action 
        Using these two point values logically together:

        Epic Strength = Special Rule = +10 Points = 2*(+5 Points) = 2* (+1 Strength)

        There we have it ... Epic Strength is a 10 point special rule, so the equivalent Strength Value boost for that would be an increase of 2 Strength Value Points.

        Epic Strength will increase the Strength Value of a Hero by +2 to a maximum of 10. Furthermore, if there are other special rules that have taken effect (even after Epic Strength has been applied) the minimum that a Epic Hero's Strength Value with Epic Strength applied can be reduced to is 2 (0 + 2).


        ANGMAR HEROES


        Key: (C) = Command Hero, (L) = Legendary Hero, (E) = Epic Hero
        • (C) Ghostly Captain GL - Underpriced by 41%
        • (C) Ghostly Captain GR - Underpriced by 41%
        • (E) The Dwimmerlaik - Underpriced by 40%
        • (E) The Tainted - Underpriced by 40%
        • (E) The Witch-king - Underpriced by 15%
        • (C) Barbarian Chieftain - Accurately Priced (0% deviation)
        • (C) Angmar Shaman - Overpriced by 33%
        • (C) Orc Captain - Overpriced by 43%
        Sorting by the cost calculated by the template from cheapest (weakest stat-wise) to most expensive (most powerful):
        • Heroes that should cost 35 Points:
          • (C) Orc Captain
        • Heroes that should cost 50 Points:
          • (C) Barbarian Chieftain
        • Heroes that should cost 75 Points:
          • (C) Angmar Shaman
        • Heroes that should cost 85 Points:
          • (C) Ghostly Captain GL
          • (C) Ghostly Captain GR
        • Heroes that should cost 210 Points:
          • (E) The Dwimmerlaik
          • (E) The Tainted
        • Heroes that should cost 235 Points:
          • (E) The Witch-King

        Sunday, November 30, 2014

        Very Hard to Kill Should be More than -1 to Roll … [Part 3/5: Analyzing the "Very Hard to Kill" Special Rule]

        ** PART 3/5 in the Hard to Kill Analysis Series **

        The next rule up in the queue for the Hard to Kill series is the "Very Hard to Kill!" special rule. Under the basic rule set this one takes the "Hard to Kill!" rule and deducts 1 from the dice roll on the Hard to Kill table. This means that you could effectively never roll a natural 6 on turn one resulting in an insta-kill and rolling a 1 or 2 would result in effectively No Effect on the table. Ironically, this doesn't really increase the difficulty of killing the monster by very much. In fact, the average number of rounds to kill a "Very Hard to Kill!" monster over multiple runs using the simulator provided 3.6 rounds. Again, not very impressive for a monster that should be very hard to kill.

        From part 2/5 of this series of posts, we found that a monster with the "Hard to Kill!" rule should need about 5-6 rounds to be killed. That would mean that the target for the "Very Hard to Kill!" should take more rounds than that … maybe something like 8 rounds would be about right. We updated the rule as follows and re-ran the simulator with these values:


        The simulator provides 8.6 rounds for the average of this new table. That seems a lot better.


        Now, the next question is … should this new version of the "Very Hard to Kill!" rule cost more than the base 10 points for a special rule? And if "yes", how much more exactly? Let's face off a monster with the "Very Hard to Kill!" rule against a large formation of infantry again to see how they both fare. I suggest a fight between Treebeard (230 Points) and two formations of 4 companies of Uruk-hai Warband (35 points per company = 280 Points).


        STEP-BY-STEP EXAMPLE OF THE FIGHT

        Round 1:

        Priority Phase

        Treebeard rolls a 1 and Isengard rolls a 2. Isengard Wins Priority for the Round.

        Move Phase

        Isengard stays where they are for the Move Phase, as does Treebeard.

        Charge Phase

        Isengard decides they want to charge, and takes their Courage Tests for Treebeard's Terror special rule. The first formation rolls a 2 and a 2. Adding their Courage Value (3) it totals 7, so the test is failed and the charge is stalled for Formation 1. The second formation rolls a 5 and a 6. Adding their Courage Value (3) it totals 14, so the test is passed.

        Since the first Isengard formation failed its courage test, it cannot charge ... the charge is stalled!

        The second Isengard formation rolls for their charge and rolls a 3, so the charge is successful.

        Fight Phase

        Treebeard gets to attack first (even though he doesn't have priority because of Striking Order [pg 46] and he is Type: Monster). He rolls 3 dice for his Attack Value and 5 additional dice for his Battle Skill bonus (Treebeard's Fight - Uruk-hai's Fight = 9-4 = 5). He needs 3+'s To Hit (S:9 vs D:7 - 66% chance To Hit) and since the warriors have only 1 Resilience, each hit ends up wounding a warrior. This means he gets 8 dice to roll: 1, 6, 4, 4, 2, 4, 5, & 3. This kills 6 Isengard Warriors.

        Isengard now gets to attack. Formation #1 stalled and they are out of range. Formation #2, they roll 8 dice for the direct company and then 3 more dice for the three supporting companies and then they get a extra die for Charging. They need 6/2+'s To Hit (S:4 vs D:10). Rolling their 12 dice, they get: 4, 1, 6, 6, 3, 2, 2, 5, 6, 3, 5, & 1. Since they need 6/2's they pick up the three 6's that they rolled and re-roll them needing 2+'s, they get: 3, 2, & 1. So that means 2 hits (6/2's). Since Treebeard has 2 Resilience, these 2 hits are reduced to a single wound on Treebeard - This means one roll on the Very Hard to Kill table.

        Rolling on the Very Hard to Kill table, Isengard Formation #2 rolls a 5. This adds one counters to Treebeard.

        Fight Results

        [** Recall that we modified the Determine Victor Rule back in Part 2/5 **] Treebeard inflicted 6 wounds. Isengard added 1 counter. This means that Treebeard wins the fight and Isengard Formation #2 has to fall back 1" and take a Panic Test. Formation #2 rolls a 6 and they remain Steadfast.

        Round 2:

        Priority Phase

        Treebeard rolls a 5 and Isengard rolls a 4. Treebeard wins Priority for Round 2.

        Move Phase

        Treebeard stays where he is for the Move Phase, as do the Isengard Formations.

        Charge Phase

        Treebeard decides he want to charge, and rolls to charge Formation #2. He rolls a 3 - good. Formation #2 takes their Courage Test for Treebeard's Terror special rule. They roll a 1 and a 3. Adding their Courage Value (3) it totals 7, so the test is failed - this means that their Fight Value is reduced to 0 for Round 2.

        Isengard Formation #1 is going to attempt to charge Treebeard, again. They take their Courage Test for Treebeard's Terror special rule, rolling: 5 & 5. Adding their Courage Value (3) it totals 13, so they pass - then they roll for their charge distance: 5, so it's good - both formations are in the fray this time!

        Fight Phase

        Treebeard gets to attack first (he has priority and Striking Order). He decides he is going to continue to attack Formation #2 (they are Fight 0 for the round … so, of course) - so he rolls 3 dice for his Attack Value, an additional die for Charging, and 9 additional dice for his Battle Skill bonus (Treebeard's Fight - Uruk-hai's Fight = 9-0 = 9). He still needs 3+'s To Hit. This means he gets 13 dice to roll: 5, 1, 2, 3, 5, 2, 5, 1, 3, 3, 5, 4, & 2. This kills 8 Isengard Warriors - there goes the first company and only 2 remaining in the second supporting company.

        Isengard now gets to attack. Formation #1 rolls 8 dice for the direct company and 3 more for the three supporting companies and then they get a extra die for Charging. They need 6/2+'s To Hit (S:4 vs D:10). Rolling their 12 dice, they get: 4, 3, 3, 2, 1, 4, 3, 5, 4, 6, 3, & 3. Since they need 6/2's they pick up the one 6 that they rolled and re-roll them needing 2+, they get: 4. So that means 1 hit (so far). Formation #2 rolls 8 dice for the direct company and 2 more for the two remaining support companies. Rolling their 10 dice, they get: 6, 5, 1, 2, 2, 4, 6, 6, 3, & 1. They pick up the three 6's they rolled and re-rolling them needing 2+'s, they get 3, 6, & 2. So 3 more hits. That means that Isengard got 4 total hits on Treebeard - and due to his Resilience of 2 they get to roll twice on the Very Hard to Kill table.

        Rolling on the Very Hard to Kill table for the first wound, Isengard rolls a 6! Adding the one counter that is already on Treebeard means that they score an attack value of 7 on the table … this adds two more wound counters to Treebeard (now he has 3) - and since they rolled a 6, they get to re-roll!! They roll a 3 … adding the 3 counters on Treebeard give an attack value of 6 on the table … this adds one more wound counter to Treebeard (now he has 4). Now, for the second wound, the roll … ANOTHER 6 - wow! OK, adding the 4 wound counters - they have an attack value of 10 on the table … two more wound counters (now he has 6). They get to re-roll for the natural 6 … and they roll a 1. Again, adding the existing counters gives an attack value of 7 on the table … this adds two more counters to Treebeard - so he ends up with 8 counters on him at the end of Round 2.

        Nice job Isengard dice rollers! [Just as a note … Under the old Very Hard to Kill rule - Treebeard would have already been dead …]

        Fight Results

        Well, that was a pretty bloody Round … Treebeard inflicted 8 wounds. Isengard added 7 counters. This means that Treebeard wins the fight (barely) and both Isengard Formations have to fall back 1" and take a Panic Test. Formation #1 rolls a 6 for their Panic Test and they remain Steadfast. Formation #2 rolls a 4 for their Panic Test - so all 3 companies in Formation #2 become Disordered. They then take their Courage Test to determine if they take additional casualties … they roll a 6 and a 6. Adding their Courage Value (3) they get a 15 … so the test is passed and no additional casualties.

        Round 3:

        Priority Phase

        Treebeard rolls a 4 and Isengard rolls a 2. Treebeard wins Priority for Round 3.

        Move Phase

        Treebeard stays where he is for the Move Phase.

        Isengard Formation #2 is Disordered, so they need to pass a Courage Test (with -1 since Treebeard is within 6" [pg 35]) in order to move, shoot, charge and get more than a single die per company for the Fight Phase. They roll a 3 & 6 - adding 3 for their Courage Value and subtracting 1 for Treebeard within 6", giving 11; (barely a pass) so Isengard Formation #2's companies are no longer Disordered. They choose to stay where they are for the Move Phase.

        Charge Phase

        Treebeard decides he want to charge, and rolls to charge Formation #2. He rolls a 4 - so good to go. Formation #2 takes their Courage Test for Treebeard's Terror special rule. They roll a 4 and a 6. Adding their Courage Value (3) it totals 13, so the test is passed.

        Isengard Formation #1 is going to attempt to charge Treebeard, again. They take their Courage Test for Treebeard's Terror special rule, rolling: 2 & 6. Adding their Courage Value (3) it totals 11, so they pass - then they roll for their charge distance: 6, Unstoppable Charge!

        Fight Phase

        Treebeard gets to attack first (he has priority and Striking Order). He decides he is going to continue to attack Formation #2 - so he rolls 3 dice for his Attack Value, an additional die for Charging, and 5 additional dice for his Battle Skill bonus. He still needs 3+'s To Hit. This means he gets 9 dice to roll: 3, 5, 4, 4, 6, 6, 2, 4, & 5. This kills 8 Isengard Warriors - there goes the second company and only 2 remaining in the third supporting company - six more wounds and Formation #2 is done for.

        Isengard now gets to attack. Formation #1 rolls 8 dice for the direct company and 3 more for the three supporting companies and then they get a 1+D3 extra die for Charging with an Unstoppable Charge (1 for Charging and D3 for Unstoppable). They roll a 2 for the Unstoppable charge - meaning they get one additional die for the charge. They need 6/2+'s To Hit (S:4 vs D:10). Rolling their 13 dice, they get: 1, 6, 3, 1, 5, 5, 1, 5, 3, 1, 1, 3, & 1. Since they need 6/2's they pick up the one 6 that they rolled and re-roll them needing 2+, they get: 3. So that means 1 hit (so far). Formation #2 rolls 8 dice for the direct company and 1 more for the remaining support company. Rolling their 9 dice, they get: 5, 5, 6, 1, 6, 3, 3, 4, & 6. They pick up the three 6's they rolled and re-rolling them needing 2+'s, they get 5, 5, & 1. So 2 more hits. That means that Isengard got 3 total hits on Treebeard - and due to his Resilience of 2 they get to roll once on the Very Hard to Kill table.

        Rolling on the Very Hard to Kill table, Isengard rolls a 4! Adding the one counter that is already on Treebeard means that they score an attack value of 12 on the table … this adds three more wound counters to Treebeard (now he has 11 at the end of Round 3). This means that the next time that Isengard rolls on the Very Hard to Kill table, they need a 3 or more to get the required 14 to kill Treebeard … that's a 66.7% chance that he will die on the next table roll.

        Fight Results

        Treebeard inflicted 8 wounds. Isengard added 3 counters. This means that Treebeard wins the fight, again, and both Isengard Formations have to fall back 1" and take a Panic Test. Formation #1 rolls a 1 for their Panic Test and the experience an Onset of Dismay! [a banner would have been really useful right now …]. However, they have not taken any casualties yet, so they don't run away but simply become Disordered. They then take their Courage Test to determine if they take additional casualties … they roll a 1 and a 2. Adding their Courage Value (3) they get a 6 - meaning that they lose 4 warriors. Formation #2 rolls a 2 for their Panic Test and they become Disordered. They then take their Courage Test to determine if they take additional casualties … they roll a 6 and a 3. Adding their Courage Value (3) they get a 12 - meaning no more additional casualties for Formation #2 … that's good, they could not afford to lose anymore, really.

        Round 4:

        Priority Phase

        Treebeard rolls a 6 and Isengard rolls a 6. Draw, so they need to re-roll. Treebeard rolls a 3 and Isengard rolls a 2. Treebeard wins Priority for Round 4.

        Move Phase

        Treebeard stays where he is for the Move Phase.

        Both Isengard Formations are Disordered, so they need to pass a Courage Test (with -1 since Treebeard is within 6") in order to move, shoot, charge and get more than a single die per company for the Fight Phase. Isengard Formation #1 rolls a 4 & 6 - adding 3 for their Courage Value and subtracting 1 for Treebeard within 6", giving 12 - so they are no longer Disordered; Isengard Formation #2 rolls a 3 & 2 - adding 3 for their Courage Value and subtracting 1 for Treebeard within 6", giving 7 - so the two companies in Formation #2 remain Disordered - and they cannot move, shoot, or charge - and they will only get 2 dice total during the Fight Phase if engaged in hand-to-hand. Isengard Formation #1 chooses to stay where they are for the Move Phase and Formation #2 can't move since they are Disordered.

        Charge Phase

        Treebeard decides he want to charge, and rolls to charge Formation #2. He rolls a 5 - good. Formation #2 takes their Courage Test for Treebeard's Terror special rule. They roll a 4 and a 1. Adding their Courage Value (3) it totals 8, so the test is failed - this means that their Fight Value is reduced to 0 for Round 2. It looks like Formation #2 is in for it this round.

        Isengard Formation #1 is going to attempt to charge Treebeard, again. They take their Courage Test for Treebeard's Terror special rule, rolling: 4 & 4. Adding their Courage Value (3) it totals 11, so they pass - then they roll for their charge distance: 1, STALLED CHARGE! I can hear Treebeard virtually laughing!

        Fight Phase

        Treebeard gets to attack first (he has priority and Striking Order). He lays into Formation #2 - so he rolls 3 dice for his Attack Value, an additional die for Charging, and 9 additional dice for his Battle Skill bonus. He still needs 3+'s To Hit. This means he gets 13 dice to roll: 5, 3, 4, 2, 4, 2, 3, 4, 5, 2, 5, 1, & 1. This kills 8 Isengard Warriors - there goes Formation #2 … the remaining 2 warriors run for the hills!

        Isengard has no one in contact with Treebeard, now, so there is no retaliation!

        Fight Results

        Treebeard wins - no need to check for Fight Results.

        Round 5:

        Priority Phase

        Treebeard rolls a 3 and Isengard rolls a 3. Draw, so they need to re-roll. Treebeard rolls a 2 and Isengard rolls a 5. Isengard wins Priority for Round 5.

        Move Phase

        Isengard stays where they are for the Move Phase, as does Treebeard.

        Charge Phase

        Isengard decides they want to charge, and takes their Courage Tests for Treebeard's Terror special rule. The first formation rolls a 1 and a 1. Adding their Courage Value (3) it totals 5, so the test is failed and the charge is stalled for Formation 1. (LOL! - My Gondor Bias is chuckling at the random number generator … ha ha ha!) Stalled charge.

        Treebeard charges, and rolls to charge Formation #1. He rolls a 4 - good. Formation #1 takes their Courage Test for Treebeard's Terror special rule. They roll a 3 and a 4. Adding their Courage Value (3) it totals 10, so the test is passed (again barely).

        Fight Phase

        Treebeard gets to attack first (even though he does not have priority - due to Striking Order). He rolls 3 dice for his Attack Value, an additional die for Charging, and 5 additional dice for his Battle Skill bonus. He needs 3+'s To Hit. This means he gets 9 dice to roll: 3, 3, 4, 3, 5, 3, 1, 5, & 5. This kills 8 Isengard Warriors - there goes the first company from Formation #1.

        Isengard now gets to attack. Formation #1 rolls 8 dice for the direct company and only 2 more for the two remaining supporting companies (since Striking Order claimed its casualties already). They need 6/2+'s To Hit (S:4 vs D:10). Rolling their 10 dice, they get: 2, 2, 1, 6, 2, 6, 2, 1, 6, & 1. Since they need 6/2's they pick up the three 6's that they rolled and re-roll them needing 2+, they get:  6, 6, & 1. So 2 hits. That means due to Treebeard's Resilience of 2 they get to roll once on the Very Hard to Kill table.

        Rolling on the Very Hard to Kill table, Isengard rolls a 6! Adding the 11 counters that are already on Treebeard means that Treebeard is slain on Round 5!!

        Fight Results

        Isengard wins - no need to check for Fight Results.

        POST MORTEM ANALYSIS

        Isengard is left with 105 Points worth of models after the fight (that is one formation comprised of three companies). And it looks like they good really lucky with their rolls on the Very Hard to Kill table (getting multiple 6's giving them the extra re-rolls). Looking at Treebeard's run … he was killing an entire company's worth of models each round … so he really only needed 2.5 more rounds to win … and if the extra rolls on the Very Hard to Kill table weren't there - or weren't as good - that could totally have panned out that way! Treebeard got to dish out 175 Points worth of damage before he was killed … still not too bad. As I mentioned above, if we had used the old version of the Very Hard to Kill Table, during Round 1 Isengard would have rolled their 5 … making it a 4 … giving Treebeard 2 counters right out the gate. Then on Round 2, Isengard would have rolled their 6 … making it a 5 … adding the 2 existing counter would be enough to kill Treebeard - and he would have only killed 14 warriors (only a single company from Formation #2) - effectively dealing only 35 Points worth of damage before he was killed.

        It looks to me like we've got a pretty good balance with this new variation of the Very Hard to Kill Rule. What does everyone else think?


        LINKS TO OTHER PARTS OF THE HARD TO KILL SERIES

        1. Overview of the Problem [Part 1/5]
        2. Hard to Kill! Rule [Part 2/5]
        3. Very Hard to Kill! Rule [Part 3/5]
        4. Extremely Hard to Kill! Rule [Part 4/5]
        5. Ridiculously Hard to Kill! Rule [Part 5/5]

        Tuesday, November 25, 2014

        The Forgotten Kingdoms Unit Cost Analysis - Good's Use of the Monster Hero Profile

        I think we have a pretty good baseline, now, with the profile posts we have analyzed so far. Next up is The Forgotten Kingdoms. We have already seen the Monster Hero profile working within the Mordor analysis, and now it is the Good Guy's turn to "monster it up".

        THE FORGOTTEN KINGDOMS WARRIORS


        I'm not sure if anyone has noticed this before, but there are only 4 companies of Warriors available to this army:
        • Hobbit Militia
        • Hobbit Archer Militia
        • Wardens of the Carrock
        • Woses Warband
        It seems like this army was intended mostly to be used as Allies for other armies, and not necessarily its own stand alone army ... well, I guess that's not entirely true - you could field an army of Monsters and just storm around ... and now that we have "fixed" the "Hard to Kill!" rule, that might actually be more viable. It would be interesting to see a fielded 1500 Point Forgotten Kingdoms Army comprised of Hobbits (there would be a TON of them) and Monsters - but could you imagine forking out all the money needed to buy Hobbit Miniatures?!?

        THE FORGOTTEN KINGDOMS WARMACHINES


        Cost 5 Monsters:
        • Ent
        Cost 6 Monster Heroes:
        • Great Eagle
        • Tom Bombadil
        Cost 7 Monster Heroes:
        • Quickbeam
        • Beechbone
        Cost 10 Monster Heroes:
        • Treebeard
        • The Three Hunters
        • Gwaihir
        • The Fellowship of the Ring
        • The White Council
        • Council of Wizardry
        Keys:
        (C) = Common Formation, (R) = Rare Formation, (L) = Legendary Formation
        [I] = Infantry, [H] = Cavalry, [A] = Artillery, [M] = "Monster", [MH] = "Monster Hero"
        • (L) [MH] The Three Hunters - Underpriced by 34%
        • (L) [MH] Beechbone - Underpriced by 16%
        • (L) [MH] Quickbeam - Underpriced by 14%
        • (L) [MH] Gwaihir - Underpriced by 11%
        • (L) [I] Wardens of the Carrock - Underpriced by 10%
        • (C) [MH] Great Eagle - Underpriced by 10%
        • (L) [MH] Council of Wizardry - Underpriced by 8%
        • (L) [MH] Treebeard - Underpriced by 2%
        • (C) [M] Ent - Accurately Priced (0% deviation)
        • (L) [I] Woses Warband - Accurately Priced (0% deviation)
        • (L) [MH] The White Council - Overpriced by 8%
        • (L) [MH] The Fellowship of the Ring - Overpriced by 11%
        • (C) [I] Hobbit Militia - Overpriced by 100%
        • (L) [MH] Tom Bombadil - Overpriced by 111%
        • (C) [I] Hobbit Archer Militia - Overpriced by 200%
        Wow, Hello Legendary Monster Heroes for cheap! Obviously if you want to play a lot of big monsters on the good side - this is definitely your army!

        Applying the template from cheapest (weakest stat-wise) to most expensive (most powerful) gives:
        • 5 Points per Company:
          • (C) [I] Hobbit Militia
          • (C) [I] Hobbit Archer Militia
        • 25 Points per Company:
          • (L) [I] Woses Warband
        • 50 Points per Company:
          • (L) [I] Wardens of the Carrock
        • 95 Points:
          • (L) [MH] Tom Bombadil
        • 125 Points:
          • (C) [M] Ent
        • 155 Points:
          • (C) [MH] Great Eagle
        • 160 Points:
          • (L) [MH] Beechbone
        • 175 Points:
          • (L) [MH] Quickbeam
        • 225 Points:
          • (L) [MH] Gwaihir
        • 230 Points:
          • (L) [MH] Treebeard
        • 265 Points:
          • (L) [MH] The Three Hunters
        • 450 Points:
          • (L) [MH] The Fellowship of the Ring
        • 465 Points:
          • (L) [MH] The White Council
        • 545 Points:
          • (L) [MH] Council of Wizardry
        Ahh, yes - much better! That makes a lot more sense seeing it laid out this way!


        THE FELLOWSHIP OF THE RING UPGRADE

        The upgrade that is available to The Fellowship of the Ring is Bill the Pony. Reading the special rule associated to Bill the Pony, he is basically an Epic Hornblower. We think that this upgrade should cost a total of 15 Points since all it does is provide a Move Value increase of +2 for a single company. Looking at the Hero Baseline Profile each point of Move Value would cost +/- 5 points (thus 10 Points for the +2 Move Value points and 5 because it is an upgrade).

        A NOTE ON GWAIHIR

        It seems like whenever there is a Monster Hero that is worthy of being a "leader of monsters" (e.g., Treebeard or Mordor Troll Chieftain) they come along with a "<Race> Charge" special rule that applies to the race of which they are a member. It would make sense for Gwaihir to have the "Eagle Charge" special rule as well [in fact we have already included that in his cost above].


        THE FORGOTTEN KINGDOMS HEROES

        Key: (C) = Command Hero, (L) = Legendary Hero, (E) = Epic Hero
        • (E) Radagast the Brown - Underpriced by 33%
        • (E) Saruman the White - Underpriced by 31%
        • (L) Grimbeorn - Underpriced by 29%
        • (E) Gandalf the Grey - Underpriced by 27%
        • (L) Ghan-buri-ghan - Underpriced by 12%
        • (E) Gandalf the White - Underpriced by 2%
        • (C) Civic Leader HAM - Overpriced by 150%
        • (C) Civic Leader HM - Overpriced by 233%
        Sorting by the cost calculated by the template from cheapest (weakest stat-wise) to most expensive (most powerful) - of course, all the awesome characters (Epic Heroes) are now at the bottom of the list … most powerful and most expensive (as we have seen time-and-again):
        • Heroes that should cost 15 Points:
          • (C) Civic Leader HM
        • Heroes that should cost 20 Points:
          • (C) Civic Leader HAM
        • Heroes that should cost 85 Points:
          • (L) Grimbeorn
          • (L) Ghan-buri-ghan
        • Heroes that should cost 240 Points:
          • (E) Radagast the Brown
        • Heroes that should cost 275 Points:
          • (E) Gandalf the Grey
        • Heroes that should cost 290 Points:
          • (E) Saruman the White
        • Heroes that should cost 305 Points:
          • (E) Gandalf the White