Showing posts with label Cartesian Coordinate Axis Frame. Show all posts

Thursday, July 28, 2016

WFMC Mobile - Art for Misty Mountains Companies and Formations of Various Supported Types [Part 8/11]

Here is the set for the Misty Mountains! The army list is very varied and comprised of Infantry Formations, Cavalry Formations, Monsters of all shapes and sizes and the Small Artillery-like Formation (the Goblin Scribe).


Let's go through each of the formations shown above, so you can get an idea of what they represent. I'll start at the top-right ... There is a medium sized monster (50 mm base) which is one of the Cave Trolls from the Moria List. To the left of that is a formation of Cloud of Bats comprised of 9 companies in 3x3 Configuration. Below the bats is a formation of Moria Goblin Warband - comprised of 9 companies in 4x3 Configuration. Up and to the left, there is a small monster formation (25 mm base) - this is a Gundabad Blacksheild Goblin and provides a more "skirmish" feel to the army. Down and to the left is the Extra Large Monster oval base - This is a Dragon of Ancient Times, ready to wreck havock on some Dwarves! Up and to the left is a Large Monster Base (60 mm) ... this is a Balrog. And finally, in the bottom left corner is the Goblin Scribe, also a Monster Hero.

How exciting! Moria definitely has their share of Monster Formations ... with all those ready to run amock, I wish i was playing and not just drawing art!

Any input, thoughts, concerns, suggestions or idea? As always they are all welcome!


LINKS TO OTHER PARTS OF THE WFMC PROGRESS SERIES
Help make WFMC Mobile get released to the Apple App Store with a donation!


    LINKS TO OTHER PARTS OF MOVEMENT TYPES AND LIMITS SERIES

    • Movement Types and Limits Series - Reconfiguration Movement of Cavalry Formations Comprised of 2-3 Companies [Part 11/23]
    • Movement Types and Limits Series - Reconfiguration Movement of Cavalry Formations Comprised for 4 Companies [Part 12/23]
    • Movement Types and Limits Series - Reconfiguration Movement of Cavalry Formations Comprised of 5 Companies [Part 13/23]
    • Movement Types and Limits Series - Reconfiguration Movement of Cavalry Formations Comprised of 6 Companies [Part 14/23]
    • Movement Types and Limits Series - Reconfiguration Movement of Cavalry Formations Comprised of 7 Companies [Part 15/23]
    • Movement Types and Limits Series - Reconfiguration Movement of Cavalry Formations Comprised of 8 Companies [Part 16/23]
    • Movement Types and Limits Series - Reconfiguration Movement of Infantry Formations Comprised of 9 Companies [Part 17/23]
    • Movement Types and Limits Series - Cavalry Movement Example 1 from Page 33 of WotR Rulebook Analysis [Part 18/23]
    • Movement Types and Limits Series - Cavalry Movement Example 2 from Page 33 of WotR Rulebook Analysis [Part 19/23]
    • Movement Types and Limits Series - Cavalry Movement Example 3 from Page 33 of WotR Rulebook Analysis [Part 20/23]
    • Movement Types and Limits Series - Reconfiguration Summary of Cavalry Formations by Company Size [Part 21/23]
    • Movement Types and Limits Series - Cavalry Restrictions of Reconfiguration by Formation Name Summary [Part 22/23]
    • Using WFMC to Verify Movement Examples [Part 23/23]


    LINKS TO OTHER PARTS OF THE WFMC MOBILE ART SERIES

      Wednesday, May 25, 2016

      WFMC - Continuing to Implement the Mobile Version on iPhone/iPad [Part 11/12]

       I've made a little more head-way on the Mobile Version of WFMC and thought everyone would be interested to see some screenshots.


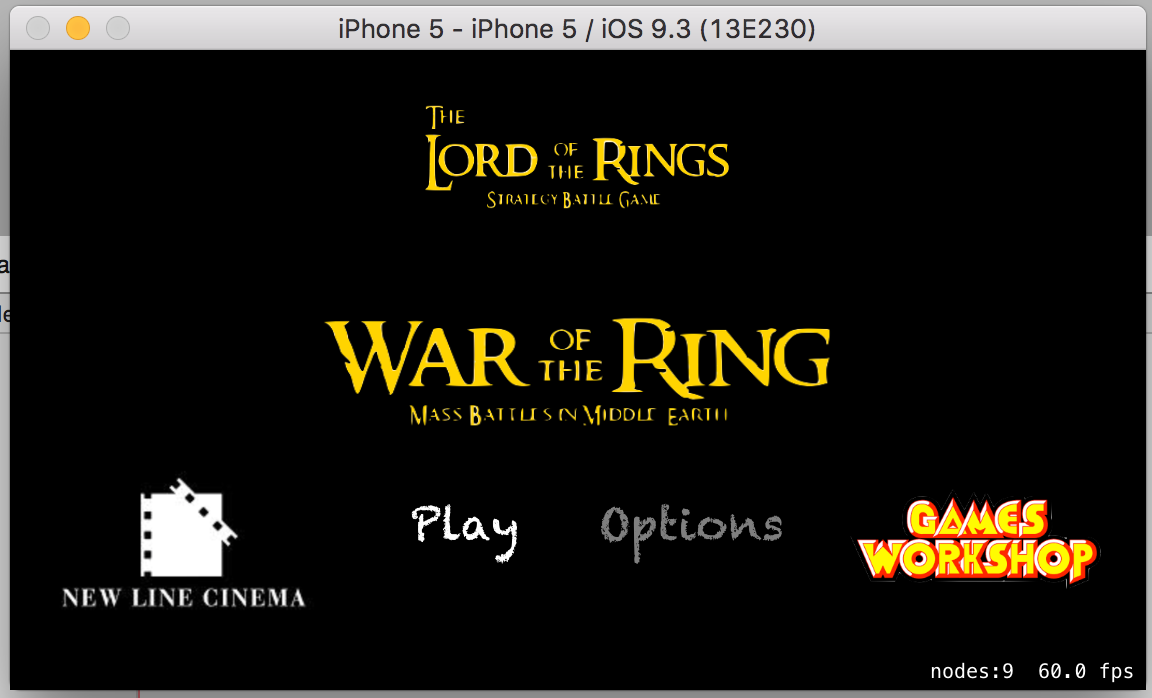
      Here is the Launch Screen. Notice that it is similar to what was drawn out in Part 10/12 (as expected - lol). You can click on the "Play" label (as of right now the "Options" label is still disabled) and it takes you to the next Screen.


      This is the Play Options screen. When you click on "Play" on the previous screen it brings you here. Similarly, the "Custom Play" option is still disabled and getting worked. Clicking on "Quick Play" takes you straight to the Priority Phase for the game.


      This is the screen for the Priority Phase. The round at the top shows you which round it currently is - as well as who has the Priority from the previous round (marked with the One Ring). The players can click on the dice icon to "roll" and it will keep track of what values have been rolled. Likewise, the target button at the top right is the "Intervention" button that allows the "other player" to intervene with Might Modifications or other Active Special Rules that have applicability to the Priority Phase. The icon at the bottom right is the "Modify" button that allows the "current player" to intervene with Might Modifications to their roll. The door button at the bottom left is the "Done" button that allows the Priority Phase to be completed and move on to the Move Phase after both players have rolled for Priority and the victor for priority for the current round has been determined.


      I have a screen for the Move and Magic Phase - but I just have not included them. The next screenshot is the Shoot Phase. Here, Player 2 has priority for the round, but the Isengard Formation doesn't have any ballistic capabilities, so then Player 1 gets to perform his shooting attacks. The Gondor Formation of Minas Tirith Archers are shooting at short range (you can't see it but the long range is actually a lighter shade of alpha'ed green. Also, notice that it is only showing the command company for range - this is something that needs to be fixed as well ... so that all 3 front companies are included when drawing in the "in range" cone.


      Here is the Charge Phase. Again, Player 2 had the priority for the phase, but the Isengard Formation stalled its charge - so now the Gondor Formation can attempt to charge. Notice that it shows the "required roll value" by the shade of Red - where in this case a 4 is needed to reach the Isengard Formation dead on and a roll of 4-6 will "reach".


      So, there we have it so far ... I know it doesn't look like much yet ... since it is still getting underway ... but, believe me, that was a lot of work just to get it to this point! Any thoughts, comments or suggestions are of course welcome. I look forward to what the greater community has to say.


      LINKS TO OTHER PARTS OF THE WFMC PROGRESS SERIES
      Help make WFMC Mobile get released to the Apple App Store with a donation!


        LINKS TO OTHER PARTS OF MOVEMENT TYPES AND LIMITS SERIES

        • Movement Types and Limits Series - Reconfiguration Movement of Cavalry Formations Comprised of 2-3 Companies [Part 11/23]
        • Movement Types and Limits Series - Reconfiguration Movement of Cavalry Formations Comprised for 4 Companies [Part 12/23]
        • Movement Types and Limits Series - Reconfiguration Movement of Cavalry Formations Comprised of 5 Companies [Part 13/23]
        • Movement Types and Limits Series - Reconfiguration Movement of Cavalry Formations Comprised of 6 Companies [Part 14/23]
        • Movement Types and Limits Series - Reconfiguration Movement of Cavalry Formations Comprised of 7 Companies [Part 15/23]
        • Movement Types and Limits Series - Reconfiguration Movement of Cavalry Formations Comprised of 8 Companies [Part 16/23]
        • Movement Types and Limits Series - Reconfiguration Movement of Infantry Formations Comprised of 9 Companies [Part 17/23]
        • Movement Types and Limits Series - Cavalry Movement Example 1 from Page 33 of WotR Rulebook Analysis [Part 18/23]
        • Movement Types and Limits Series - Cavalry Movement Example 2 from Page 33 of WotR Rulebook Analysis [Part 19/23]
        • Movement Types and Limits Series - Cavalry Movement Example 3 from Page 33 of WotR Rulebook Analysis [Part 20/23]
        • Movement Types and Limits Series - Reconfiguration Summary of Cavalry Formations by Company Size [Part 21/23]
        • Movement Types and Limits Series - Cavalry Restrictions of Reconfiguration by Formation Name Summary [Part 22/23]
        • Using WFMC to Verify Movement Examples [Part 23/23]


        LINKS TO OTHER PARTS OF THE WFMC MOBILE ART SERIES

          Sunday, May 1, 2016

          WFMC - Starting the Implementation of the Mobile Version on iPhone/iPad [Part 10/12]

          So, I was inspired and figured that I would use my Friday snow day starting the mobile application for WFMC that I was talking about ...


          In the 8 hours that I had to spend working on the application, I was able to get the mobile version instantiated and get it to draw the formations in the proper configuration. You can also see that I have the dice rolling working and drawing to the screen. Even though it doesn't look like much, yet; I am pleased with the progress that has been made ... I can change the configuration of the formation and have it draw correctly. I also have it mark which company is the command company (outlined in Red). Just getting this far was a lot more work than I thought it would be! Continue to stay tuned ... I am sure that more will develop as going forward!


          LINKS TO OTHER PARTS OF THE WFMC PROGRESS SERIES
          Help make WFMC Mobile get released to the Apple App Store with a donation!


            LINKS TO OTHER PARTS OF MOVEMENT TYPES AND LIMITS SERIES

            • Movement Types and Limits Series - Reconfiguration Movement of Cavalry Formations Comprised of 2-3 Companies [Part 11/23]
            • Movement Types and Limits Series - Reconfiguration Movement of Cavalry Formations Comprised for 4 Companies [Part 12/23]
            • Movement Types and Limits Series - Reconfiguration Movement of Cavalry Formations Comprised of 5 Companies [Part 13/23]
            • Movement Types and Limits Series - Reconfiguration Movement of Cavalry Formations Comprised of 6 Companies [Part 14/23]
            • Movement Types and Limits Series - Reconfiguration Movement of Cavalry Formations Comprised of 7 Companies [Part 15/23]
            • Movement Types and Limits Series - Reconfiguration Movement of Cavalry Formations Comprised of 8 Companies [Part 16/23]
            • Movement Types and Limits Series - Reconfiguration Movement of Infantry Formations Comprised of 9 Companies [Part 17/23]
            • Movement Types and Limits Series - Cavalry Movement Example 1 from Page 33 of WotR Rulebook Analysis [Part 18/23]
            • Movement Types and Limits Series - Cavalry Movement Example 2 from Page 33 of WotR Rulebook Analysis [Part 19/23]
            • Movement Types and Limits Series - Cavalry Movement Example 3 from Page 33 of WotR Rulebook Analysis [Part 20/23]
            • Movement Types and Limits Series - Reconfiguration Summary of Cavalry Formations by Company Size [Part 21/23]
            • Movement Types and Limits Series - Cavalry Restrictions of Reconfiguration by Formation Name Summary [Part 22/23]
            • Using WFMC to Verify Movement Examples [Part 23/23]


            LINKS TO OTHER PARTS OF THE WFMC MOBILE ART SERIES

            Monday, March 28, 2016

            Movement Types and Limits Series - Reconfiguration Movement of Infantry Formations Comprised of 6 Companies [Part 5/23]


            This post will cover formation that are comprised of 6 infantry companies and will provide images to help determine the proper initial and final location of companies while undergoing the reconfiguration and provide the movement costs associated with the movement.


            WARNING: THIS IS GOING TO BE A LONG POST FOR THE VARIOUS PERMUTATIONS OF CASES THAT NEED TO BE COVERED!


            So, it appears that Company 6 has the furthest move distance, this means that to reconfigure from Line (6x1) configuration to compact 1 (5x2) configuration would require a move distance of 13.21".


            So, it appears that Company 5 has the furthest move distance, this means that to reconfigure from Compact 1 (5x2) configuration to compact 2 (4x2) configuration would require a move distance of 8.98".


            So, it appears that Company 4 has the furthest move distance, this means that to reconfigure from Compact 2 (4x2) configuration to compact 3 (3x2) configuration would require a move distance of 8.98".


            So, it appears that Company 6 has the furthest move distance, this means that to reconfigure from Compact 3 (3x2) configuration to compact 4 (2x3) configuration would require a move distance of 8.98".


            So, it appears that Company 6 has the furthest move distance, this means that to reconfigure from Compact 4 (2x3) configuration to column (1x6) configuration would require a move distance of 8.31".


            So, it appears that Company 5&6 have the furthest move distance, this means that to reconfigure from Line (6x1) configuration to compact 2 (4x2) configuration would require a move distance of 8.98".


            So, it appears that Company 6 has the furthest move distance, this means that to reconfigure from Line (6x1) configuration to compact 3 (3x2) configuration would require a move distance of 17.48". This means that a formation with a move value of 6" would require a Heroic Move to perform this reconfiguration move.


            So, it appears that Company 5&6 have the furthest move distance, this means that to reconfigure from Line (6x1) configuration to compact 4 (2x3) configuration would require a move distance of 9.87".


            So, it appears that Company 6 has the furthest move distance, this means that to reconfigure from Line (6x1) configuration to Column (1x6) configuration would require a move distance of 17.56".


            So, it appears that Company 5 has the furthest move distance, this means that to reconfigure from Compact 1 (5x2) configuration to compact 3 (3x2) configuration would require a move distance of 13.21".


            So, it appears that Company 5 has the furthest move distance, this means that to reconfigure from Compact 1 (5x2) configuration to compact 4 (2x3) configuration would require a move distance of 9.87".


            So, it appears that Company 5 has the furthest move distance, this means that to reconfigure from Compact 1 (5x2) configuration to Column (1x6) configuration would require a move distance of 12.82". Again, this would require a Heroic Move to accomplish this reconfiguration for a formation with a move value of 6".


            So, it appears that Company 3&4 have the furthest move distance, this means that to reconfigure from Compact 2 (4x2) configuration to compact 4 (2x3) configuration would require a move distance of 4.93". It is interesting to note that this is the only reconfiguration for 6 infantry companies that does not require an "At the Double" or Heroic Move.


            So, it appears that Company 4 has the furthest move distance, this means that to reconfigure from Compact 2 (4x2) configuration to Column (1x6) configuration would require a move distance of 11.19".


            So, it appears that Company 6 has the furthest move distance, this means that to reconfigure from Compact 3 (3x2) configuration to Column (1x6) configuration would require a move distance of 10.39".


            SUMMARY (for Infantry Formation Comprised of 6 Companies with Move Value of 6")


            LINKS TO OTHER PARTS OF THE WFMC PROGRESS SERIES


              LINKS TO OTHER PARTS OF MOVEMENT TYPES AND LIMITS SERIES


              • Movement Types and Limits Series - Reconfiguration Movement of Cavalry Formations Comprised of 2-3 Companies [Part 11/23]
              • Movement Types and Limits Series - Reconfiguration Movement of Cavalry Formations Comprised for 4 Companies [Part 12/23]
              • Movement Types and Limits Series - Reconfiguration Movement of Cavalry Formations Comprised of 5 Companies [Part 13/23]
              • Movement Types and Limits Series - Reconfiguration Movement of Cavalry Formations Comprised of 6 Companies [Part 14/23]
              • Movement Types and Limits Series - Reconfiguration Movement of Cavalry Formations Comprised of 7 Companies [Part 15/23]
              • Movement Types and Limits Series - Reconfiguration Movement of Cavalry Formations Comprised of 8 Companies [Part 16/23]
              • Movement Types and Limits Series - Reconfiguration Movement of Infantry Formations Comprised of 9 Companies [Part 17/23]
              • Movement Types and Limits Series - Cavalry Movement Example 1 from Page 33 of WotR Rulebook Analysis [Part 18/23]
              • Movement Types and Limits Series - Cavalry Movement Example 2 from Page 33 of WotR Rulebook Analysis [Part 19/23]
              • Movement Types and Limits Series - Cavalry Movement Example 3 from Page 33 of WotR Rulebook Analysis [Part 20/23]
              • Movement Types and Limits Series - Reconfiguration Summary of Cavalry Formations by Company Size [Part 21/23]
              • Movement Types and Limits Series - Cavalry Restrictions of Reconfiguration by Formation Name Summary [Part 22/23]
              • Using WFMC to Verify Movement Examples [Part 23/23]

              Tuesday, March 15, 2016

              Movement Types and Limits Series - Reconfiguration Movement of Infantry Formations Comprised of 5 Companies [Part 4/23]


              After reviewing several of the older posts for reconfiguring formations, I noticed that the images that were included with the 5 Company reconfigurations were "off". As such, I've decided to revisit this thread of posts and continue to provide clarification and calculations. This post will deal with  Infantry Formations that are comprised of 5 Companies and their associated permutations of reconfiguration and the movement cost associated with those reconfigurations.


              WARNING: THIS IS GOING TO BE A LONG POST FOR THE VARIOUS PERMUTATIONS OF CASES THAT NEED TO BE COVERED!


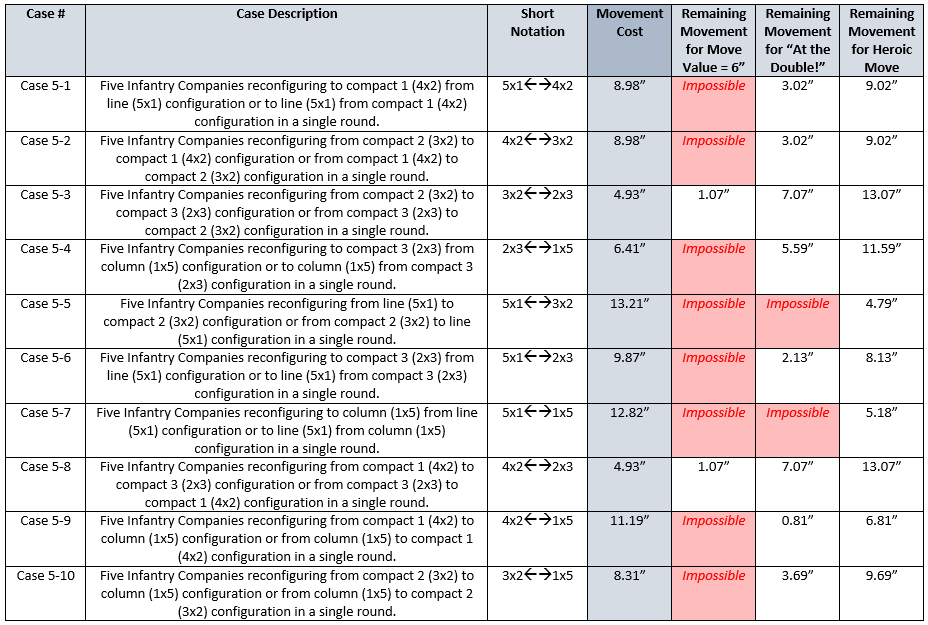
              For Case 5-1 it appears that the worst case movement is Company 5. So reconfiguring in this fashion would require a Move of 8.98".


              For Case 5-2 it appears that the worst case movement is Company 4. So reconfiguring in this fashion would require a Move of 8.98".


              For Case 5-3 it appears that the worst case movement is Company 3. So reconfiguring in this fashion would require a Move of 4.93".


              For Case 5-4 it appears that the worst case movement is Company 4. So reconfiguring in this fashion would require a Move of 6.41".


              For Case 5-5 it appears that the worst case movement is Company 5. So reconfiguring in this fashion would require a Move of 13.21".


              For Case 5-6 it appears that the worst case movement is Company 5. So reconfiguring in this fashion would require a Move of 9.87".


              For Case 5-7 it appears that the worst case movement is Company 5. So reconfiguring in this fashion would require a Move of 12.82". Oh, now this is interesting ... This means that for a Formation that has a Move Value of 6" the only way to perform this type of reconfiguration in a single round would be to expend Might and perform a Heroic Move.


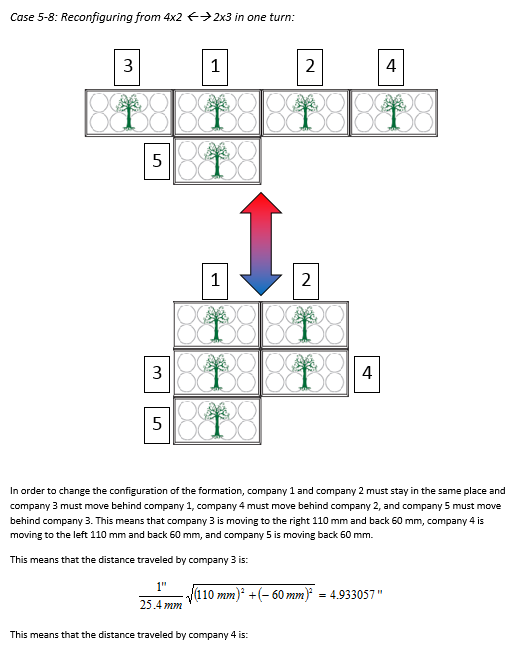
              For Case 5-8 it appears that the worst case movement is Company 3 or 4. So reconfiguring in this fashion would require a Move of 4.93".


              So, for Case 5-9 it appears that the worst case movement is Company 4. So reconfiguring in this fashion would require a Move of 11.19". For a Formation with Move Value 6" this is still barely doable with an "At the Double!".


              For Case 5-10 it appears that the worst case movement is Company 5. So reconfiguring in this fashion would require a Move of 8.31".


              SUMMARIES (for the 5 Company Formation)


              LINKS TO OTHER PARTS OF THE WFMC PROGRESS SERIES


                LINKS TO OTHER PARTS OF MOVEMENT TYPES AND LIMITS SERIES


                • Movement Types and Limits Series - Reconfiguration Movement of Cavalry Formations Comprised of 2-3 Companies [Part 11/23]
                • Movement Types and Limits Series - Reconfiguration Movement of Cavalry Formations Comprised for 4 Companies [Part 12/23]
                • Movement Types and Limits Series - Reconfiguration Movement of Cavalry Formations Comprised of 5 Companies [Part 13/23]
                • Movement Types and Limits Series - Reconfiguration Movement of Cavalry Formations Comprised of 6 Companies [Part 14/23]
                • Movement Types and Limits Series - Reconfiguration Movement of Cavalry Formations Comprised of 7 Companies [Part 15/23]
                • Movement Types and Limits Series - Reconfiguration Movement of Cavalry Formations Comprised of 8 Companies [Part 16/23]
                • Movement Types and Limits Series - Reconfiguration Movement of Infantry Formations Comprised of 9 Companies [Part 17/23]
                • Movement Types and Limits Series - Cavalry Movement Example 1 from Page 33 of WotR Rulebook Analysis [Part 18/23]
                • Movement Types and Limits Series - Cavalry Movement Example 2 from Page 33 of WotR Rulebook Analysis [Part 19/23]
                • Movement Types and Limits Series - Cavalry Movement Example 3 from Page 33 of WotR Rulebook Analysis [Part 20/23]
                • Movement Types and Limits Series - Reconfiguration Summary of Cavalry Formations by Company Size [Part 21/23]
                • Movement Types and Limits Series - Cavalry Restrictions of Reconfiguration by Formation Name Summary [Part 22/23]
                • Using WFMC to Verify Movement Examples [Part 23/23]