Showing posts with label Fallen Realms. Show all posts

Sunday, October 9, 2016

Complete Army Profile Documents are Finally Here and Ready to Download

It is the 2 year anniversary of this blog, and appropriately the time has finally come for the PDFs with the profiles to be posted and available for download!

Head over to the download page where you can get a copy of the files that have already been updated and completed!


Why not get them, print them off and have the full set of profiles available? With nearly 300 pages of profiles already posted and available - and the remaining coming very soon - you could finally have the full set - looking consistent, with clarification and completeness finally available for your games.


Also as you can see - there are pages that are ready that have not yet been provided up on the blog ... so you get an early preview and can start playing with the new profiles immediately!


What are you waiting for? Get some now while they are marked down - before they go back to full price!

All WotR Evil Army Lists - Bundled

To download and unlock all 5 of the PDFs for Evil Armies (Mordor, Isengard, Misty Mountains, Fallen Realms, & Angmar), click the Buy Now button below! The PDF will be delivered to your email address that you provide during checkout.

$112.49 (Original Price)
$79.95 (30% Off - Purch. Individually)
$59.99 (Nearly 50% Discount!)


This is a 254 Page PDF that includes all of the Evil Lists above in a single file for batch purchase. It includes the full set of rules for Wargear, Upgrades, Special Rules, Heroic Actions & Epic Actions associated to each formation within the Army List.

Tuesday, October 20, 2015

Status Update for Progress on Profile Creation and Army List Document Writing - Evil Armies [Part 2b/13]

Here is the current progress that I have made for putting together the new army lists with the updated profiles that have already been created for the missing models in WotR for Evil Armies.

Similar to what we did for the Good Armies is in the Post for Part 1/2, I will include the current progress and the lists for each document. Recall that the headers for the colored matrix include:
  • Order Correct
  • Name Correct
  • Points Correct
  • Image Correct
  • Image Text Correct
  • Stats Correct
  • Type Correct
  • Company Size Ranges Correct
  • Wargear Correct
  • Command Correct
  • Special Rules Correct
  • Updated H2Kill Rule Used
  • Monster Striking Order
  • Cavalry Striking Order
  • Cavalry Charge
  • Unique Character/Unique Weapon
  • Heroic Actions Included
  • Epic Actions Included
  • Magic Included
  • Profile Proofread
  • Borders Correct
Each cell is marked with a Red No, a Green Yes, or a Yellow N/A. If the header item hasn't been implemented or verified it is marked Red, if it is completely correct it is marked Green - and if the profile does not have any applicability to a header (i.e. the profile is not a monster or cavalry) then they are marked Yellow.

1) Mordor


Here is a close-up of the profile list on the left:


As you already know (from the previous post) Mordor's Army List is 100% complete. When finished it turned out be a 63 page document - Mostly due to the large number of Magic Casting Monsters that are included in the Army! Everything has been written and the only remaining thing to do is to create it and secure it via PDF and put it up on the downloads page.

The current completion status for the 34 profiles within Mordor: 100%

2) The Fortress of Isengard


Here is the profile list for The Fortress of Isengard:


The profiles for The Fortress of Isengard are the next closest set to be ready to be done. There are a few Legendary Formations that need to be completed - including the new Legendary Formation for Sharkey and Worm! Notice that there is also a name change for the Ruffians - to distinguish it from the Legendary Formation that is coming. I'm fairly certain that this one will be the next one to have its post put up for the purple profiles.

The current completion status for the 29 profiles within The Fortress of Isengard is: 100%

3) The Misty Mountains (Moria)


Here is the profile list for The Misty Mountains:


This Army List still has a ways to go - and has the majority of impacts for new profiles (including Smaug and Gollum, Riddler in the Dark - necessitating the name change in Mordor's Army List). Once this is done in conjunction with the Dwarf List - everyone will be pretty excited, I'm sure. Actually, it's been a while since I've done the Audit on this list ... it is actually mostly likely further along than this is indicating - because I know that Durburz and Druzhag's profiles are both complete.

The current completion status for the 26 profiles within The Misty Mountains (Moria) is: 16%

4) The Fallen Realms


Here is the profile list for The Fallen Realms:


The Army List for the Fallen Realms is complete! It has been updated with a full set of profiles that existed in SBG but had been omitted from WotR..

The current completion status for the 38 profiles within The Fallen Realms is: 100%

5) Angmar


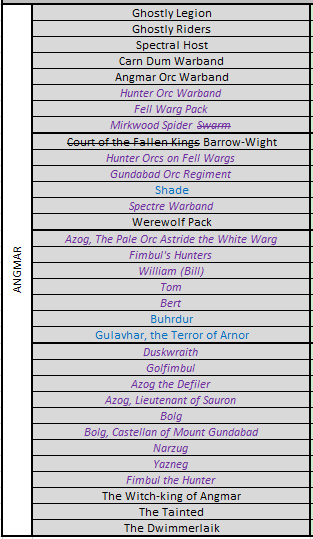
Here is the profile list for Angmar:


This is another list that required a lot of new profile updates. The only reason that this one is so "incomplete" is just due to the fact that there are so many new profiles to be added to this Army List. The updates that have been made make Angmar a more "smart-person" type of Army ... it will require a lot of anticipation for enemy movements and puts more emphasis on the importance of Priority.

The current completion status for the 33 profiles within Angmar is: 100%.

So, there we go - keep you eyes peeled for more updates coming soon!! It is definitely getting exciting!


LINKS TO OTHER PARTS OF THE SBG TO WOTR CONVERSION SERIES

  1. Describing the Process [Part 1/13]
  2. Creating the Full List of Needed Profiles and Assigning WotR Armies [Part 2/13]
    1. Status Update for Progress on Profile Creation and Army List Document Writing - Good Armies [Part 2a/13]
    2. Status Update for Progress on Profile Creation and Army List Document Writing - Evil Armies [Part 2b/13]
  3. Extending the Gondor & Arnor List [Part 3/13]
  4. Extending The Kingdom of Rohan List [Part 4/13]
  5. Extending The Elven Kingdoms List [Part 5/13]
  6. Extending The Dwarf Holds List [Part 6/13]
    1. Sneak Peak at the Profiles for Thorin [Part 6a/13]
    2. Common Formations [Part 6b/13]
    3. Legendary Formations [Part 6c/13]
    4. Epic Heroes [Part 6d/13]
  7. Creating The City of Dale List [Part 7/13]
  8. Extending The Forgotten Kingdoms List [Part 8/13]
  9. Extending the Mordor List [Part 9/13]
  10. Extending The Fortress of Isengard List [Part 10/13]
  11. Extending The Misty Mountains (Moria) List [Part 11/13]
  12. Extending The Fallen Realms List [Part 12/13]
  13. Extending the Angmar List [Part 13/13]
    1. Common and Rare Formations [Part 13a/13]
    2. Legendary Formations [Part 13b/13]
    3. Epic Heroes [Part 13c/13]


    Tuesday, September 15, 2015

    WotR Magic - Updates to the Rules for the Spells of Darkness [Part 5/7]

    Here is the final part of updates to Magic Spell Lists for WotR. The last one in the queue is the Spells of Darkness. Ironically it is also the set that has the most changes to the text. Let's get on with it - I know that everyone is patiently waiting for the updates!

    The set of magic users that have access to the Spells of Darkness are as follows:


     As you would expect, the Darkness Users are all Evil (with the exception of Saruman in the Forgotten Kingdoms list - again who is still technically Evil). Also, the majority of the users are within the Mordor, Fallen Realms, and Angmar lists.

    ON WITH THE UPDATES!


    Awesome! Notice that the special rules for Epic Strike and Take Aim take precedence over the Magic Spells. We will get more into this in a future post where we will discuss resolution order based upon the "epic-ness" of the special rules in effect.

    Also, as an aside, I've been working hard on compiling the updates for the Hobbit and Warbands models into my Army Lists ... The Elven Kingdoms is about 95% done, Gondor & Arnor is about 75% done, and Angmar is about 70% done. Perhaps in the near future those will be available to be posted and downloaded for your pleasure and use!


    Saturday, January 31, 2015

    Fallen Realms Epic Hero Special Rule Applicability [Part 9/10]

    Next up is the Epic Heroes from the Fallen Realms, let us look at the individual special rules that each of the Epic Heroes have and determine what applicability they have to the Hero themselves, the Hero's current company, the Hero's current formation, or another target all together.


    LINKS TO OTHER SPECIAL RULE EVALUATION POSTS
    1. Gondor & Arnor Epic Heroes' Special Rules [Part 1/10]
    2. The Kingdom of Rohan Epic Heroes' Special Rules [Part 2/10]
    3. The Elven Kingdoms Epic Heroes' Special Rules [Part 3/10]
    4. The Dwarf Holds Epic Heroes' Special Rules [Part 4/10]
    5. The Forgotten Kingdoms Epic Heroes' Special Rules [Part 5/10]
    6. Mordor Epic Heroes' Special Rules [Part 6/10]
    7. The Fortress of Isengard Epic Heroes' Special Rules [Part 7/10]
    8. The Misty Mountains (Moria) Epic Heroes' Special Rules [Part 8/10]
    9. The Fallen Realms Epic Heroes' Special Rules [Part 9/10]
    10. Angmar Epic Heroes' Special Rules [Part 10/10]

    LINKS TO OTHER UNIT COST ANALYSIS POSTS

    Monday, January 26, 2015

    The Fallen Realms Unit Cost Analysis

    We have already covered the massive beast that belongs to The Fallen Realms, The Mumak, in the post for the Ridiculously Hard to Kill rule and got to see it in action (even if it ended up dying - it was still entertaining to see it trampling and stampeding over some warriors). Let's look at the remainder of the army to determine if it is well balanced and what point adjustments would be appropriate for the warriors of the East.

    FALLEN REALMS WARRIORS

    • (R) [I] Corsair Arbalesters - Underpriced by 17%
    • (C) [I] Easterling Cohort - Underpriced by 14%
    • (C) [I] Khandish Mercenary Warband - Accurately Priced (0% deviation)
    • (R) [I] Mahud Warband - Accurately Priced (0% deviation)
    • (R) [I] Black Numenorean Regiment - Accurately Priced (0% deviation)
    • (R) [H] Morgul Knight Regiment - Accurately Priced (0% deviation)
    • (R) [M] War Mumak of Harad - Overpriced by 6%
    • (R) [MH] Khandish King Charioteer - Overpriced by 7%
    • (C) [I] Easterling Archer Cohort - Overpriced by 17%
    • (C) [H] Easterling Kataphrakt Cohort - Overpriced by 17%
    • (R) [I] Watcher Warband - Overpriced by 17%
    • (R) [M] Khandish Charioteer - Overpriced by 18%
    • (C) [I] Serpent Guard Warband - Overpriced by 20%
    • (C) [H] Serpent Rider Warband - Overpriced by 20%
    • (R) [H] Mahud Raider Warband - Overpriced by 20%
    • (L) [I] Abrakhan Guard - Overpriced by 20%
    • (C) [I] Khandish Mercenary Warband - Overpriced by 25%
    • (C) [I] Haradrim Warband - Overpriced by 25%
    • (C) [H] Haradrim Raider Warband - Overpriced by 25%
    • (C) [I] Corsair Raiding Party - Overpriced by 67%
    • (R) [I] Half Troll Warband - Overpriced by 138%
    Sorting the Fallen Realms Warriors under the template from cheapest (weakest stat-wise) to most expensive (most powerful) gives:
    • 15 Points per Company:
      • (C) [I] Corsair Raiding Party
    • 20 Points per Company:
      • (C) [I] Khandish Mercenary Warband
      • (C) [I] Haradrim Warband
      • (C) [H] Haradrim Raider Warband
    • 25 Points per Company:
      • (C) [I] Serpent Guard Warband
      • (C) [H] Khandish Mercenary Raiders
      • (C) [H] Serpent Rider Warband
      • (R) [H] Mahud Raider Warband
      • (L) [I] Abrakhan Guard
    • 30 Points per Company:
      • (C) [I] Easterling Archer Cohort
      • (C) [H] Easterling Kataphrakt Cohort
      • (R) [I] Corsair Arbalesters
      • (R) [I] Mahud Warband
      • (R) [I] Watcher Warband
    • 35 Points per Company:
      • (C) [I] Easterling Cohort
      • (R) [I] Black Numenorean Regiment
      • (R) [H] Morgul Knight Regiment
    • 40 Points per Company:
      • (R) [I] Half Troll Warband
    • 85 Points per Company:
      • (R) [M] Khandish Charioteer
    • 140 Points per Company:
      • (R) [MH] Khandish King Charioteer
    • 235 Points per Company:
      • (R) [M] War Mumak of Harad

    OK, this is interesting - it seems like the Fallen Realms is in the same boat as the Elves. They are absurdly overpriced and the only ones that are reasonable are rare formations - which would require a bunch of Easterlings or Khandish Mercenaries (the latter of which are all metal, of course) just to bring them along.


    FALLEN REALMS HEROES
    • (E) Khamul the Easterling - Underpriced by 40%
    • (E) The Knight of Umbar - Underpriced by 40%
    • (E) The Betrayer - Underpriced by 40%
    • (E) The Undying - Underpriced by 40%
    • (E) The Shadow Lord - Underpriced by 40%
    • (E) The Dark Marshal - Underpriced by 40%
    • (E) Queen Beruthiel - Underpriced by 35%
    • (L) The Golden King - Underpriced by 23%
    • (C) Morgul Knight Commander - Underpriced by 17%
    • (C) Serpent Guard Chieftain [SRW] - Underpriced by 9%
    • (C) Black Numenorean Marshal - Underpriced by 9%
    • (E) Dalamyr, Fleetmaster of Umbar - Underpriced by 5%
    • (C) Serpent Guard Chieftain [SGW] - Accurately Priced (0% deviation)
    • (C) Dragon Knight [EC] - Accurately Priced (0% deviation)
    • (C) Dragon Knight [EKC] - Accurately Priced (0% deviation)
    • (E) Suladan, the Serpent Lord - Overpriced by 7%
    • (C) Haradrim Chieftain [HRW] - Overpriced by 11%
    • (C) Khandish Chieftain [KMR] - Overpriced by 11%
    • (C) Easterling Captain [EC] - Overpriced by 11%
    • (C) Easterling Captain [EKC] - Overpriced by 11%
    • (C) Captain of Kataphrakts [EKC] - Overpriced by 11%
    • (C) Haradrim Chieftain [HW] - Overpriced by 25%
    • (C) Hasharin [SGW] - Overpriced by 25%
    • (C) Corsair Captain [CA] - Overpriced by 25%
    • (E) Amdur, Lord of Blades - Overpriced by 32%
    • (C) Corsair Bo'sun [CRP] - Overpriced by 43%
    • (C) Mahud Chieftain [MW] - Overpriced by 43%
    • (C) Mahud Chieftain [MRW] - Overpriced by 43%
    • (C) Easterling War Priest [EC] - Overpriced by 54%
    • (C) Easterling War Priest [EAC] - Overpriced by 54%
    • (C) Easterling War Priest [EKC] - Overpriced by 54%
    • (C) Corsair Captain [CRP] - Overpriced by 67%
    • (C) Khandish Chieftain [KMW] - Overpriced by 67%
    OK, looks like cheap Epic Heroes for the Fallen Realms - but to bring along a command hero is anything but cost effective. The good news is that we've seen this before, and it gets easily corrected with the template. Sorting by the cost calculated by the template from cheapest (weakest stat-wise) to most expensive (most powerful):
    • Heroes that should cost 30 Points:
      • (C) Corsair Captain [CRP]
      • (C) Khandish Chieftain [KMW]
    • Heroes that should cost 35 Points:
      • (C) Dragon Knight [EC]
      • (C) Dragon Knight [EKC]
      • (C) Corsair Bo'sun [CRP]
      • (C) Mahud Chieftain [MW]
      • (C) Mahud Chieftain [MRW]
    • Heroes that should cost 40 Points:
      • (C) Haradrim Chieftain [HW]
      • (C) Hasharin [HW]
      • (C) Hasharin [SGW]
      • (C) Corsair Captain [CA]
    • Heroes that should cost 45 Points:
      • (C) Haradrim Chieftain [HRW]
      • (C) Khandish Chieftain [KMR]
      • (C) Easterling Captain [EC]
      • (C) Easterling Captain [EAC]
      • (C) Captain of Kataphrakts [EKC]
    • Heroes that should cost 50 Points:
      • (C) Serpent Guard Chieftain [SGW]
    • Heroes that should cost 55 Points:
      • (C) Serpent Guard Chieftain [SRW]
      • (C) Black Numenorean Marshal
    • Heroes that should cost 60 Points:
      • (C) Morgul Knight Commander
    • Heroes that should cost 65 Points:
      • (C) Easterling War Priest [EC]
      • (C) Easterling War Priest [EAC]
      • (C) Easterling War Priest [EKC]
      • (L) The Golden King
    • Heroes that should cost 105 Points:
      • (E) Dalamyr, Fleetmaster of Umbar
    • Heroes that should cost 125 Points:
      • (E) Amdur, Lord of Blades
    • Heroes that should cost 140 Points:
      • (E) Suladan, the Serpent Lord
    • Heroes that should cost 155 Points:
      • (E) Queen Beruthiel
    • Heroes that should cost 210 Points:
      • (E) Khamul the Easterling
      • (E) The Knight of Umbar
      • (E) The Betrayer
      • (E) The Undying
      • (E) The Shadow Lord
      • (E) The Dark Marshal


    LINKS TO OTHER UNIT COST ANALYSIS POSTS
    1. Gondor & Arnor Warriors
    2. Gondor & Arnor Heroes
    3. The Kingdom of Rohan Unit Cost Analysis
    4. The Elven Kingdoms Unit Cost Analysis
    5. The Dwarf Holds Unit Cost Analysis
    6. The Forgotten Kingdoms Unit Cost Analysis
    7. Mordor Unit Cost Analysis
    8. The Fortress of Isengard Unit Cost Analysis
    9. The Misty Mountains (Moria) Unit Cost Analysis
    10. The Fallen Realms Unit Cost Analysis
    11. Angmar Unit Cost Analysis

      Tuesday, January 6, 2015

      Ridiculously Hard to Kill! The Mumak's Special Rule [Part 5/5 of the Hard to Kill Series]

      This is the end of the Series for the Hard to Kill Special Rules. This post will cover the Ridiculously Hard to Kill! Special Rule and provide an example of how one may go about fighting this thing in a game.

      The Mumakil in The Fallen Realms Army is the only formation that has this special rule. Once again, the good armies do not get any equivalent characters with it, unfortunately.


      The first thing to notice is that it has the same ranges as the Extremely Hard to Kill! rule, it just has the additional effect of removing crew members (thusly reducing its capability to Shoot during the Shoot Phase and increasing its probability of Stampeding) as wound counters are applied to the Mumakil.


      Let's go through an example and have Legolas (in the Front left company of Formation 1 - marked with an "L") and some Minas Tirith Warriors go to town on a Mumakil!


      STEP-BY-STEP EXAMPLE OF THE FIGHT

      Round 1:

      Priority Phase

      Gondor rolls a 1 and the Mumak rolls a 2. The Mumak Wins Priority for the Round.

      Move Phase

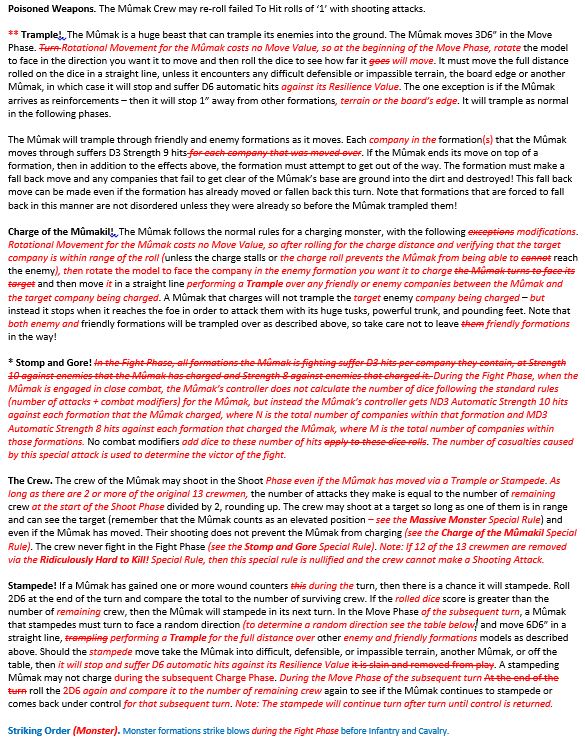
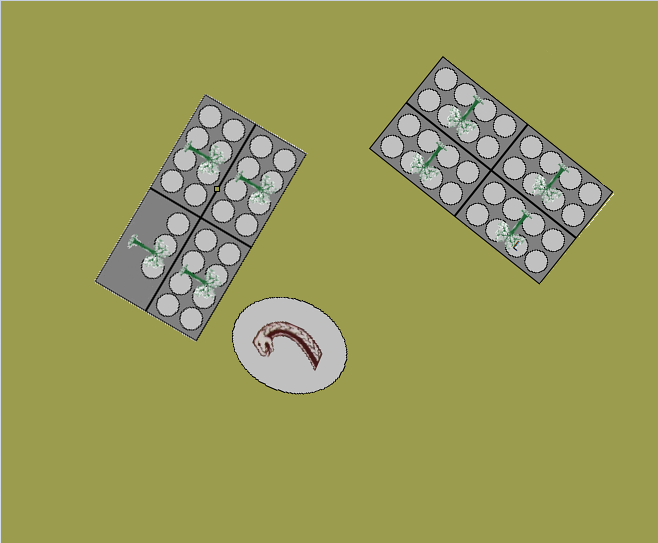
      The Mumak rotates Counter-clock-wise to aim toward Formation 2 of the Minas Tirith Warriors (recall that this rotation move cost is free under the Trample rule). For the Trample distance the Mumak rolls a 5, 3, & 6. Totaling 14" for the Move. The front two companies of Formation 2 are trampled, this means that the Mumak deals 2D3 Strength 9 hits to Formation 2. For the two dice that he rolls he gets a 5 & a 5 - that means 6 Strength 9 hits to Formation 2. Strength 9 versus Defense 7 means that he needs 3's to Wound. The six dice he rolls results in a 1, 3, 3, 3, 4, & 3 - thus 5 wounds on the Minas Tirith Warriors Formation 2. Formation 2 has to take a Fall Back! roll and rolls a 1 ... meaning that they fall back 3" (that wasn't a very good roll - but at least enough to get clear of the Mumak).

      It is now Good's turn to move. Formation 2 decides that they want to expand their frontage so that the inevitable charge from the Mumak will not be as devastating - however since the Mumak is within 6" of Formation 2, they have their Move Value halved and can only move 3". To reconfigure to a 3x2 configuration from the 2x2 would require a move of 4.93" ... so that's not possible; and to go to a 4x1 configuration from the 2x2 would also require a move of 4.93", so that's not possible, either. Guess they have to stay the way they are configured ... As for rotating ... as a 2x2 configuration with a 3" Move value, we could rotate clock-wise or counter-clock-wise 37.45-degrees - maybe a counter-clock-wise rotation would be the best move. Here's hoping! Formation 1 decided to rotate 45-degrees clock-wise so that Legolas can have Line-of-Sight to the Mumak. This uses up 3.49" of their movement value - so they have 2.51" left for translational movement. They move forward toward the  Mumak the remaining distance.

      Shoot Phase

      The Mumak has priority, so gets to shoot first. According to The Crew rule, the Mumak gets 13/2 = 6.5 Shots, rounded up to 7. The crewmembers are armed with Bows, so have a 24" Range and a Strength of 2. They decide to continue to barrage Formation 2 - since it is already a little depleted (and no matter which formation they target they will be attacking the front, so they will have Defense 7). For Strength 2 against the front of Formation 2's Defense 7 means they need 6/4's to wound. For the 7 dice, they roll: 3, 5, 5, 1, 1, 1, & 5. Due to the Poisoned Weapons special rule, they get to re-roll the 1's ... so they pick up the three 1's and get: 4, 4, & 2. No 6's - so all the shots miss. Good's turn for the Shoot Phase. Since Formation 2 has no ballistic capabilities, they cannot do anything - but Formation 1 has Legolas in it - and he decides to use his Crippling Shot special rule on the Monster. Legolas rolls a 6 for Crippling Shot - meaning that the Mumak's Resilience Value is reduced by 1 (from 2 down to 1) for the remainder of the turn. Now's the chance to go crazy! Legolas also expends a point of Might (down from 3 to 2) and calls an Epic Shot. He nominates the Mumak and deals 1D6 automatic hits to the Mumak. He rolls a 3 - meaning 3 hits against the Mumak's Resilience of 1 ... 3 rolls on the Ridiculously Hard to Kill! table. The First roll of the dice produces a die value of 2 - No Effect. The Second roll on the table produces a die value of 6 - Flesh Wound: Slay one crewman and gain 1 counter (now down to 12 crewmen) and a natural 6 gives a re-roll! The re-roll die value is 5 ... adding the one counter produces a critical value of 6 - Flesh Wound: Slaying an additional crewman and gaining another 1 counter (now down to 11 crewmen and 2 counters on the Mumak). The Third roll on the table produces a die value of 3 ... adding the 2 counters gives an attack value of 5 - Another Flesh Wound: Slaying another crewman and adding another counter (remaining crew = 10; counters = 3). Not too shabby, Mr. Legolas!

      Charge Phase

      The Mumak decides it is going to charge Formation 2. He rolls a 5 for the Charge - so the charge is successful. Having been charged by a Monster with Terror, Formation 2 rolls their courage test: 1 & 3. Adding their courage of 3 gives 7 ... not enough - so Formation 2 is reduced to Fight 0 for the remainder of the turn. Formation 1 nominates the Command Company with Legolas as the Spearhead and measures the distance to the Mumak - 7.57" ... meaning they will need to roll a 6 to reach him. They roll for the Mumak's Terror: 2 & 4. Adding Legolas' Courage of 6 gives 12 ... so that's a Pass. For the charge they roll a 5 ... Legolas uses another point of Might to adjust it up to a 6 (plus now it's an Unstoppable Charge!)... Legolas is now at 1 Might Point remaining, and the charge is successful - hopefully it will be enough with the Mumak's Resilience still reduced during the Fight Phase. Since the Mumak is being charged by a company with Terror (due to Legolas providing it via the Bestow Terror Special Rule) the Mumak rolls its Courage Test: 4 & 1 ... adding the Mumak's Courage Value gives 9 ... LOL ... the Mumak is Fight 0 for the turn, too! (Bad day Mr. Mumak!)

      Fight Phase

      The Mumak has priority - but even if he didn't he would still get to attack first (because of Striking Order [pg 46] and he is Type: Monster - and Legolas' Swift Strike only gives the Infantry Formation Striking Order (Cavalry) - so they get to go second and finally Formation 2 last ...). According to the Stomp and Gore special rule, Formation 2 (charged by the Mumak) has 4 companies in it so they suffer 4D3 hits at Strength 10. Formation 1 (charged the Mumak) has 4 companies in it so they suffer 4D3 hits at Strength 8. For the Number of hits against Formation 2, the Mumak rolls: 6, 3, 4, & 5. This totals: 3+2+2+3 = 10 Strength 10 hits against Formation 2. Strength 10 against Defense 7 needs 3's to wound. Rolling the 10 dice gives: 6, 3, 4, 5, 4, 4, 3, 2, 4, & 6. That means 9 Wounds against Formation 2! Now, against Formation 1 .... rolling the 4D3 for the number of Hits gives: 1, 6, 5, & 5. This totals: 1+3+3+3 = 10 Strength 8 hits against Formation 1. This also needs 3's to wound. Rolling the 10 dice gives: 1, 4, 1, 6, 6, 4, 5, 6, 3, & 2. That is 7 wounds against Formation 1 - ouch! Looks like with the 16 Wounds from the Fight Phase and the 5 from the Trample, that's 21 wounded warriors from the Mumak!!

      OK, Good's turn to Fight ... Formation 1 has Striking Order (Cavalry) so they get to attack next. The Command Company has a Fight of 6 from Legolas - so against the Fight of 0 that the Mumak has this turn that means that they get 8 dice for Attack Value (fighting directly) + 6 for the difference in Fight Value (Battle Skill) + 1 for Charging + D3 (rolled a 3 ... therefore +2) for the Unstoppable Charge. That is 17 dice from Company 1 ... Company 2 is also fighting directly so they give 8 dice for their Attack Value (fighting directly) + 3 for the difference in Fight Value (Battle Skill) + 1 for Charging + D3 (roll a 2 ... therefore +1) for the Unstoppable Charge. That's 13 dice from Company 2. Companies 3 and 4 are support - so they provide 1 die each and 2D3 dice for their Unstoppable Charge. Company 3 gets a 4 ... so +2 more dice and Company 4 gets a 1 ... so +1 more dice. So, the grand total of dice from Formation 1 is: 17+13+3+2= 35 dice. Strength 3 against Defense 8 needs 6/4's to Hit. Let's see what the 35 dice produce: 6, 1, 6, 3, 4, 4, 1, 6, 1, 1, 5, 4, 6, 5, 4, 3, 1, 2, 1, 6, 1, 5, 5, 6, 1, 6, 6, 5, 5, 5, 1, 3, 4, 3, & 2. There are eight 6's - rerolling them (needing 4+'s) gives: 6, 5, 2, 2, 5, 1, 4, & 6) - that's 5 rolls on the Ridiculously Hard to Kill! table (since the Mumak has a Resilience of 1 still due to Legolas' Crippling Shot during the Shoot Phase). Here we go ... First roll on the table is a 4 - adding the 3 counters gives a 7: Flesh Wound (another dead crewman and another counter - 9 crew remaining and 4 counters, so far). Second roll on the table is a 3 - adding the 4 counters gives a 7, again: Flesh Wound (another dead crewman and another counter - 8 crew remaining and 5 counters, so far). Third roll is a 1 - adding the 5 counters gives a 6: Flesh Wound (dead crewman and another counter - 7 crew remaining and 6 counters, so far). Fourth roll is a 1 - adding the 6 counters is a 7: Flesh Wound (dead crewman and another counter - 6 crew remaining and 7 counters). Fifth roll is a 3 - adding the 7 counters gives 10: Debilitating Strike (2 crew are slain and 2 more wound counters - 4 crew remaining and 9 counters, now). Fifth, and final, roll is 4 - adding the 9 counters is 13: Devastating Wound (3 crew dead and 3 counters - 1 crew remains ...so much for the Shooting capability of The Crew special rule for the Mumak, now ... and he has 12 counters on him, now). Holy Cow! Go Crippling Shot!


      Now for Formation 2's turn. Formation 2 has one company this is fighting directly and 2 support. That 8 dice (for Attack Value) + 0 (for Battle Skill) + 1 (for support from company 2) + 1 (for support from company 3) = 10 dice. They also need 6/4's to Hit: 4, 2, 1, 5, 2, 2, 4, 5, 3, & 6. They got one 6 - re-rolling the 6 (needing 4+) they roll a 5. One roll on the Mumak's table. They roll a 4 adding the 12 counters gives 16: Devastating Wound (3 crew dead and 3 counters - 0 crew remains and that gives 15 total counters on the Mumak).

      Fight Results

      [** Recall that we modified the Determine Victor Rule back in Part 2/5 **] The Mumak inflicted 21 wounds. Good added 15 counters to the Mumak. This means that the Mumak wins the fight and both Good Formations have to fall back 1" and take a Panic Test.

      Formation 2 rolls a 1 and experience an Onset of Dismay - rolling for the Courage Test: 2 & 2 - adding their Courage Value of 3 gives 7 (Failed by 3 ... 3 more additional casualties to Formation 2) and they are also Disordered.

      Formation 1 rolls a 1 (son-of-a-!) and experience an Onset of Dismay - rolling for the Courage Test: 1 & 1 (are you kidding me?) adding their Courage Value of 6 (from Legolas) gives 8 (Failed by 2 ... 2 more additional casualties to Formation 1) and they are also Disordered.

      So, this is what we have at the end of Round 1 - that was rather bloody! Three full companies of Minas Tirith Warriors are gone and the Mumak barely survives with 15 Wound Counters on him.


      Also, since the Mumak received 1+ wound counters this turn and since he has no crew members alive, this means that during Round 2+ he is going to Stampede! This should be interesting ... I suspect that Legolas is going to do another Epic Shot - so it's going to be lights out for the Mumak in Round 2.

      Round 2:

      Priority Phase

      Gondor rolls a 3 and the Mumak rolls a 3. It is a tie, so both sides re-roll. Gondor rolls a 5 and the Mumak rolls a 2, so Gondor wins Priority for the Round.

      Move Phase

      Both Gondor Formations are Disordered, so they need to pass a Courage Test (with -1 since The Mumak is within 6") in order to move, shoot, charge and get more than a single die per company for the Fight Phase. Formation 1 rolls a 4 & 2 - adding 6 for Legolas' Courage Value and subtracting 1 for the Mumak being within 6", giving 11 - so they are no longer Disordered; Isengard Formation 2 rolls a 2 & 6 - adding 3 for their Courage Value and subtracting 1 for the Mumak within 6", giving 10 - so Formation 2 is no longer Disordered, either.

      Gondor decides that they don't want to move. The Mumak was wounded during the previous round, and since there are no more crew members no matter what the 2D6 roll is, the Mumak is going to Stampede! Let's roll anyway just for good measure. The roll produces a 5 and a 2. 7 > 0 so the result is of course a Stampede! The next roll will be to determine the random direction that the Mumak is going to move. The Mumak rolls a 5 - which means diagonally away from the original deployment zone for the Mumak. The second roll after the 5 is a 6 - which means that the Mumak rotates to the heading right toward Formation 1. The Stampede! distance is 6D6". The roll produces: 6, 2, 3, 3, 5, & 4 = 23". The formation in the front left of Formation1 takes D3 Strength 9 hits. The D3 die roll a 5 which means 3 Strength 9 hits. Those his need 3's to hit, rolling the 3 dice give: 5, 4, & 5  - all three hit.

      Shoot Phase

      Now that the Mumak has run off Legolas cannot do an About Face! to shoot the Mumak. Also, since all the crewmen of the Mumak are dead, there is no Shoot Phase.

      Charge Phase

      No one is within charge range distance, so there is no Charge Phase for Round 2.

      Fight Phase

      No one is in contact, so there is no Fight Phase for Round 2.

      Round 3:

      Priority Phase

      Gondor rolls a 4 and the Mumak rolls a 2, so Gondor wins Priority for the Round.

      Move Phase

      Gondor Formation 1 (with Legolas) does an About Face! and rotates 45-degrees counter-clock-wise and moves forward the remaining 2.5". Formation 2 rotates 45-degree counter-clock-wise. The Mumak's turn - they roll 2D6: 1 & 5 = 6 > 0 so it is still Stampede!-ing. The random direction roll gives a 3. The 6D6 distance that it will Stampede! gives: 5, 3, 2, 2, 3, & 3 = 18".

      Shoot Phase

      Legolas measures the distance to the Mumak ... 11.4" - just within the 12" range of Epic Shot ... Perfect! Legolas is going to use his Crippling Shot again (just to make sure that his Epic Shot doesn't get a 1 on the D6 against the Mumak's Resilience of 2). He rolls a 5, reducing the Mumak's Resilience to 1 and expends his last point of Might to perform an Epic Shot. Rolling the D6 for the number of hits gives a 5 - which means 5 automatic rolls against the Ridiculously Hard to Kill! table. For the first roll, Gondor rolls a 5 - adding the 15 wound counters gives 20 … delivering the final Death Blow to the Mumak.


      FINAL ANALYSIS

      Whew, what a fight! Legolas really was the key to the downfall of the Mumak - especially with the Crippling Shot special rule. Dropping the Mumak's Resilience Value to 1 really accelerated the number of wounds that the Mumak received. It would have taken twice as long to get through the 2 Resilience points if the Crippling Shot didn't stick or wasn't available. Also, having the Epic Shot special rule and letting the Minas Tirith Warriors attack during the Shoot Phase really made the final difference - otherwise, the Mumak would have continued to run amuck around the board round-after-round, and possibly Trample over the formations several more times. In fact, it would be very hard to "catch" the Stampede!-ing Mumak after it is running around 6D6" every turn in a random direction.

      The Mumak took out a total of 29 Warriors in just the one Round that it was fighting (that's 45% of the total) - so if Legolas wasn't there to cause so much damage with the Crippling Shot, he could have taken out the 2 formations in possibly 2-3 Rounds. Maybe it would have been wiser to initially have the Mumak attack Legolas' Formation (not the command company directly since they have Terror, but the company to the left of the command company). But then would Legolas just react to that by simply jumping to the other formation and rinse-and-repeat what happened above... Interesting!

      That was fun!

      Hopefully you can see that even though a Monster is Ridiculously Hard to Kill does not mean that it is not able to be destroyed - and proper army participation of heroes, engagement, and a little bit luck help a lot!


      LINKS TO OTHER PARTS OF THE HARD TO KILL SERIES

      1. Overview of the Problem [Part 1/5]
      2. Hard to Kill! Rule [Part 2/5]
      3. Very Hard to Kill! Rule [Part 3/5]
      4. Extremely Hard to Kill! Rule [Part 4/5]
      5. Ridiculously Hard to Kill! Rule [Part 5/5]