Showing posts with label Terror. Show all posts

Monday, March 13, 2017

WFMC Mobile - Art for The Kingdom of Rohan Companies and Formations of Various Supported Types [Part 2/11]

Getting back to the art for WFMC Mobile!!


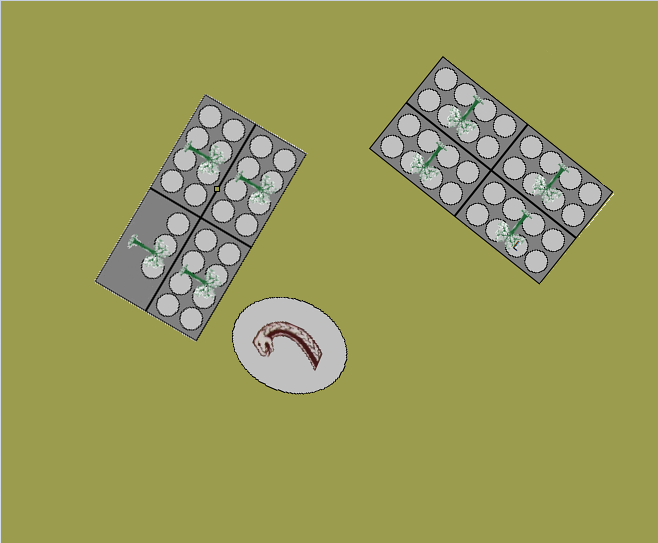
Here are a couple of the Formations from The Kingdom of Rohan, showing one of each type of formation that is supported in the current Rohan list. Keep in mind that Rohan is very heavy with cavalry formations - that means that the majority of them will be similar to the image at the top-left.


Starting from the top-left, here we have a Formation in 3x2 Configuration of The Sons of Eorl. They are sporting their wide array of special rules, as well. This is what makes Rohan Cavalry so Unique - they have a wide array of additional special rules which make them very dangerous to encounter. Behind the Sons of Eorl is Eomer, King of Pelennor. He is the only Monster that is included within the Rohan Army List. He is armed with a Bow in addition to thrown weapons and other special rules to make him an intimidating addition with his Very Hard to Kill Special Rule, as well. Over on the right is a 2x3 Configuration Formation of Oathsworn Militia. While they are not overly powerful - they do provide a good staple for infantry for relatively inexpensive cost. They are very useful when fielded in small company count formations to allow the cavalry formations to line up for flank and rear attacks.


LINKS TO OTHER PARTS OF THE WFMC PROGRESS SERIES
Help make WFMC Mobile get released to the Apple App Store with a donation!


    LINKS TO OTHER PARTS OF MOVEMENT TYPES AND LIMITS SERIES

    • Movement Types and Limits Series - Reconfiguration Movement of Cavalry Formations Comprised of 2-3 Companies [Part 11/23]
    • Movement Types and Limits Series - Reconfiguration Movement of Cavalry Formations Comprised for 4 Companies [Part 12/23]
    • Movement Types and Limits Series - Reconfiguration Movement of Cavalry Formations Comprised of 5 Companies [Part 13/23]
    • Movement Types and Limits Series - Reconfiguration Movement of Cavalry Formations Comprised of 6 Companies [Part 14/23]
    • Movement Types and Limits Series - Reconfiguration Movement of Cavalry Formations Comprised of 7 Companies [Part 15/23]
    • Movement Types and Limits Series - Reconfiguration Movement of Cavalry Formations Comprised of 8 Companies [Part 16/23]
    • Movement Types and Limits Series - Reconfiguration Movement of Infantry Formations Comprised of 9 Companies [Part 17/23]
    • Movement Types and Limits Series - Cavalry Movement Example 1 from Page 33 of WotR Rulebook Analysis [Part 18/23]
    • Movement Types and Limits Series - Cavalry Movement Example 2 from Page 33 of WotR Rulebook Analysis [Part 19/23]
    • Movement Types and Limits Series - Cavalry Movement Example 3 from Page 33 of WotR Rulebook Analysis [Part 20/23]
    • Movement Types and Limits Series - Reconfiguration Summary of Cavalry Formations by Company Size [Part 21/23]
    • Movement Types and Limits Series - Cavalry Restrictions of Reconfiguration by Formation Name Summary [Part 22/23]
    • Using WFMC to Verify Movement Examples [Part 23/23]


    LINKS TO OTHER PARTS OF THE WFMC MOBILE ART SERIES

      Tuesday, August 23, 2016

      WFMC Mobile - Art for Dwarves' Companies and Formations of Various Supported Types [Part 4/11]

      Next up is a couple of the Dwarf Formations, showing one or more of each type of formation that is supported in the current Dwarf Holds list.


      The Dwarves are the list that has had the most updates to it (mostly due to the fact that they have a lot of profiles from the Hobbit that have been created).

      Let's start at the top left and work around again ... In the top-left (within the water) is Thorin Oakenshield the Epic Hero, using his Barrel Rider Upgrade and Special Rule. Down from him is the formation of Thorin's Company - notice that they have a special base (as specified in their profile) and have the Company of Heroes rules, which makes it look even more intimidating. Recall that Thorin's Company and the Epic Hero Thorin Oakenshield are unique, so technically cannot be in the same army - but are shown here since they are "different" types supported in the army list, only. Down and to the right is a 3x1 Configuration Formation of Dwarven Ballistas. Up and to the Right is a 3x2 Configuration Formation of 5 Companies of Dwarf Warrior Kinband. They have their standard equipment of Shields ... with no other upgrades, but remember that they could have exchanged wither shields for two-handed weapons ... or upgraded their armor to heavy or mithril for extra points per company. Finally on the far right is a King's Champion Monster Hero.

      So there we have it for Dwarves, everything else in the list is either an infantry or small monster (like the King's Champion - e.g., The King's Herald or Thrain the Broken).


      LINKS TO OTHER PARTS OF THE WFMC PROGRESS SERIES
      Help make WFMC Mobile get released to the Apple App Store with a donation!


        LINKS TO OTHER PARTS OF MOVEMENT TYPES AND LIMITS SERIES

        • Movement Types and Limits Series - Reconfiguration Movement of Cavalry Formations Comprised of 2-3 Companies [Part 11/23]
        • Movement Types and Limits Series - Reconfiguration Movement of Cavalry Formations Comprised for 4 Companies [Part 12/23]
        • Movement Types and Limits Series - Reconfiguration Movement of Cavalry Formations Comprised of 5 Companies [Part 13/23]
        • Movement Types and Limits Series - Reconfiguration Movement of Cavalry Formations Comprised of 6 Companies [Part 14/23]
        • Movement Types and Limits Series - Reconfiguration Movement of Cavalry Formations Comprised of 7 Companies [Part 15/23]
        • Movement Types and Limits Series - Reconfiguration Movement of Cavalry Formations Comprised of 8 Companies [Part 16/23]
        • Movement Types and Limits Series - Reconfiguration Movement of Infantry Formations Comprised of 9 Companies [Part 17/23]
        • Movement Types and Limits Series - Cavalry Movement Example 1 from Page 33 of WotR Rulebook Analysis [Part 18/23]
        • Movement Types and Limits Series - Cavalry Movement Example 2 from Page 33 of WotR Rulebook Analysis [Part 19/23]
        • Movement Types and Limits Series - Cavalry Movement Example 3 from Page 33 of WotR Rulebook Analysis [Part 20/23]
        • Movement Types and Limits Series - Reconfiguration Summary of Cavalry Formations by Company Size [Part 21/23]
        • Movement Types and Limits Series - Cavalry Restrictions of Reconfiguration by Formation Name Summary [Part 22/23]
        • Using WFMC to Verify Movement Examples [Part 23/23]


        LINKS TO OTHER PARTS OF THE WFMC MOBILE ART SERIES

          Tuesday, July 28, 2015

          Mordor Epic Heroes' Special Rules [Part 6/10]

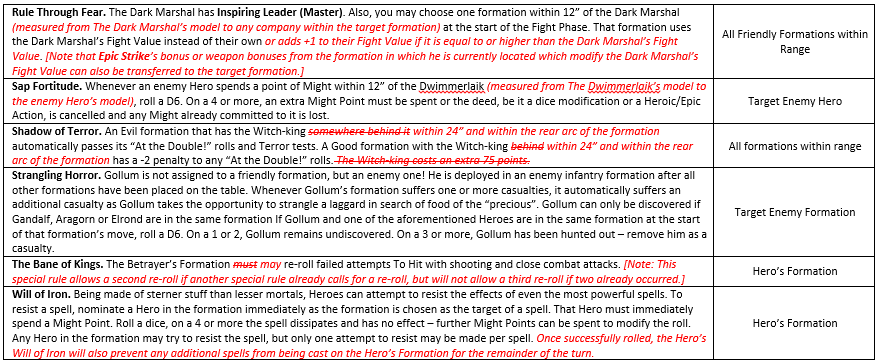
          Mordor is a fun army to analyze. There are so many heroes, with all the ringwraiths) and so much magic behind them that it really makes it hard to determine the subset of things to use when building a "reasonably sized" army. They have a nice array of augmentation abilities as well as straight up offensive capabilities - and that only adds to the fun factor of the army. Without further delay, here is the applicability list for Mordor:


          So, there it is ... If we look at the applicability column, it is interesting to see that the following spread exists:
          • Only the Hero - 4/27
          • Hero's Company - 3/27
          • Hero's Formation - 10/27
          • Target Enemy - 4/27
          • All Friendly Formations within Range - 4/27
          • Target Friendly Hero - 2/27
          The really cool thing about Mordor's Epic Heroes is their versatility. They have something for basically any situation. I can see why they are basically the Gondor & Arnor equivalent for Evil.


          LINKS TO OTHER SPECIAL RULE EVALUATION POSTS
          1. Gondor & Arnor Epic Heroes' Special Rules [Part 1/10]
          2. The Kingdom of Rohan Epic Heroes' Special Rules [Part 2/10]
          3. The Elven Kingdoms Epic Heroes' Special Rules [Part 3/10]
          4. The Dwarf Holds Epic Heroes' Special Rules [Part 4/10]
          5. The Forgotten Kingdoms Epic Heroes' Special Rules [Part 5/10]
          6. Mordor Epic Heroes' Special Rules [Part 6/10]
          7. The Fortress of Isengard Epic Heroes' Special Rules [Part 7/10]
          8. The Misty Mountains (Moria) Epic Heroes' Special Rules [Part 8/10]
          9. The Fallen Realms Epic Heroes' Special Rules [Part 9/10]
          10. Angmar Epic Heroes' Special Rules [Part 10/10]

          LINKS TO OTHER UNIT COST ANALYSIS POSTS

          Thursday, June 18, 2015

          The Forgotten Kingdoms Epic Heroes' Special Rules [Part 5/10]

          It has been a while since we've put up an Epic Hero Special Rule Applicability List. Time has just been flying buy and I am quickly running out of it! Here is the list for The Forgotten Kingdoms' Epic Heroes. For only having 3 Epic Heroes within the list I was surprised at how many special rules and Epic Rules that they have. It looks like their primary focus is to augment the formations in which they are included:


          So, there it is ... If we look at the applicability column, it is interesting to see that the following spread exists:
          • Only the Hero - 4/21
          • Hero's Company - 1/21
          • Hero's Formation - 9/21
          • Target Enemy - 1/21
          • All Friendly Formations within Range - 4/21
          • Target Friendly Hero - 2/21
          As you can see above, 13/21 are Formation-centric and only 8/21 are not. This would be very useful for formation augmentation.


          LINKS TO OTHER SPECIAL RULE EVALUATION POSTS
          1. Gondor & Arnor Epic Heroes' Special Rules [Part 1/10]
          2. The Kingdom of Rohan Epic Heroes' Special Rules [Part 2/10]
          3. The Elven Kingdoms Epic Heroes' Special Rules [Part 3/10]
          4. The Dwarf Holds Epic Heroes' Special Rules [Part 4/10]
          5. The Forgotten Kingdoms Epic Heroes' Special Rules [Part 5/10]
          6. Mordor Epic Heroes' Special Rules [Part 6/10]
          7. The Fortress of Isengard Epic Heroes' Special Rules [Part 7/10]
          8. The Misty Mountains (Moria) Epic Heroes' Special Rules [Part 8/10]
          9. The Fallen Realms Epic Heroes' Special Rules [Part 9/10]
          10. Angmar Epic Heroes' Special Rules [Part 10/10]

          LINKS TO OTHER UNIT COST ANALYSIS POSTS

          Tuesday, April 14, 2015

          The Dwarf Holds Epic Heroes' Special Rules [Part 4/10]

          Next in the queue is The Dwarf Holds' Epic Hero List. It appears that within the list for the Dwarves there is a plethora of Bestow rules - it looks like their primary focus is to augment the companies and formation in which they are included:


          There we have it ... If we look at the applicability column, it is interesting to see that the following spread exists:
          • Only the Hero - 1/22
          • Hero's Company - 7/22
          • Hero's Formation - 9/22
          • Target Enemy - 3/22
          • All Friendly Formations within Range - 1/22
          • Target Friendly Hero - 2/22
          This would appear that The Dwarf Hold's Epic Hero Special Rules are targeted to augmenting the hero's company and formation. So, long story short - even if you are not playing with the Dwarves directly, it would seem to be worth the investment to bring a few Dwarf Heroes along as allies just to get the company and formation bonuses.


          LINKS TO OTHER SPECIAL RULE EVALUATION POSTS
          1. Gondor & Arnor Epic Heroes' Special Rules [Part 1/10]
          2. The Kingdom of Rohan Epic Heroes' Special Rules [Part 2/10]
          3. The Elven Kingdoms Epic Heroes' Special Rules [Part 3/10]
          4. The Dwarf Holds Epic Heroes' Special Rules [Part 4/10]
          5. The Forgotten Kingdoms Epic Heroes' Special Rules [Part 5/10]
          6. Mordor Epic Heroes' Special Rules [Part 6/10]
          7. The Fortress of Isengard Epic Heroes' Special Rules [Part 7/10]
          8. The Misty Mountains (Moria) Epic Heroes' Special Rules [Part 8/10]
          9. The Fallen Realms Epic Heroes' Special Rules [Part 9/10]
          10. Angmar Epic Heroes' Special Rules [Part 10/10]

          LINKS TO OTHER UNIT COST ANALYSIS POSTS

          Wednesday, March 4, 2015

          The Kingdom of Rohan Epic Hero Special Rule Applicability [Part 2/10]

          Next up is the Kingdom of Rohan's Epic Hero List. It appears that within the list for Rohan there are quite a few rules that adjust dice counts and rolls and duels. Here's the applicability list:


          There we have it ... If we look at the applicability column, it is interesting to see that the following spread exists:
          • Only the Hero - 9/28
          • Hero's Company - 1/28
          • Hero's Formation - 14/28
          • Target Enemy - 2/28
          • All Friendly Formations within Range - 2/28
          This would appear that Rohan's Epic Hero Special Rule are targeted to formation wide applicability - this is good for paying the cost of an Epic Hero, I guess.

          Something else to note is that the Kingdom of Rohan Epic Heroes do not have any "Bestow" special rules. I guess they don't have anything special to "teach" others ... but wouldn't you think that at least they could Bestow Expert Rider?


          LINKS TO OTHER SPECIAL RULE EVALUATION POSTS
          1. Gondor & Arnor Epic Heroes' Special Rules [Part 1/10]
          2. The Kingdom of Rohan Epic Heroes' Special Rules [Part 2/10]
          3. The Elven Kingdoms Epic Heroes' Special Rules [Part 3/10]
          4. The Dwarf Holds Epic Heroes' Special Rules [Part 4/10]
          5. The Forgotten Kingdoms Epic Heroes' Special Rules [Part 5/10]
          6. Mordor Epic Heroes' Special Rules [Part 6/10]
          7. The Fortress of Isengard Epic Heroes' Special Rules [Part 7/10]
          8. The Misty Mountains (Moria) Epic Heroes' Special Rules [Part 8/10]
          9. The Fallen Realms Epic Heroes' Special Rules [Part 9/10]
          10. Angmar Epic Heroes' Special Rules [Part 10/10]

          LINKS TO OTHER UNIT COST ANALYSIS POSTS

          Tuesday, January 6, 2015

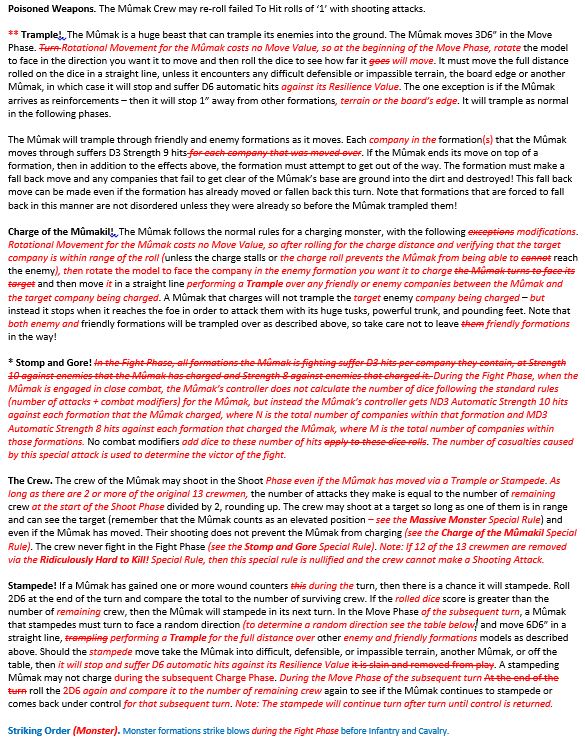
          Ridiculously Hard to Kill! The Mumak's Special Rule [Part 5/5 of the Hard to Kill Series]

          This is the end of the Series for the Hard to Kill Special Rules. This post will cover the Ridiculously Hard to Kill! Special Rule and provide an example of how one may go about fighting this thing in a game.

          The Mumakil in The Fallen Realms Army is the only formation that has this special rule. Once again, the good armies do not get any equivalent characters with it, unfortunately.


          The first thing to notice is that it has the same ranges as the Extremely Hard to Kill! rule, it just has the additional effect of removing crew members (thusly reducing its capability to Shoot during the Shoot Phase and increasing its probability of Stampeding) as wound counters are applied to the Mumakil.


          Let's go through an example and have Legolas (in the Front left company of Formation 1 - marked with an "L") and some Minas Tirith Warriors go to town on a Mumakil!


          STEP-BY-STEP EXAMPLE OF THE FIGHT

          Round 1:

          Priority Phase

          Gondor rolls a 1 and the Mumak rolls a 2. The Mumak Wins Priority for the Round.

          Move Phase

          The Mumak rotates Counter-clock-wise to aim toward Formation 2 of the Minas Tirith Warriors (recall that this rotation move cost is free under the Trample rule). For the Trample distance the Mumak rolls a 5, 3, & 6. Totaling 14" for the Move. The front two companies of Formation 2 are trampled, this means that the Mumak deals 2D3 Strength 9 hits to Formation 2. For the two dice that he rolls he gets a 5 & a 5 - that means 6 Strength 9 hits to Formation 2. Strength 9 versus Defense 7 means that he needs 3's to Wound. The six dice he rolls results in a 1, 3, 3, 3, 4, & 3 - thus 5 wounds on the Minas Tirith Warriors Formation 2. Formation 2 has to take a Fall Back! roll and rolls a 1 ... meaning that they fall back 3" (that wasn't a very good roll - but at least enough to get clear of the Mumak).

          It is now Good's turn to move. Formation 2 decides that they want to expand their frontage so that the inevitable charge from the Mumak will not be as devastating - however since the Mumak is within 6" of Formation 2, they have their Move Value halved and can only move 3". To reconfigure to a 3x2 configuration from the 2x2 would require a move of 4.93" ... so that's not possible; and to go to a 4x1 configuration from the 2x2 would also require a move of 4.93", so that's not possible, either. Guess they have to stay the way they are configured ... As for rotating ... as a 2x2 configuration with a 3" Move value, we could rotate clock-wise or counter-clock-wise 37.45-degrees - maybe a counter-clock-wise rotation would be the best move. Here's hoping! Formation 1 decided to rotate 45-degrees clock-wise so that Legolas can have Line-of-Sight to the Mumak. This uses up 3.49" of their movement value - so they have 2.51" left for translational movement. They move forward toward the  Mumak the remaining distance.

          Shoot Phase

          The Mumak has priority, so gets to shoot first. According to The Crew rule, the Mumak gets 13/2 = 6.5 Shots, rounded up to 7. The crewmembers are armed with Bows, so have a 24" Range and a Strength of 2. They decide to continue to barrage Formation 2 - since it is already a little depleted (and no matter which formation they target they will be attacking the front, so they will have Defense 7). For Strength 2 against the front of Formation 2's Defense 7 means they need 6/4's to wound. For the 7 dice, they roll: 3, 5, 5, 1, 1, 1, & 5. Due to the Poisoned Weapons special rule, they get to re-roll the 1's ... so they pick up the three 1's and get: 4, 4, & 2. No 6's - so all the shots miss. Good's turn for the Shoot Phase. Since Formation 2 has no ballistic capabilities, they cannot do anything - but Formation 1 has Legolas in it - and he decides to use his Crippling Shot special rule on the Monster. Legolas rolls a 6 for Crippling Shot - meaning that the Mumak's Resilience Value is reduced by 1 (from 2 down to 1) for the remainder of the turn. Now's the chance to go crazy! Legolas also expends a point of Might (down from 3 to 2) and calls an Epic Shot. He nominates the Mumak and deals 1D6 automatic hits to the Mumak. He rolls a 3 - meaning 3 hits against the Mumak's Resilience of 1 ... 3 rolls on the Ridiculously Hard to Kill! table. The First roll of the dice produces a die value of 2 - No Effect. The Second roll on the table produces a die value of 6 - Flesh Wound: Slay one crewman and gain 1 counter (now down to 12 crewmen) and a natural 6 gives a re-roll! The re-roll die value is 5 ... adding the one counter produces a critical value of 6 - Flesh Wound: Slaying an additional crewman and gaining another 1 counter (now down to 11 crewmen and 2 counters on the Mumak). The Third roll on the table produces a die value of 3 ... adding the 2 counters gives an attack value of 5 - Another Flesh Wound: Slaying another crewman and adding another counter (remaining crew = 10; counters = 3). Not too shabby, Mr. Legolas!

          Charge Phase

          The Mumak decides it is going to charge Formation 2. He rolls a 5 for the Charge - so the charge is successful. Having been charged by a Monster with Terror, Formation 2 rolls their courage test: 1 & 3. Adding their courage of 3 gives 7 ... not enough - so Formation 2 is reduced to Fight 0 for the remainder of the turn. Formation 1 nominates the Command Company with Legolas as the Spearhead and measures the distance to the Mumak - 7.57" ... meaning they will need to roll a 6 to reach him. They roll for the Mumak's Terror: 2 & 4. Adding Legolas' Courage of 6 gives 12 ... so that's a Pass. For the charge they roll a 5 ... Legolas uses another point of Might to adjust it up to a 6 (plus now it's an Unstoppable Charge!)... Legolas is now at 1 Might Point remaining, and the charge is successful - hopefully it will be enough with the Mumak's Resilience still reduced during the Fight Phase. Since the Mumak is being charged by a company with Terror (due to Legolas providing it via the Bestow Terror Special Rule) the Mumak rolls its Courage Test: 4 & 1 ... adding the Mumak's Courage Value gives 9 ... LOL ... the Mumak is Fight 0 for the turn, too! (Bad day Mr. Mumak!)

          Fight Phase

          The Mumak has priority - but even if he didn't he would still get to attack first (because of Striking Order [pg 46] and he is Type: Monster - and Legolas' Swift Strike only gives the Infantry Formation Striking Order (Cavalry) - so they get to go second and finally Formation 2 last ...). According to the Stomp and Gore special rule, Formation 2 (charged by the Mumak) has 4 companies in it so they suffer 4D3 hits at Strength 10. Formation 1 (charged the Mumak) has 4 companies in it so they suffer 4D3 hits at Strength 8. For the Number of hits against Formation 2, the Mumak rolls: 6, 3, 4, & 5. This totals: 3+2+2+3 = 10 Strength 10 hits against Formation 2. Strength 10 against Defense 7 needs 3's to wound. Rolling the 10 dice gives: 6, 3, 4, 5, 4, 4, 3, 2, 4, & 6. That means 9 Wounds against Formation 2! Now, against Formation 1 .... rolling the 4D3 for the number of Hits gives: 1, 6, 5, & 5. This totals: 1+3+3+3 = 10 Strength 8 hits against Formation 1. This also needs 3's to wound. Rolling the 10 dice gives: 1, 4, 1, 6, 6, 4, 5, 6, 3, & 2. That is 7 wounds against Formation 1 - ouch! Looks like with the 16 Wounds from the Fight Phase and the 5 from the Trample, that's 21 wounded warriors from the Mumak!!

          OK, Good's turn to Fight ... Formation 1 has Striking Order (Cavalry) so they get to attack next. The Command Company has a Fight of 6 from Legolas - so against the Fight of 0 that the Mumak has this turn that means that they get 8 dice for Attack Value (fighting directly) + 6 for the difference in Fight Value (Battle Skill) + 1 for Charging + D3 (rolled a 3 ... therefore +2) for the Unstoppable Charge. That is 17 dice from Company 1 ... Company 2 is also fighting directly so they give 8 dice for their Attack Value (fighting directly) + 3 for the difference in Fight Value (Battle Skill) + 1 for Charging + D3 (roll a 2 ... therefore +1) for the Unstoppable Charge. That's 13 dice from Company 2. Companies 3 and 4 are support - so they provide 1 die each and 2D3 dice for their Unstoppable Charge. Company 3 gets a 4 ... so +2 more dice and Company 4 gets a 1 ... so +1 more dice. So, the grand total of dice from Formation 1 is: 17+13+3+2= 35 dice. Strength 3 against Defense 8 needs 6/4's to Hit. Let's see what the 35 dice produce: 6, 1, 6, 3, 4, 4, 1, 6, 1, 1, 5, 4, 6, 5, 4, 3, 1, 2, 1, 6, 1, 5, 5, 6, 1, 6, 6, 5, 5, 5, 1, 3, 4, 3, & 2. There are eight 6's - rerolling them (needing 4+'s) gives: 6, 5, 2, 2, 5, 1, 4, & 6) - that's 5 rolls on the Ridiculously Hard to Kill! table (since the Mumak has a Resilience of 1 still due to Legolas' Crippling Shot during the Shoot Phase). Here we go ... First roll on the table is a 4 - adding the 3 counters gives a 7: Flesh Wound (another dead crewman and another counter - 9 crew remaining and 4 counters, so far). Second roll on the table is a 3 - adding the 4 counters gives a 7, again: Flesh Wound (another dead crewman and another counter - 8 crew remaining and 5 counters, so far). Third roll is a 1 - adding the 5 counters gives a 6: Flesh Wound (dead crewman and another counter - 7 crew remaining and 6 counters, so far). Fourth roll is a 1 - adding the 6 counters is a 7: Flesh Wound (dead crewman and another counter - 6 crew remaining and 7 counters). Fifth roll is a 3 - adding the 7 counters gives 10: Debilitating Strike (2 crew are slain and 2 more wound counters - 4 crew remaining and 9 counters, now). Fifth, and final, roll is 4 - adding the 9 counters is 13: Devastating Wound (3 crew dead and 3 counters - 1 crew remains ...so much for the Shooting capability of The Crew special rule for the Mumak, now ... and he has 12 counters on him, now). Holy Cow! Go Crippling Shot!


          Now for Formation 2's turn. Formation 2 has one company this is fighting directly and 2 support. That 8 dice (for Attack Value) + 0 (for Battle Skill) + 1 (for support from company 2) + 1 (for support from company 3) = 10 dice. They also need 6/4's to Hit: 4, 2, 1, 5, 2, 2, 4, 5, 3, & 6. They got one 6 - re-rolling the 6 (needing 4+) they roll a 5. One roll on the Mumak's table. They roll a 4 adding the 12 counters gives 16: Devastating Wound (3 crew dead and 3 counters - 0 crew remains and that gives 15 total counters on the Mumak).

          Fight Results

          [** Recall that we modified the Determine Victor Rule back in Part 2/5 **] The Mumak inflicted 21 wounds. Good added 15 counters to the Mumak. This means that the Mumak wins the fight and both Good Formations have to fall back 1" and take a Panic Test.

          Formation 2 rolls a 1 and experience an Onset of Dismay - rolling for the Courage Test: 2 & 2 - adding their Courage Value of 3 gives 7 (Failed by 3 ... 3 more additional casualties to Formation 2) and they are also Disordered.

          Formation 1 rolls a 1 (son-of-a-!) and experience an Onset of Dismay - rolling for the Courage Test: 1 & 1 (are you kidding me?) adding their Courage Value of 6 (from Legolas) gives 8 (Failed by 2 ... 2 more additional casualties to Formation 1) and they are also Disordered.

          So, this is what we have at the end of Round 1 - that was rather bloody! Three full companies of Minas Tirith Warriors are gone and the Mumak barely survives with 15 Wound Counters on him.


          Also, since the Mumak received 1+ wound counters this turn and since he has no crew members alive, this means that during Round 2+ he is going to Stampede! This should be interesting ... I suspect that Legolas is going to do another Epic Shot - so it's going to be lights out for the Mumak in Round 2.

          Round 2:

          Priority Phase

          Gondor rolls a 3 and the Mumak rolls a 3. It is a tie, so both sides re-roll. Gondor rolls a 5 and the Mumak rolls a 2, so Gondor wins Priority for the Round.

          Move Phase

          Both Gondor Formations are Disordered, so they need to pass a Courage Test (with -1 since The Mumak is within 6") in order to move, shoot, charge and get more than a single die per company for the Fight Phase. Formation 1 rolls a 4 & 2 - adding 6 for Legolas' Courage Value and subtracting 1 for the Mumak being within 6", giving 11 - so they are no longer Disordered; Isengard Formation 2 rolls a 2 & 6 - adding 3 for their Courage Value and subtracting 1 for the Mumak within 6", giving 10 - so Formation 2 is no longer Disordered, either.

          Gondor decides that they don't want to move. The Mumak was wounded during the previous round, and since there are no more crew members no matter what the 2D6 roll is, the Mumak is going to Stampede! Let's roll anyway just for good measure. The roll produces a 5 and a 2. 7 > 0 so the result is of course a Stampede! The next roll will be to determine the random direction that the Mumak is going to move. The Mumak rolls a 5 - which means diagonally away from the original deployment zone for the Mumak. The second roll after the 5 is a 6 - which means that the Mumak rotates to the heading right toward Formation 1. The Stampede! distance is 6D6". The roll produces: 6, 2, 3, 3, 5, & 4 = 23". The formation in the front left of Formation1 takes D3 Strength 9 hits. The D3 die roll a 5 which means 3 Strength 9 hits. Those his need 3's to hit, rolling the 3 dice give: 5, 4, & 5  - all three hit.

          Shoot Phase

          Now that the Mumak has run off Legolas cannot do an About Face! to shoot the Mumak. Also, since all the crewmen of the Mumak are dead, there is no Shoot Phase.

          Charge Phase

          No one is within charge range distance, so there is no Charge Phase for Round 2.

          Fight Phase

          No one is in contact, so there is no Fight Phase for Round 2.

          Round 3:

          Priority Phase

          Gondor rolls a 4 and the Mumak rolls a 2, so Gondor wins Priority for the Round.

          Move Phase

          Gondor Formation 1 (with Legolas) does an About Face! and rotates 45-degrees counter-clock-wise and moves forward the remaining 2.5". Formation 2 rotates 45-degree counter-clock-wise. The Mumak's turn - they roll 2D6: 1 & 5 = 6 > 0 so it is still Stampede!-ing. The random direction roll gives a 3. The 6D6 distance that it will Stampede! gives: 5, 3, 2, 2, 3, & 3 = 18".

          Shoot Phase

          Legolas measures the distance to the Mumak ... 11.4" - just within the 12" range of Epic Shot ... Perfect! Legolas is going to use his Crippling Shot again (just to make sure that his Epic Shot doesn't get a 1 on the D6 against the Mumak's Resilience of 2). He rolls a 5, reducing the Mumak's Resilience to 1 and expends his last point of Might to perform an Epic Shot. Rolling the D6 for the number of hits gives a 5 - which means 5 automatic rolls against the Ridiculously Hard to Kill! table. For the first roll, Gondor rolls a 5 - adding the 15 wound counters gives 20 … delivering the final Death Blow to the Mumak.


          FINAL ANALYSIS

          Whew, what a fight! Legolas really was the key to the downfall of the Mumak - especially with the Crippling Shot special rule. Dropping the Mumak's Resilience Value to 1 really accelerated the number of wounds that the Mumak received. It would have taken twice as long to get through the 2 Resilience points if the Crippling Shot didn't stick or wasn't available. Also, having the Epic Shot special rule and letting the Minas Tirith Warriors attack during the Shoot Phase really made the final difference - otherwise, the Mumak would have continued to run amuck around the board round-after-round, and possibly Trample over the formations several more times. In fact, it would be very hard to "catch" the Stampede!-ing Mumak after it is running around 6D6" every turn in a random direction.

          The Mumak took out a total of 29 Warriors in just the one Round that it was fighting (that's 45% of the total) - so if Legolas wasn't there to cause so much damage with the Crippling Shot, he could have taken out the 2 formations in possibly 2-3 Rounds. Maybe it would have been wiser to initially have the Mumak attack Legolas' Formation (not the command company directly since they have Terror, but the company to the left of the command company). But then would Legolas just react to that by simply jumping to the other formation and rinse-and-repeat what happened above... Interesting!

          That was fun!

          Hopefully you can see that even though a Monster is Ridiculously Hard to Kill does not mean that it is not able to be destroyed - and proper army participation of heroes, engagement, and a little bit luck help a lot!


          LINKS TO OTHER PARTS OF THE HARD TO KILL SERIES

          1. Overview of the Problem [Part 1/5]
          2. Hard to Kill! Rule [Part 2/5]
          3. Very Hard to Kill! Rule [Part 3/5]
          4. Extremely Hard to Kill! Rule [Part 4/5]
          5. Ridiculously Hard to Kill! Rule [Part 5/5]

          Monday, December 29, 2014

          The Elven Kingdoms Unit Cost Analysis

          I know that we already covered the Elves a little bit in the post for Warrior Baseline Cost within Gondor & Arnor, but let's give the Elves their own post … it only seems fair for such a pretty army when it is fully painted. Honestly, I think that may be part of the original over-pricing … the jealousy that we all have when an opponent pulls out 2000 points of Elves that are just beautiful!

          ELVEN WARRIORS

          • (L) [I] Gildor's Household - Underpriced by 11%
          • (L) [MH] Glorfindel, Lord of the West - Underpriced by 11%
          • (R) [H] Galadhrim Knight Regiment - Underpriced by 9%
          • (C) [I] Galadhrim Regiment - Accurately Priced (0% deviation)
          • (C) [I] Wood Elf Warband - Accurately Priced (0% deviation)
          • (L) [I] Rivendell Guard - Overpriced by 8%
          • (R) [I] High Elf Cohort - Overpriced by 9%
          • (C) [I] High Elf Regiment - Overpriced by 10%
          • (C) [I] Galadhrim Archer Regiment - Overpriced by 11%
          • (R) [I] Mirkwood Sentinels - Overpriced by 11%
          • (L) [I] Haldir's Elves - Overpriced by 11%
          • (L) [I] Guardians of Caras Galadhon - Overpriced by 17%
          • (C) [I] High Elf Archer Regiment - Overpriced by 20%
          • (R) [I] Guards of the Galadhrim Court - Overpriced by 27%
          Interesting ... It seems like the complaining about this faction has not been in vain ... Half of the common formations fall in the overpriced range, in fact it is nearly impossible to build a cost effective force of elves with anything other than the common formations of Wood Elf Warband or Galadhrim Regiment; and everyone knows that when you play Elves, you want to have a "shooty" army of High Elf Archers, right?

          Sorting the Elves under the template from cheapest (weakest stat-wise) to most expensive (most powerful) gives:
          • 40 Points per Company:
            • (C) [I] Wood Elf Warband
          • 45 Points per Company:
            • (C) [I] Galadhrim Regiment
            • (C) [I] Galadhrim Archer Regiment
            • (R) [I] Mirkwood Sentinels
            • (L) [I] Gildor's Household
            • (L) [I] Haldir's Elves
          • 50 Points per Company:
            • (C) [I] High Elf Regiment
            • (C) [I] High Elf Archer Regiment
          • 55 Points per Company:
            • (R) [H] Galadhrim Knight Regiment
            • (R) [I] Guards of the Galadhrim Court
            • (R) [I] High Elf Cohort
          • 60 Points per Company:
            • (L) [I] Rivendell Guard
            • (L) [I] Guardians of Caras Galadhon
          • 280 Points per Company:
            • (L) [MH] Glorfindel, Lord of the West
          NOTE ABOUT GLAIVES & PIKES AND BALLISTIC VALUES FOR NON-BOW ARMED UNITS

          It looks like the extra fight value point that is provided by Glaives and Pikes is not reflected in the profiles for the Elves. In fact on the description for Glaives that is given on page 56 of the Rulebook, it gives the example of Galadhrim Regiment within the example saying that it takes their Fight Value of 5 up to 6 (and it is shown on page 120 as being 5). So, this means that the Galadhrim Regiment and the High Elf Regiment both have +1 to all the Fight Values that are displayed.

          Furthermore, neither of these profiles have the option for a Longbow, so it doesn't make sense to have them have a Ballistic Value (of 3+, specifically). Since the baseline warrior profile has a Ballistic Value of 4+, it seems silly to charge them the additional cost of an extra 5 points for something that they will never use - so for calculating points for these units, we will assume that they have a Ballistic Value of "-" and equate that to a value of 4+ when entering the numbers into the warrior baseline profile for calculation. All of this has already been taken into account for the point costs and image that are reflected above. 

          NOTE ABOUT GLORFINDEL, LORD OF THE WEST

          Glorfindel is a Monster Hero (with a Cost Value of 7) that has a special rule that allows him to move and charge like a flying monster. Also, GW released an Errata about him saying that his Move Value should not be 8", but instead 12". Furthermore, he is armed with a Glaive - so his Fight Value should be 7+1=8 and he does not have a range weapon, so his Ballistic Value should be "-" and counted as a 4+ for the Monster Hero calculation. Finally, we have gone back and forth on counting the xxbane special rules as a single special rule or each one individually, and it seems to make more sense to count them each separately. All that being said and done - that is how his calculated points were determined.


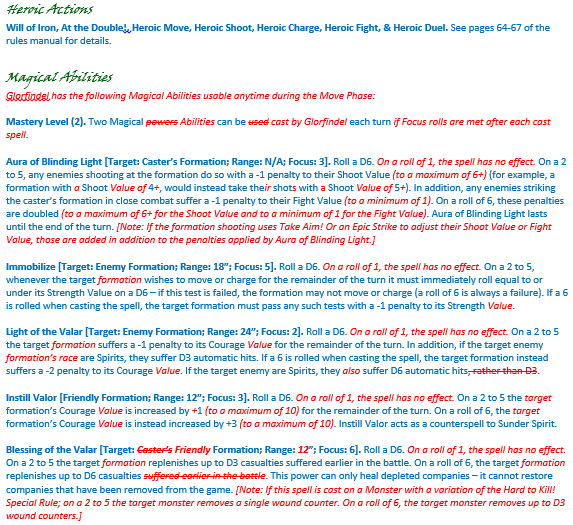
          Over at the one-ring.co.uk website, one of the dedicated WotR players mentioned that there was some confusion with the Blessing of the Valar spell above for Glorfindel:

          oli-zapp wrote:
          One question about the the spell for Glorfindel's ability to cast "Blessing of the Valar" - is Glorfindel able to heal himself with this spell? Or should he only heal other companies or monsters?

          Thank you for answering, maybe it will be more clear if you put this information additionally within his profile!

          If you look at the target in the spell in question above - I changed it from Caster's Formation (meaning only themselves) to Friendly Formation. I intended this to mean that it could be cast on any target formation within the Army (including oneself); so, yes - to answer Oli's question - he can cast the spell on himself and remove wound counters with the "Blessing of the Valar" spell. In fact this is why the "Note" was added at the end of the text for the spell - it dawned on me that a lot of things within the WotR rules don't take into consideration what effect they have on Monster Formation - since usually the descriptions are targeted at Infantry and Cavalry Formation.

          Great question, Oli, and thanks for helping to clarify this for others reading the blog, as well! I appreciate your input!

          ELVEN HEROES

          • (E) Elladan - Underpriced by 65%
          • (E) Elrohir- Underpriced by 65%
          • (L) Haldir HE - Underpriced by 55%
          • (C) Guard Captain GotGC - Underpriced by 52%
          • (C) Wood Elf Captain MS - Underpriced by 50%
          • (C) Knight Captain GKR - Underpriced by 50%
          • (C) Commander HEC - Underpriced by 50%
          • (C) High Elf Captain HER - Underpriced by 47%
          • (C) High Elf Captain HEAR - Underpriced by 44%
          • (E) Cirdan of the Havens - Underpriced by 44%
          • (E) Haldir, Guardian of Lorien - Underpriced by 42%
          • (C) Galadhrim Captain GR - Underpriced by 41%
          • (C) Galadhrim Captain GAR - Underpriced by 38%
          • (C) Wood Elf Captain WEW - Underpriced by 38%
          • (E) Thranduil, King of Mirkwood - Underpriced by 34%
          • (E) Galadriel, Lady of Lothlorien - Underpriced by 34%
          • (L) Rumil GoCG - Underpriced by 28%
          • (L) Elven Stormcaller GoCG - Underpriced by 26%
          • (E) Awen Evenstar - Underpriced by 22%
          • (E) Elrond, Master of Rivendell - Underpriced by 22%
          • (C) Elven Stormcaller GotGC - Underpriced by 20%
          • (L) Gildor Inflorion GH - Underpriced by 19%
          • (L) Erestor RG - Underpriced by 18%
          • (E) Celeborn, Lord of Lothlorien - Underpriced by 13%
          • (C) Elven Stormcaller GR - Underpriced by 9%
          • (E) Galadriel, Protectress of Lothlorien - Overpriced by 14%
          • (E) Gil-galad, High King of the Elves - Overpriced by 40%
          • (E) Legolas, Prince of Mirkwood - Overpriced by 43%

          Sorting by the cost calculated by the template from cheapest (weakest stat-wise) to most expensive (most powerful):
          • Heroes that should cost 80 Points:
            • (C) Galadhrim Captain GAR
            • (C) Wood Elf Captain WEW
          • Heroes that should cost 85 Points:
            • (C) Galadhrim Captain GR
          • Heroes that should cost 90 Points:
            • (C) High Elf Captain HEAR
          • Heroes that should cost 95 Points:
            • (C) High Elf Captain HER
          • Heroes that should cost 100 Points:
            • (C) Wood Elf Captain MS
            • (C) Knight Captain GKR
            • (C) Commander HEC
            • (L) Haldir HE
            • (E) Elladan
            • (E) Elrohir
          • Heroes that should cost 105 Points:
            • (C) Guard Cptain GotGC
          • Heroes that should cost 110 Points:
            • (C) Elven Stormcaller GR
            • (L) Erestor RG
          • Heroes that should cost 125 Points:
            • (C) Elven Stormcaller GotGC
            • (L) Rumil GoCG
          • Heroes that should cost 130 Points:
            • (E) Haldir, Guardian of Lorien
          • Heroes that should cost 135 Points:
            • (L) Elven Stormcaller GoCG
            • (E) Cirdan of the Havens
          • Heroes that should cost 140 Points:
            • (E) Legolas, Prince of Mirkwood
          • Heroes that should cost 155 Points:
            • (L) Gildor Inglorion GH
          • Heroes that should cost 160 Points:
            • (E) Arwen Evenstar
          • Heroes that should cost 175 Points:
            • (E) Galadriel, Protectress of Lothlorien
          • Heroes that should cost 190 Points:
            • (E) Thranduil, King of Mirkwood
          • Heroes that should cost 200 Points:
            • (E) Celeborn, Lord of Lothlorien
          • Heroes that should cost 215 Points:
            • (E) Gil-galad, High King of the Elves
          • Heroes that should cost 265 Points:
            • (E) Galadriel, Lady of Lothlorien
          • Heroes that should cost 275 Points:
            • (E) Elrond, Master of Rivendell

          Shout-out to Elliot! Thanks for suggesting the following post update in your comments - great idea!

          WHY DO ALL THE ELF EPIC HEROES HAVE REDUNDANT SPECIAL RULES?

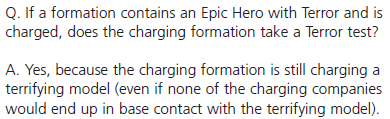
          When going through the profiles for the Elf Heroes, all of them have the special rules Pathfinder (Master) and Terror; yet all the companies within the list also have these special rules as well. This would imply that the reason that these rules are included with the Epic Heroes is that they can imbue that ability onto the company or formation of which they are currently included within; however, GW has the rule on page 69 and the Errata which seem to imply otherwise.


          OK, GW - that's at least consistently inconsistent! LOL!

          I have updated the special rules to exercise the loophole that is contained within the rule on page 69 and to capture the intent of the Errata FAQ question for Terror above. I have changed the rule to explicitly indicate that the special rule is applied to the Epic Hero's company or formation. (Notice that the rule has been pre-appended with the word "Bestow" as well, to emphasize that it is applied to the company/formation as appropriate.) What this means that if I were playing a Gondor & Arnor Army and decided to ally in Legolas, Prince of Mirkwood - and put him within a formation comprised of 6 companies of Minas Tirith Archers he would use his special rules Bestow Pathfinder (Master) and Bestow Terror and that formation would have the special rule Pathfinder (Master) for the entire formation (i.e., Legolas was "helping" them to navigate the terrain that would otherwise be difficult for them to traverse if he were not present) and Terror for the command company in which he was included.

          Now, what this means is that we need to look closely at the special rules associated to Epic Heroes and determine which have effect on themselves, their currently residing company or their currently residing formation. This also brings up an interesting sub-feature rule ... Epic Heroes may need to roll their own dice for their attack, separate from those of their company or formation - so it makes it necessary to have several different colored dice when playing the game - and keeping track of who's dice belong to who. [NOTE: We saw this with the post for the modification that was made to the Epic Strike Special rule.]

          COMING SOON: I suspect that this will need to be another set of posts per army to discuss each of the special rules owned by Epic Heroes and how they apply to their participating company and/or formation, just to clarify the confusion of whether or not it is a "Bestow" capability or not ... I'll try to get this together for at least the Elves relatively quickly.

          Here is a screenshot of the work in progress - just so you all know that it is being worked on!