Showing posts with label Gondor Biased. Show all posts

Wednesday, July 13, 2016

WFMC Mobile - Art for Gondor and Arnor Companies and Formations of Various Supported Types [Part 1/11]

I was looking at my spreadsheet that I keep of all the blog posts that I write, and I noticed that it has been a few weeks since I've put anything new up. After my feeling of guilt for not posting any progress or updates that have been worked on I figured that I would give a little peek at the art that is going into WFMC Mobile for iPhone and iPad ... It is starting to come together and every time I dry-run it I get really excited!


So here we go - we will start with Gondor and Arnor! The army list is comprised of Infantry Formations, Cavalry Formations, Small Artillery Formations (the Bolt Thrower), and Large Artillery Formations (the Trebuchet).


As you can see in the image above, at the top-middle, I also have sprites for a Large Monsters and Small Monsters (although they currently do not exist in the Gondor and Arnor Army List ... yet ...). The formation on the left is the Avenger Bolt Thrower Formation comprised of 6 companies in 3x2 Configuration. The next formation (moving right) is Minas Tirith Warriors (with Standard Shields - hence the icon) comprised of 4 companies in 2x2 Configuration. The next formation is Minas Tirith Knights (with the Standard Shields Upgrade, Striking Order (Cavalry), Earth-shaking Charge, and Lances) comprised of 4 companies in 1x4 Configuration. The far right formation is the Battlecry Trebuchet Formation comprised of 3 companies in 2x2 Configuration.


I think it looks pretty sexy, if I can say so myself.


Any input, thoughts, concerns, suggestions or idea? As always they are all welcome!


LINKS TO OTHER PARTS OF THE WFMC PROGRESS SERIES
Help make WFMC Mobile get released to the Apple App Store with a donation!


    LINKS TO OTHER PARTS OF MOVEMENT TYPES AND LIMITS SERIES

    • Movement Types and Limits Series - Reconfiguration Movement of Cavalry Formations Comprised of 2-3 Companies [Part 11/23]
    • Movement Types and Limits Series - Reconfiguration Movement of Cavalry Formations Comprised for 4 Companies [Part 12/23]
    • Movement Types and Limits Series - Reconfiguration Movement of Cavalry Formations Comprised of 5 Companies [Part 13/23]
    • Movement Types and Limits Series - Reconfiguration Movement of Cavalry Formations Comprised of 6 Companies [Part 14/23]
    • Movement Types and Limits Series - Reconfiguration Movement of Cavalry Formations Comprised of 7 Companies [Part 15/23]
    • Movement Types and Limits Series - Reconfiguration Movement of Cavalry Formations Comprised of 8 Companies [Part 16/23]
    • Movement Types and Limits Series - Reconfiguration Movement of Infantry Formations Comprised of 9 Companies [Part 17/23]
    • Movement Types and Limits Series - Cavalry Movement Example 1 from Page 33 of WotR Rulebook Analysis [Part 18/23]
    • Movement Types and Limits Series - Cavalry Movement Example 2 from Page 33 of WotR Rulebook Analysis [Part 19/23]
    • Movement Types and Limits Series - Cavalry Movement Example 3 from Page 33 of WotR Rulebook Analysis [Part 20/23]
    • Movement Types and Limits Series - Reconfiguration Summary of Cavalry Formations by Company Size [Part 21/23]
    • Movement Types and Limits Series - Cavalry Restrictions of Reconfiguration by Formation Name Summary [Part 22/23]
    • Using WFMC to Verify Movement Examples [Part 23/23]


    LINKS TO OTHER PARTS OF THE WFMC MOBILE ART SERIES

      Wednesday, May 25, 2016

      WFMC - Continuing to Implement the Mobile Version on iPhone/iPad [Part 11/12]

       I've made a little more head-way on the Mobile Version of WFMC and thought everyone would be interested to see some screenshots.


      Here is the Launch Screen. Notice that it is similar to what was drawn out in Part 10/12 (as expected - lol). You can click on the "Play" label (as of right now the "Options" label is still disabled) and it takes you to the next Screen.


      This is the Play Options screen. When you click on "Play" on the previous screen it brings you here. Similarly, the "Custom Play" option is still disabled and getting worked. Clicking on "Quick Play" takes you straight to the Priority Phase for the game.


      This is the screen for the Priority Phase. The round at the top shows you which round it currently is - as well as who has the Priority from the previous round (marked with the One Ring). The players can click on the dice icon to "roll" and it will keep track of what values have been rolled. Likewise, the target button at the top right is the "Intervention" button that allows the "other player" to intervene with Might Modifications or other Active Special Rules that have applicability to the Priority Phase. The icon at the bottom right is the "Modify" button that allows the "current player" to intervene with Might Modifications to their roll. The door button at the bottom left is the "Done" button that allows the Priority Phase to be completed and move on to the Move Phase after both players have rolled for Priority and the victor for priority for the current round has been determined.


      I have a screen for the Move and Magic Phase - but I just have not included them. The next screenshot is the Shoot Phase. Here, Player 2 has priority for the round, but the Isengard Formation doesn't have any ballistic capabilities, so then Player 1 gets to perform his shooting attacks. The Gondor Formation of Minas Tirith Archers are shooting at short range (you can't see it but the long range is actually a lighter shade of alpha'ed green. Also, notice that it is only showing the command company for range - this is something that needs to be fixed as well ... so that all 3 front companies are included when drawing in the "in range" cone.


      Here is the Charge Phase. Again, Player 2 had the priority for the phase, but the Isengard Formation stalled its charge - so now the Gondor Formation can attempt to charge. Notice that it shows the "required roll value" by the shade of Red - where in this case a 4 is needed to reach the Isengard Formation dead on and a roll of 4-6 will "reach".


      So, there we have it so far ... I know it doesn't look like much yet ... since it is still getting underway ... but, believe me, that was a lot of work just to get it to this point! Any thoughts, comments or suggestions are of course welcome. I look forward to what the greater community has to say.


      LINKS TO OTHER PARTS OF THE WFMC PROGRESS SERIES
      Help make WFMC Mobile get released to the Apple App Store with a donation!


        LINKS TO OTHER PARTS OF MOVEMENT TYPES AND LIMITS SERIES

        • Movement Types and Limits Series - Reconfiguration Movement of Cavalry Formations Comprised of 2-3 Companies [Part 11/23]
        • Movement Types and Limits Series - Reconfiguration Movement of Cavalry Formations Comprised for 4 Companies [Part 12/23]
        • Movement Types and Limits Series - Reconfiguration Movement of Cavalry Formations Comprised of 5 Companies [Part 13/23]
        • Movement Types and Limits Series - Reconfiguration Movement of Cavalry Formations Comprised of 6 Companies [Part 14/23]
        • Movement Types and Limits Series - Reconfiguration Movement of Cavalry Formations Comprised of 7 Companies [Part 15/23]
        • Movement Types and Limits Series - Reconfiguration Movement of Cavalry Formations Comprised of 8 Companies [Part 16/23]
        • Movement Types and Limits Series - Reconfiguration Movement of Infantry Formations Comprised of 9 Companies [Part 17/23]
        • Movement Types and Limits Series - Cavalry Movement Example 1 from Page 33 of WotR Rulebook Analysis [Part 18/23]
        • Movement Types and Limits Series - Cavalry Movement Example 2 from Page 33 of WotR Rulebook Analysis [Part 19/23]
        • Movement Types and Limits Series - Cavalry Movement Example 3 from Page 33 of WotR Rulebook Analysis [Part 20/23]
        • Movement Types and Limits Series - Reconfiguration Summary of Cavalry Formations by Company Size [Part 21/23]
        • Movement Types and Limits Series - Cavalry Restrictions of Reconfiguration by Formation Name Summary [Part 22/23]
        • Using WFMC to Verify Movement Examples [Part 23/23]


        LINKS TO OTHER PARTS OF THE WFMC MOBILE ART SERIES

          Sunday, May 1, 2016

          WFMC - Starting the Implementation of the Mobile Version on iPhone/iPad [Part 10/12]

          So, I was inspired and figured that I would use my Friday snow day starting the mobile application for WFMC that I was talking about ...


          In the 8 hours that I had to spend working on the application, I was able to get the mobile version instantiated and get it to draw the formations in the proper configuration. You can also see that I have the dice rolling working and drawing to the screen. Even though it doesn't look like much, yet; I am pleased with the progress that has been made ... I can change the configuration of the formation and have it draw correctly. I also have it mark which company is the command company (outlined in Red). Just getting this far was a lot more work than I thought it would be! Continue to stay tuned ... I am sure that more will develop as going forward!


          LINKS TO OTHER PARTS OF THE WFMC PROGRESS SERIES
          Help make WFMC Mobile get released to the Apple App Store with a donation!


            LINKS TO OTHER PARTS OF MOVEMENT TYPES AND LIMITS SERIES

            • Movement Types and Limits Series - Reconfiguration Movement of Cavalry Formations Comprised of 2-3 Companies [Part 11/23]
            • Movement Types and Limits Series - Reconfiguration Movement of Cavalry Formations Comprised for 4 Companies [Part 12/23]
            • Movement Types and Limits Series - Reconfiguration Movement of Cavalry Formations Comprised of 5 Companies [Part 13/23]
            • Movement Types and Limits Series - Reconfiguration Movement of Cavalry Formations Comprised of 6 Companies [Part 14/23]
            • Movement Types and Limits Series - Reconfiguration Movement of Cavalry Formations Comprised of 7 Companies [Part 15/23]
            • Movement Types and Limits Series - Reconfiguration Movement of Cavalry Formations Comprised of 8 Companies [Part 16/23]
            • Movement Types and Limits Series - Reconfiguration Movement of Infantry Formations Comprised of 9 Companies [Part 17/23]
            • Movement Types and Limits Series - Cavalry Movement Example 1 from Page 33 of WotR Rulebook Analysis [Part 18/23]
            • Movement Types and Limits Series - Cavalry Movement Example 2 from Page 33 of WotR Rulebook Analysis [Part 19/23]
            • Movement Types and Limits Series - Cavalry Movement Example 3 from Page 33 of WotR Rulebook Analysis [Part 20/23]
            • Movement Types and Limits Series - Reconfiguration Summary of Cavalry Formations by Company Size [Part 21/23]
            • Movement Types and Limits Series - Cavalry Restrictions of Reconfiguration by Formation Name Summary [Part 22/23]
            • Using WFMC to Verify Movement Examples [Part 23/23]


            LINKS TO OTHER PARTS OF THE WFMC MOBILE ART SERIES

            Tuesday, December 15, 2015

            WotR Army Roster Example 1000 Point Gondor Army

            I decided to write-up my Gondor Army as an example for filling out the WotR Army Roster. It is available on the Downloads Page, clicking the link you can get the full version.


            I regularly played Gondor as my main Army. I had Aragorn, Isildur's Heir as my Army leader. Here you can see that my basic cost was 1000 points for my Army. (Also notice that I use the updated point cost of Formations and Heroes based upon previous posts on the blog.) You can also see that all 1000 points are dedicated to Gondor models - and I didn't include 250 points of Allies since I wanted to use more than the 750 points for my Gondor units.


            I wrote in the Stats for Aragorn and filled out his Special Rules and Epic Abilities, as well. I then started with my first Common Formation (Minas Tirith Warriors). They don't have anything special from command upgrades or anything ... Likewise for formation 2 and 3. I've found that when playing with my army, 4 Companies in a Formation was about right ... anything more than that and the Company became too big to move ... and anything less that that it didn't seem to "stay around" very long.


            Next, I added my Minas Tirith Knights and then the Axemen (Rare Formation) and Grey Company (Legendary Formation).

            I then went through the list of Army Validation Checks:


            Everything checked out ok!


            Tuesday, September 22, 2015

            Extending the Gondor & Arnor List with Missing Profiles [Part 3/13]

            The first Army List to be extended is Gondor & Arnor. Recall from Part 2/12 that the set of missing profiles for the Gondor & Arnor Army List included the following:
            • Knight of the White Tower
            • Aragorn, King Elessar
            • Dunedain of Arnor
            • Faramir, Captain of Gondor
            • King of Men
            • Ranger of the North
            Each of the SBG profiles were considered carefully and determined the best means by which they would be integrated into the WotR list. It was finally decided that there would be 4 new command upgrade heroes and 2 new epic heroes from the list above.

            NEW COMMAND HEROES FOR GONDOR & ARNOR
            1. Knight of the White Tower
            2. King of Men
            3. Dunedain of Arnor
            4. Ranger of the North
            1) KNIGHT OF THE WHITE TOWER

            The Knight of the White Tower is now a common hero upgrade option for the following formations:
            • Minas Tirith Warriors
            • Minas Tirith Archers
            • Minas Tiirth Knights
            • Citadel Guard
            • Guards of the Fountain Court
            The Knight of the White Tower has a new Heroic Special Rule. This is the White Sword of Gondor. It allows the Knight of the White Tower to be more deadly in Heroic Duels.

            2) KING OF MEN

            A King of Men is now a common hero upgrade option for the following formations:
            • Minas Tirith Warriors
            • Numenorean Warriors
            • Warriors of Arnor

            Furthermore, the King of Men has been given a new Heroic Special Rule. This is Heroic Strike. The intent of Heroic Strike is to be similar to Epic Strike, just less potent.


            3) DUNEDAIN OF ARNOR

            The Dunedain of Arnor is now a common hero upgrade option for the following formations:
            • Rangers of Gondor
            • Rangers of Arnor
            They provide Terror to the formations in which they are including. This provides more opportunity for Gondor & Arnor to have access to that special rule.

            4) RANGER OF THE NORTH

            Similar to the Dunedain of Arnor, the Rangers of the North are also common hero upgrade option for the following formations:
            • Rangers of Gondor
            • Rangers of Arnor
            The Rangers of the North will provide the ability to use the Take Aim! Heroic Special Rule.


              UPDATES TO LEGENDARY FORMATIONS FOR GONDOR & ARNOR

              In order to be consistent with his SBG profile, Duinhir has been given his special rules for Go for the Eyes! and Critical Strike. These make this formation the "monster-killer" that they should be.


              NEW EPIC HEROES FOR GONDOR & ARNOR
              1. Aragorn, King Elessar
              2. Faramir, Captain of Gondor
              1) ARAGORN, KING ELESSAR


              2) FARAMIR, CAPTAIN OF GONDOR

              The existing profile within vanilla WotR has had its name changed to distinguish it from the new profile for Faramir. Likewise, the "correct" model is now shown in the profile as well - Faramir wearing Heavy Armor of Gondor; riding off to perform his Epic Sacrifice.


              LINKS TO OTHER PARTS OF THE SBG TO WOTR CONVERSION SERIES

              1. Describing the Process [Part 1/13]
              2. Creating the Full List of Needed Profiles and Assigning WotR Armies [Part 2/13]
                1. Status Update for Progress on Profile Creation and Army List Document Writing - Good Armies [Part 2a/13]
                2. Status Update for Progress on Profile Creation and Army List Document Writing - Evil Armies [Part 2b/13]
              3. Extending the Gondor & Arnor List [Part 3/13]
              4. Extending The Kingdom of Rohan List [Part 4/13]
              5. Extending The Elven Kingdoms List [Part 5/13]
              6. Extending The Dwarf Holds List [Part 6/13]
                1. Sneak Peak at the Profiles for Thorin [Part 6a/13]
                2. Common Formations [Part 6b/13]
                3. Legendary Formations [Part 6c/13]
                4. Epic Heroes [Part 6d/13]
              7. Creating The City of Dale List [Part 7/13]
              8. Extending The Forgotten Kingdoms List [Part 8/13]
              9. Extending the Mordor List [Part 9/13]
              10. Extending The Fortress of Isengard List [Part 10/13]
              11. Extending The Misty Mountains (Moria) List [Part 11/13]
              12. Extending The Fallen Realms List [Part 12/13]
              13. Extending the Angmar List [Part 13/13]
                1. Common and Rare Formations [Part 13a/13]
                2. Legendary Formations [Part 13b/13]
                3. Epic Heroes [Part 13c/13]

                Tuesday, August 25, 2015

                WotR Magic - Updates to the Rules for the Spells of Command [Part 2/7]

                The next set of Magic to be covered is the Spells of Command. The Spells of Command are mostly used by Good Models; in fact the only model that is Evil that has access to this set of magic is Saruman the White Hand.

                Here is the list of Magic Users that have access to the Spells of Command. Notice that those entries that are in purple italics are the "new profiles" that were added via bringing SBG Hobbit profiles into WotR.


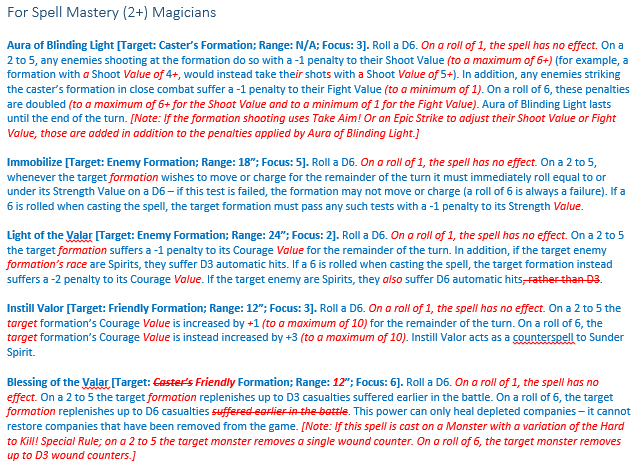
                The spells have been separated again for Spell Mastery (1) and Spell Mastery (2+) Magicians.


                The Spells of Command are intended to be defensive and augmenting in nature. Notice that the biggest change is within the Blessing of the Valar spell being used on a non-infantry/non-cavalry formation (i.e., Glorfindel casting the spell on himself as a Monster Hero). Since there is no specification for how to handle "casualties" for Monsters the addendum needed to be added to make the spell viable for these unit types as well.


                Monday, June 8, 2015

                WFMC - Implementing the Options for Rotation [Part 8/11]
                The last three weeks has been busy with real life, so trying to find the time to squeeze in a little bit of coding has been quite the struggle; and to add salt to the wound, the majority of the work that I've been working toward accomplishing has been refactoring code within the Business Logic Layer of the Application, which is non-functional - paying back my Technical Debt over the last two months or so … Long story short - I've gotten some work done on features that are necessary but not super "flashy", but hopefully it will be enough to keep everyone interested until I can unveil more fun and exciting features.

                WHERE WE LEFT OFF WITH PART 7/11

                Here is what the application looked like on the 20th May 2015.


                We had added the zoom in/out capability (in the top right of the OpenGL View. We had also added the code to ensure that the checkboxes for Hornblowers, Difficult Terrain, Enemy Upon Us, At the Double, and Heroic Move were all adjusting the Remaining Move Value to allow them to be fully functional.

                MORE PROGRESS THAT HAS BEEN MADE

                The first thing that you should notice is the newly enabled feature and the placeholder for a new future feature.


                We have enabled the Rotation Radio Button Options in the Center on the Left and added the Clear All placeholder button to the bottom right of the Application. You may have noticed that the Radio Buttons for the Translation Sliders have also been renamed to the function that they are appropriately performing. As of right now, all Translation is Vector Based, so that is the default selected Radio Button.


                I had originally intended to also include the functionality for the "Use Vanilla WotR Move Limit Rules" Checkbox in this update, but alas - I had run out of time and that feature is requiring more Non-Functional Refactoring and effort than I had originally anticipated. Perhaps it was the 20-hour SmallWorld ©, Star Wars Epic Duels ®,  & Diablo III © XBox One © Extravaganza I had with my brother over the weekend that consumed all my time … NAH! That couldn't be it.


                The first thing I want to show is the changed availability of the Hornblower Checkbox. Previously, it was enabled and disabled only by the selected Desired Formation and Desired Unit's availability.


                We have changed it so that once a formation is Baselined, the state of the Hornblower Checkbox is committed and persisted for the formation. That is to say, there is no way to remove a Hornblower from a formation after it is in play - so why should the checkbox be enabled after the formation is baselined. With leaving it enabled, I was able to check and uncheck the checkbox at my leisure round-after-round (effectively allowing me to add +1" Move whenever I wanted extra Move Value). This defeats the intent of the Application, so it has been locked down once the formation is Baselined. If you then make a change to the Desired Unit, it will re-enable allowing the new formation to be selected for Hornblower availability.


                As mentioned earlier, We have also turned on the Radio Buttons for the Rotation Options.

                Recall back to previous posts about Rotating via Spinning (which occurs about the center of the formation) and Rotating via Wheeling (which occurs about a specified corner of the formation).
                The way that the Application up to this point has been using a combination of the two above, because the formation was rotating about the Origin of the crosshairs (which is actually located at the bottom-center of the Command Company within the Formation. Furthermore, the Expended Move Value for the Rotation had no bearing in reality - and didn't take into consideration the width or length of the Formation for calculating cost. So, basically, we were letting everyone "Get Away with Murder" and not calculating realistic rotation costs! The Translation Costs were accurate and as of today's incarnation, now the Rotation Costs are correct, as well.

                The Expended Move Value is still not "compounded" until the Formation is baselined; so any Rotation or Translation or Reconfiguration to orient and place the Formation before Baselining will not occur Expended Move Value Cost (just like before).

                Now, this is actually going to be rather difficult to show with static images. I guess I'll just have to give it a shot and see how it goes. I'll start with the rotating about the center option, first. It is the "Rotate via Spinning" Radio Button Option.

                Here is the Formation that we were just playing with for the Hornblower. It is a Formation of Minas Tirith Archers in 2x3 Configuration with the "Rotate via Spinning" Option selected. The formation has been Baselined (so it will start to accrue Expended Move Value based upon the dimension of the Formation).

                Here we go, I'll move the Rotation Slider and watch how it rotates about the center of the Formation, which is 1 Company in from the left/right sides and 1.5 Companies in from the front/bottom sides.

                Hopefully that is enough to give the idea of how it works for Rotating via Spinning about the Center of the Formation. I'm going to Reset the Round (for Round 1) to get the Formation back in its original location and then I'll do the same for Rotating via Wheeling.


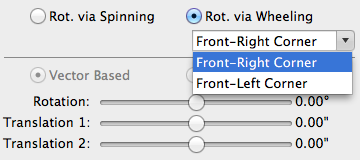
                Once the Radio Button is changed from "Rotating via Spinning" to "Rotating via Wheeling" the drop down ComboBox under the Radio Button is also enabled (since you have to select a corner via which the wheeling will be applied).


                When you select the drop down for the ComboBox, it right now only has the option for the two front corners of the formation. I plan to add the back corners, but I need to think about a cleaver way to do that for non-rectangular Formations.

                So, let's start with Rotating via Wheeling for the Front-Right Corner of the Formation:


                Here is a Cavalry Formation of Elves in a 5x2 Configuration Wheeling about the Front-Left Corner of the Formation:


                A few other minor fixes included the fact that the Zoom Buttons were not working for Cavalry Formation. It was a happenstance that I stumbled upon while testing the Rotation functionality. So, there we go. I guess it wasn't as small of a change as I had originally thought - in fact this filled up a post quite nicely.

                Any thoughts or feedback? It's getting close to my original "Definition of Ready" that I had created for myself!!


                  LINKS TO OTHER PARTS OF THE WFMC PROGRESS SERIES


                    LINKS TO OTHER PARTS OF MOVEMENT TYPES AND LIMITS SERIES


                    • Movement Types and Limits Series - Reconfiguration Movement of Cavalry Formations Comprised of 2-3 Companies [Part 11/23]
                    • Movement Types and Limits Series - Reconfiguration Movement of Cavalry Formations Comprised for 4 Companies [Part 12/23]
                    • Movement Types and Limits Series - Reconfiguration Movement of Cavalry Formations Comprised of 5 Companies [Part 13/23]
                    • Movement Types and Limits Series - Reconfiguration Movement of Cavalry Formations Comprised of 6 Companies [Part 14/23]
                    • Movement Types and Limits Series - Reconfiguration Movement of Cavalry Formations Comprised of 7 Companies [Part 15/23]
                    • Movement Types and Limits Series - Reconfiguration Movement of Cavalry Formations Comprised of 8 Companies [Part 16/23]
                    • Movement Types and Limits Series - Reconfiguration Movement of Infantry Formations Comprised of 9 Companies [Part 17/23]
                    • Movement Types and Limits Series - Cavalry Movement Example 1 from Page 33 of WotR Rulebook Analysis [Part 18/23]
                    • Movement Types and Limits Series - Cavalry Movement Example 2 from Page 33 of WotR Rulebook Analysis [Part 19/23]
                    • Movement Types and Limits Series - Cavalry Movement Example 3 from Page 33 of WotR Rulebook Analysis [Part 20/23]
                    • Movement Types and Limits Series - Reconfiguration Summary of Cavalry Formations by Company Size [Part 21/23]
                    • Movement Types and Limits Series - Cavalry Restrictions of Reconfiguration by Formation Name Summary [Part 22/23]
                    • Using WFMC to Verify Movement Examples [Part 23/23]


                    Saturday, November 8, 2014

                    The "About Face!" Errata - More Game Changing than Expected ...

                    Before going on with the reconfiguration movement costs, I wanted to talk a little about the official errata that Games Workshop posted for WotR. In that errata, there was a modification to the movement rules for "About Face!".

                    The official Rules Errata from Games Workshop contained the following rule change:

                    About Face! 
                    A formation can turn to face the opposite direction at any point during its move, without using any of its movement allowance.
                    I think that this rule change has a lot more impact on game play than anticipated. I am fairly certain that GW was thinking of the case of Formations with a few number of companies - or a formation that is not "spread out", because this changes the entire move mechanic where the "most expensive move a formation can make" is now a 90-degree rotation, where it used to be that the "most expensive move" was a 180-degree rotation (i.e., an About Face).

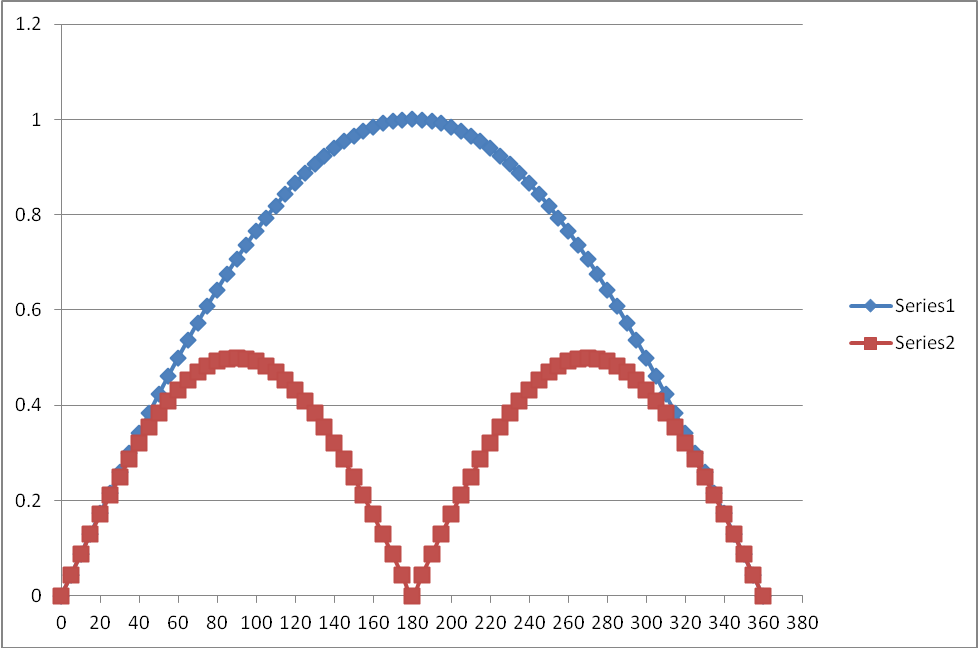
                    The blue line shows the "relative cost" based upon the old rule where the red line shows the "cost" based upon the new rule for rotating formations. By "relative cost", this means that the formation's type (infantry vs cavalry), its size and current configuration of companies within the formation dictate the amount of move distance required to make the rotation and a value of "1" means that is it 100% of the cost to rotate around to an about face direction. (See the previous post where a formation of a single company's cost to rotate versus a 3x2 formation of 5 company's cost to rotate … remember that the second's was 3 times as costly.)

                    Notice that the reason that the red line (under the new rule) is smaller is due to the fact that it is less efficient to move 91-180 degrees, but more efficient to instead perform a "no cost about face" and rotate back to the desired angle and then perform a second "no cost about face" to return to the original facing direction. in fact the most expensive rotation move that could be made is a 90-degree turn to the right or to the left.

                    Furthermore, there was not specified limit to the number of times that a formation could perform and "About Face!" move - which means that a spell caster could effectively cast simultaneously from both the back and the front of the formation (with respect to measuring). This really becomes an issue with the "long" formations (e.g., 1x5 or 1x6 formations).


                    Imagine this formation that is comprised of 6 companies of Minas Tirith Warriors and Gandalf the White are positioned as shown on the left. Assume that he casts a spell and then the formation performs an "About Face!" and then he rolls and passes his focus roll - and then casts another spell (now 360mm [just over 14"] away from where he was located originally), rinse and repeat.

                    To quote from El Macho from Despicable Me 2: "Are you kidding?!?"

                    This could be really annoying, really quickly … especially with those frustrating Spells of Ruin and Spells of Command … Imagine the frustration that a Mastery Level 3 Wizard like Saruman could inflict! Isengard you ARE my bane!

                    I think that the way to fix the "holes" that were introduced by this rule change would be to limit the number of "About Face!" moves that a formation can perform should be limited to one per turn, and require the companies to retain their orientation within a formation - and literally turn around. For Example:


                    This would mean that the wizard in the front company would only gain a distance advantage of 60mm and would not be nearly as annoying as the alternative. Is that too much to ask, considering that using a rotation about the center of the formation would cost 24.25" of movement? I mean even a Heroic Move with a Hornblower would only give this formation a total of 21" of rotational movement - still not enough to fully rotate around to an "About Face!".


                    LINKS TO OTHER RANDOM POSTS
                    1. GW WotR Unit Cost Controversy
                    2. What About Banners and Hornblowers in Profiles?
                    3. Legendary Formations and Their Point Costs
                    4. The "About Face!" Errata - More Game Changing than Expected
                    5. What Would a WotR Blog be without a Discussion of Epic Strike?!?
                    6. Blog Introduction
                    7. WotR Army Roster Sheet - Available for Download 
                    8. WotR Army Roster Example 1000 Point Gondor Army
                    9. Ideas for iPad Simulator of WotR

                    Wednesday, November 5, 2014

                    The Fortress of Isengard Unit Cost Analysis

                    My buddy, Jeremy, would be infuriated with my blog … all the examples for Warriors and Heroes and Legendary Companies have been focused around Gondor & Arnor. He would want to see the analysis from a "bad guy's" perspective and have that resource available, also.

                    My initial response would probably be a little passive aggressive: "I've laid out the equations and process for doing the calculations - why can't you just do it and figure it out yourself?!?" However, thinking about it in the sense that "If he doesn't have the information available easily, then who exactly am I going to play against?".

                    OK, bad guys, here you go … Don't ever say I am "Gondor-biased", again, Jeremy!

                    ISENGARD WARRIORS

                    Keys:
                    (C) = Common Formation, (R) = Rare Formation, (L) = Legendary Formation
                    [I] = Infantry, [H] = Cavalry, [A] = Artillery, [M] = "Monster", [MH] = "Monster Hero"
                    • (R) [I] Wild Men of Dunland - Underpriced by 25%
                    • (L) [I] Mauhur's Marauders - Underpriced by 25%
                    • (L) [I] Ugluk's Raiders - Underpriced by 14%
                    • (R) [M] Isengard Troll - Underpriced by 5%
                    • (C) [I] Uruk-hai Warband - Accurately Priced (0% deviation)
                    • (C) [I] Uruk-hai Scout Warband - Accurately Priced (0% deviation)
                    • (R) [I] Uruk-hai Sappers - Accurately Priced (0% deviation)
                    • (R) [I] Ferel Uruk-hai Warband - Accurately Priced (0% deviation)
                    • (R) [I] Dunlending Huscarls - Accurately Priced (0% deviation)
                    • (R) [H] Warg Rider Warband - Accurately Priced (0% deviation)
                    • (R) [A] Isengard Assault Ballista - Accurately Priced (0% deviation)
                    • (L) [H] Sharku's Hunters - Accurately Priced (0% deviation)
                    • (C) [I] Uruk-hai Phalanx - Accurately Priced (0% deviation)
                    • (R) [MH] Isengard Troll Captain - Overpriced by 3%
                    • (R) [A] Isengard Battering Ram - Overpriced by 11%
                    • (L) [I] Vrashku's Talons - Overpriced by 17%
                    • (R) [H] Dunlending Horsemen - Overpriced by 33%
                    • (C) [I] Isengard Orc Warband - Overpriced by 50%
                    • (R) [I] Uruk-hai Berserker Warband - Overpriced by 100%
                    • (R) [I] Sharkey's Ruffians - Overpriced by 100%
                    Applying the template from cheapest (weakest stat-wise) to most expensive (most powerful) gives:
                    • 5 Points per Company:
                      • (R) [I] Sharkey's Ruffians
                    • 10 Points per Company:
                      • (C) [I] Isengard Orc Warband
                    • 15 Points per Company:
                      • (R) [H] Dunlending Horsemen
                    • 20 Points per Company:
                      • (R) [I] Wild Men of Dunland
                      • (R) [H] Warg Rider Warband
                    • 25 Points per Company:
                      • (R) [I] Dunlending Huscarls
                      • (L) [H] Sharku's Hunters
                    • 30 Points per Company:
                      • (C) [I] Uruk-hai Scout Warband
                      • (R) [I] Uruk-hai Sappers
                      • (L) [I] Vrashku's Talons
                    • 35 Points per Company:
                      • (C) [I] Uruk-hai Warband
                      • (C) [I] Uruk-hai Phalanx
                      • (L) [I] Ugluk's Raider
                    • 40 Points per Company:
                      • (R) [I] Ferel Uruk-hai Warband
                      • (L) [I] Mauhur's Marauders
                    • 45 Points per Company:
                      • (R) [A] Isengard Battering Ram
                    • 55 Points per Company:
                      • (R) [I] Uruk-hai Berserker Warband
                    • 75 Points per Company:
                      • (R) [A] Isengard Assault Ballista
                    • 105 Points per Company:
                      • (R) [M] Isengard Troll
                    • 145 Points per Company:
                      • (R) [M] Isengard Troll Captain
                    ISENGARD HEROES


                    Key: (C) = Command Hero, (L) = Legendary Hero, (E) = Epic Hero
                    • (E) Thrydan Wolfsbane - Underpriced by 47%
                    • (E) Saruman the White Hand - Underpriced by 9%
                    • (C) Uruk-hai Captain UP - Underpriced by 9%
                    • (C) Uruk-hai Captain UW - Accurately Priced (0% deviation)
                    • (C) Orc Captain WRW - Accurately Priced (0% deviation)
                    • (L) Sharku - Accurately Priced (0% deviation)
                    • (E) Grima Wormtongue - Accurately Priced (0% deviation)
                    • (C) Dunlending Chieftain DHu - Overpriced by 11%
                    • (E) Lurtz - Overpriced by 17%
                    • (C) Uruk-hai Shaman UP - Overpriced by 18%
                    • (C) Uruk-hai Captain USW - Overpriced by 25%
                    • (C) Dunlending Chieftain DHo - Overpriced by 25%
                    • (C) Uruk-hai Shaman UW - Overpriced by 25%
                    • (C) Isengard Shaman WRW - Overpriced by 25%
                    • (L) Mauhur - Overpriced by 33%
                    • (L) Ugluk - Overpriced by 35%
                    • (L) Vrashku - Overpriced by 36%
                    • (C) Orc Captain IOW - Overpriced by 43%
                    • (C) Uruk-hai Shaman USW - Overpriced by 43%
                    • (C) Isengard Shaman IOW - Overpriced by 54%
                    Applying the template and sorting by the cost calculated by the template for Isengard heroes, we get the following from cheapest (weakest stat-wise) to most expensive (most powerful):
                    • Heroes that should cost 35 Points:
                      • (C) Orc Captain IOW
                    • Heroes that should cost 40 Points:
                      • (C) Uruk-hai Captain USW
                      • (C) Dunlending Chieftain DHo
                    • Heroes that should cost 45 Points:
                      • (C) Dunlending Chieftain DHu
                    • Heroes that should cost 50 Points:
                      • (C) Uruk-hai Captain UW
                      • (C) Orc Captain WRW
                    • Heroes that should cost 55 Points:
                      • (C) Uruk-hai Captain UP
                    • Heroes that should cost 65 Points:
                      • (C) Isengard Shaman IOW
                    • Heroes that should cost 70 Points:
                      • (L) Vrashku
                      • (C) Uruk-hai Shaman USW
                    • Heroes that should cost 75 Points:
                      • (L) Sharku
                      • (L) Mauhur
                      • (E) Grima Wormtongue
                    • Heroes that should cost 80 Points:
                      • (C) Uruk-hai Shaman UW
                      • (C) Isengard Shaman WRW
                    • Heroes that should cost 85 Points:
                      • (C) Uruk-hai Shaman UP
                      • (L) Ugluk
                    • Heroes that should cost 95 Points:
                      • (E) Thrydan Wolfsbane
                    • Heroes that should cost 150 Points:
                      • (E) Lurtz
                    • Heroes that should cost 265 Points:
                      • (E) Saruman the White Hand
                    TASKMASTERS COMMAND UPGRADE
                    "By ensuring that their fellows fear them more than the foe, Taskmaster can instill an enthusiasm for battle in even the most cowardly of Orcs! A formation with a Taskmaster adds 1 to its Courage characteristic, on top of any other bonuses."  
                    - WotR Rule Book pg 60
                    Similar to the analyses that were done for Hornblowers, a profile line increase of 1 for the Courage Value costs +2.5 points [0.5*+5 points].

                    So, what I am suggesting is that the Taskmasters upgrade should be based upon the number of companies within a formation - and not just a flat rate upgrade point cost, thus it would be as if simply upping the Courage Value by 1 of the companies within the formation:
                    • 1-2 Company in Formation = 5 Points
                    • 3-4 Companies in Formation = 10 Points
                    • 5-6 Companies in Formation = 15 Points
                    • 7-8 Companies in Formation = 20 Points
                    • 8-9 Companies in Formation = 25 Points