Friday, July 3, 2015

WFMC - Calculating the Translation Distance for Vanilla WotR Rules of Movement [Part 9a/12]

While writing up the code within WFMC for the Vanilla WotR rules it became very obvious very quickly that the rules for the basic movement within WotR require a lot of computations to allow the expended Move Value to be calculated. I'm going to go through some of what was required within this post - and hopefully it will clear up any confusion about the way that it works within the rule set. In fact, I suspect that a lot of players actually take for granted the amount of work required to determine the actual move distance during the Move Phase of the game (and because of such do a very sloppy job at it and take full advantage of the "forgive others during the Move Phase advice within the book).

To start, let’s consider a formation in 3x2 Configuration comprised of 4 Infantry Companies that do not change configuration, but simply translate and rotate. We will calculate the Expended Move Value under the Vanilla WotR Rules and show how this is accomplished. This is technically the “simple case”.
Here is how the rules read in the rulebook for measuring distance under translation and rotation:


Here is the section on Measurement Etiquette:


Here is our goal – we want to find the corner of the company within the formation that has moved the greatest distance and use that as our Expended Move Value for the entire formation:


Notice that everything is measured with respect to a Cartesian Coordinate Axis, and the only thing that matters when determining the Expended Move Value is the corner of one of the companies within the formation that traversed the greatest distance.
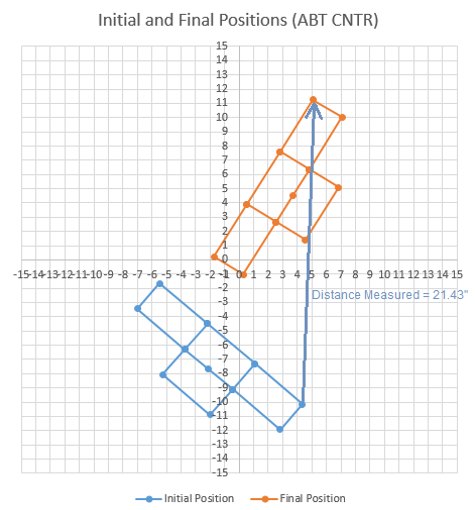
The first natural question is: How do you know which corner has traversed the greatest distance? And the short answer is: You don't unless you measure each of them individually, compare them, and determine the maximum.


Then of course the follow-up is: Well, if I’ve already moved all of my Companies within my Formation and I’ve moved “too far” … how do I know where to return them back to accurately to re-do the movement?
EXACTLY!
Let’s go through the math necessary to calculate the maximum traversed distance for the formation to show you how it is getting calculated it in WFMC (and how each of us should be calculating it during the Move Phase when we are playing an actual game).


Clear as mud? If that does not make you want to go break out all the miniatures and play a game – I don’t know what will!
This quickly becomes a ton of information to keep track of for a single Move Phase of a single Formation, so in order to ensure that the numbers I got were correct (and to validate the output from WFMC) I put together a spreadsheet to help to calculate all the values.


Let’s see if adding some pictures of what is actually going on will help to clarify things a little more.

Formation Width, # of Companies & Formation Type are the initial Inputs in order to look up within the database the offsets for the corners or each company within the formation.


Here is the Formation that is comprised of 4 Companies in 3x2 Configuration at its Initial Position relative to the Coordinate Axis Frame. We have been identifying this as the “Baseline Position” within WFMC.


The “Initial Position” (i.e., Baseline Position) is determined relative to the (0, 0) point of the Coordinate Axis Frame by means of the 3 sliders: Rotation Angle, X Position, & Y Position.


OK, I need a short break - but I want to get this posted. I'll break this Part 9/11 into a Part 9a and Part 9b and continue more with this as I have time over the next few days .... stay tuned ... you can see that this is going to be great, right?


    LINKS TO OTHER PARTS OF THE WFMC PROGRESS SERIES
    Help make WFMC Mobile get released to the Apple App Store with a donation!


      LINKS TO OTHER PARTS OF MOVEMENT TYPES AND LIMITS SERIES

      • Movement Types and Limits Series - Reconfiguration Movement of Cavalry Formations Comprised of 2-3 Companies [Part 11/23]
      • Movement Types and Limits Series - Reconfiguration Movement of Cavalry Formations Comprised for 4 Companies [Part 12/23]
      • Movement Types and Limits Series - Reconfiguration Movement of Cavalry Formations Comprised of 5 Companies [Part 13/23]
      • Movement Types and Limits Series - Reconfiguration Movement of Cavalry Formations Comprised of 6 Companies [Part 14/23]
      • Movement Types and Limits Series - Reconfiguration Movement of Cavalry Formations Comprised of 7 Companies [Part 15/23]
      • Movement Types and Limits Series - Reconfiguration Movement of Cavalry Formations Comprised of 8 Companies [Part 16/23]
      • Movement Types and Limits Series - Reconfiguration Movement of Infantry Formations Comprised of 9 Companies [Part 17/23]
      • Movement Types and Limits Series - Cavalry Movement Example 1 from Page 33 of WotR Rulebook Analysis [Part 18/23]
      • Movement Types and Limits Series - Cavalry Movement Example 2 from Page 33 of WotR Rulebook Analysis [Part 19/23]
      • Movement Types and Limits Series - Cavalry Movement Example 3 from Page 33 of WotR Rulebook Analysis [Part 20/23]
      • Movement Types and Limits Series - Reconfiguration Summary of Cavalry Formations by Company Size [Part 21/23]
      • Movement Types and Limits Series - Cavalry Restrictions of Reconfiguration by Formation Name Summary [Part 22/23]
      • Using WFMC to Verify Movement Examples [Part 23/23]


      LINKS TO OTHER PARTS OF THE WFMC MOBILE ART SERIES

      Thursday, June 18, 2015

      The Forgotten Kingdoms Epic Heroes' Special Rules [Part 5/10]

      It has been a while since we've put up an Epic Hero Special Rule Applicability List. Time has just been flying buy and I am quickly running out of it! Here is the list for The Forgotten Kingdoms' Epic Heroes. For only having 3 Epic Heroes within the list I was surprised at how many special rules and Epic Rules that they have. It looks like their primary focus is to augment the formations in which they are included:


      So, there it is ... If we look at the applicability column, it is interesting to see that the following spread exists:
      • Only the Hero - 4/21
      • Hero's Company - 1/21
      • Hero's Formation - 9/21
      • Target Enemy - 1/21
      • All Friendly Formations within Range - 4/21
      • Target Friendly Hero - 2/21
      As you can see above, 13/21 are Formation-centric and only 8/21 are not. This would be very useful for formation augmentation.


      LINKS TO OTHER SPECIAL RULE EVALUATION POSTS
      1. Gondor & Arnor Epic Heroes' Special Rules [Part 1/10]
      2. The Kingdom of Rohan Epic Heroes' Special Rules [Part 2/10]
      3. The Elven Kingdoms Epic Heroes' Special Rules [Part 3/10]
      4. The Dwarf Holds Epic Heroes' Special Rules [Part 4/10]
      5. The Forgotten Kingdoms Epic Heroes' Special Rules [Part 5/10]
      6. Mordor Epic Heroes' Special Rules [Part 6/10]
      7. The Fortress of Isengard Epic Heroes' Special Rules [Part 7/10]
      8. The Misty Mountains (Moria) Epic Heroes' Special Rules [Part 8/10]
      9. The Fallen Realms Epic Heroes' Special Rules [Part 9/10]
      10. Angmar Epic Heroes' Special Rules [Part 10/10]

      LINKS TO OTHER UNIT COST ANALYSIS POSTS

      Monday, June 8, 2015

      WFMC - Implementing the Options for Rotation [Part 8/11]

      The last three weeks has been busy with real life, so trying to find the time to squeeze in a little bit of coding has been quite the struggle; and to add salt to the wound, the majority of the work that I've been working toward accomplishing has been refactoring code within the Business Logic Layer of the Application, which is non-functional - paying back my Technical Debt over the last two months or so … Long story short - I've gotten some work done on features that are necessary but not super "flashy", but hopefully it will be enough to keep everyone interested until I can unveil more fun and exciting features.

      WHERE WE LEFT OFF WITH PART 7/11

      Here is what the application looked like on the 20th May 2015.


      We had added the zoom in/out capability (in the top right of the OpenGL View. We had also added the code to ensure that the checkboxes for Hornblowers, Difficult Terrain, Enemy Upon Us, At the Double, and Heroic Move were all adjusting the Remaining Move Value to allow them to be fully functional.

      MORE PROGRESS THAT HAS BEEN MADE

      The first thing that you should notice is the newly enabled feature and the placeholder for a new future feature.


      We have enabled the Rotation Radio Button Options in the Center on the Left and added the Clear All placeholder button to the bottom right of the Application. You may have noticed that the Radio Buttons for the Translation Sliders have also been renamed to the function that they are appropriately performing. As of right now, all Translation is Vector Based, so that is the default selected Radio Button.


      I had originally intended to also include the functionality for the "Use Vanilla WotR Move Limit Rules" Checkbox in this update, but alas - I had run out of time and that feature is requiring more Non-Functional Refactoring and effort than I had originally anticipated. Perhaps it was the 20-hour SmallWorld ©, Star Wars Epic Duels ®,  & Diablo III © XBox One © Extravaganza I had with my brother over the weekend that consumed all my time … NAH! That couldn't be it.


      The first thing I want to show is the changed availability of the Hornblower Checkbox. Previously, it was enabled and disabled only by the selected Desired Formation and Desired Unit's availability.


      We have changed it so that once a formation is Baselined, the state of the Hornblower Checkbox is committed and persisted for the formation. That is to say, there is no way to remove a Hornblower from a formation after it is in play - so why should the checkbox be enabled after the formation is baselined. With leaving it enabled, I was able to check and uncheck the checkbox at my leisure round-after-round (effectively allowing me to add +1" Move whenever I wanted extra Move Value). This defeats the intent of the Application, so it has been locked down once the formation is Baselined. If you then make a change to the Desired Unit, it will re-enable allowing the new formation to be selected for Hornblower availability.


      As mentioned earlier, We have also turned on the Radio Buttons for the Rotation Options.

      Recall back to previous posts about Rotating via Spinning (which occurs about the center of the formation) and Rotating via Wheeling (which occurs about a specified corner of the formation).
      The way that the Application up to this point has been using a combination of the two above, because the formation was rotating about the Origin of the crosshairs (which is actually located at the bottom-center of the Command Company within the Formation. Furthermore, the Expended Move Value for the Rotation had no bearing in reality - and didn't take into consideration the width or length of the Formation for calculating cost. So, basically, we were letting everyone "Get Away with Murder" and not calculating realistic rotation costs! The Translation Costs were accurate and as of today's incarnation, now the Rotation Costs are correct, as well.

      The Expended Move Value is still not "compounded" until the Formation is baselined; so any Rotation or Translation or Reconfiguration to orient and place the Formation before Baselining will not occur Expended Move Value Cost (just like before).

      Now, this is actually going to be rather difficult to show with static images. I guess I'll just have to give it a shot and see how it goes. I'll start with the rotating about the center option, first. It is the "Rotate via Spinning" Radio Button Option.

      Here is the Formation that we were just playing with for the Hornblower. It is a Formation of Minas Tirith Archers in 2x3 Configuration with the "Rotate via Spinning" Option selected. The formation has been Baselined (so it will start to accrue Expended Move Value based upon the dimension of the Formation).

      Here we go, I'll move the Rotation Slider and watch how it rotates about the center of the Formation, which is 1 Company in from the left/right sides and 1.5 Companies in from the front/bottom sides.

      Hopefully that is enough to give the idea of how it works for Rotating via Spinning about the Center of the Formation. I'm going to Reset the Round (for Round 1) to get the Formation back in its original location and then I'll do the same for Rotating via Wheeling.


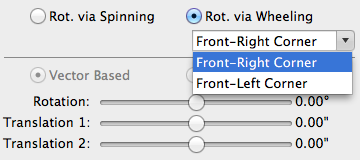
      Once the Radio Button is changed from "Rotating via Spinning" to "Rotating via Wheeling" the drop down ComboBox under the Radio Button is also enabled (since you have to select a corner via which the wheeling will be applied).


      When you select the drop down for the ComboBox, it right now only has the option for the two front corners of the formation. I plan to add the back corners, but I need to think about a cleaver way to do that for non-rectangular Formations.

      So, let's start with Rotating via Wheeling for the Front-Right Corner of the Formation:


      Here is a Cavalry Formation of Elves in a 5x2 Configuration Wheeling about the Front-Left Corner of the Formation:


      A few other minor fixes included the fact that the Zoom Buttons were not working for Cavalry Formation. It was a happenstance that I stumbled upon while testing the Rotation functionality. So, there we go. I guess it wasn't as small of a change as I had originally thought - in fact this filled up a post quite nicely.

      Any thoughts or feedback? It's getting close to my original "Definition of Ready" that I had created for myself!!


        LINKS TO OTHER PARTS OF THE WFMC PROGRESS SERIES


          LINKS TO OTHER PARTS OF MOVEMENT TYPES AND LIMITS SERIES


          • Movement Types and Limits Series - Reconfiguration Movement of Cavalry Formations Comprised of 2-3 Companies [Part 11/23]
          • Movement Types and Limits Series - Reconfiguration Movement of Cavalry Formations Comprised for 4 Companies [Part 12/23]
          • Movement Types and Limits Series - Reconfiguration Movement of Cavalry Formations Comprised of 5 Companies [Part 13/23]
          • Movement Types and Limits Series - Reconfiguration Movement of Cavalry Formations Comprised of 6 Companies [Part 14/23]
          • Movement Types and Limits Series - Reconfiguration Movement of Cavalry Formations Comprised of 7 Companies [Part 15/23]
          • Movement Types and Limits Series - Reconfiguration Movement of Cavalry Formations Comprised of 8 Companies [Part 16/23]
          • Movement Types and Limits Series - Reconfiguration Movement of Infantry Formations Comprised of 9 Companies [Part 17/23]
          • Movement Types and Limits Series - Cavalry Movement Example 1 from Page 33 of WotR Rulebook Analysis [Part 18/23]
          • Movement Types and Limits Series - Cavalry Movement Example 2 from Page 33 of WotR Rulebook Analysis [Part 19/23]
          • Movement Types and Limits Series - Cavalry Movement Example 3 from Page 33 of WotR Rulebook Analysis [Part 20/23]
          • Movement Types and Limits Series - Reconfiguration Summary of Cavalry Formations by Company Size [Part 21/23]
          • Movement Types and Limits Series - Cavalry Restrictions of Reconfiguration by Formation Name Summary [Part 22/23]
          • Using WFMC to Verify Movement Examples [Part 23/23]


          Wednesday, May 20, 2015

          WFMC - Movement Modifier Checkboxes Work Properly and Zoom Capability [Part 7/11]

          The last two weeks has been a struggle with the functionality for the color of the Formation Configuration items in the Combo Box. It was causing crashes and display problems with the view, so I finally decided to comment it out and go back to the straight black text for now - until I can refactor the whole thing and convert it in its entirety over to Attributed Strings (instead of trying to juggle between those and normal Strings). Once I finally gave up on that battle, I managed to make a few other changes that were needed.

          WHERE WE LEFT OFF WITH PART 6/10

          Here is what the application looked like on the 8th May 2015.


          We had added in the Grid Mark Reference Lines and also made the changes for Round-to-Round non-persistence of the Expended Move Value (i.e., so that it doesn't continue to compound).

          MORE PROGRESS THAT HAS BEEN MADE

          One of the problems that have been in existence since implemented has been the Move Enhancing checkbox options. We put them in back during Part 2/10, but they didn't "do" anything to the Remaining Move Value. I wanted the process of checking the checkboxes to increase/decrease the Remaining Move Value - and when unchecked they could reverse the effect - but not impact the Expended Move Value that had been accumulated.

          During the post for part 4/10, we also added the logic to enable and disable the Hornblower checkbox based upon the selected Desired unit (i.e., whether or not the Unit supports it as an upgrade or has it as a default included in the profile).

          Here, we have selected the Faction "Gondor & Arnor" and selected the Unit "Minas Tirith Archers" - which allow for the Hornblower upgrade (hence the checkbox is enabled). Notice that the profile's Move Value (just under the Desired Unit) shows the baseline value of 6.00" for the Archers. Since the Hornblower checkbox is unchecked the Remaining Move Value is equal to the baseline profile Move Value (6.00") - since there are no modifiers applied to the formation.


          Here, we have checked the Hornblower checkbox. The baseline value for the unit is still unchanged (as expected) and the Remaining Move Value has been updated to include the extra 1" provided by the upgrade (so now it is reading 7.00").


          Recall that in order to enable the other checkboxes (which are impacted on a Round-by-Round basis of activation), the first Round must be established by Baselining the Formation and its configuration. The baseline configuration is set to be the 2x3 Configuration of the Formation of 6 Infantry companies.

          Next, we checked the "At the Double!" checkbox. From the description in the rulebook on page 64 - this effectively allows the Remaining Move Value to be doubled. Again, notice that there is a Hornblower in the formation, and the formation is performing an "At the Double!". This means that the formation can move its full 7.00" (from the baseline Move Value + the Hornblower) and then move another full 7.00" immediately, again. If you look at the Remaining Move Value for the formation - it is under this combination now a value of 14.00" (double 7.00"). Something else to notice, here, is that before - checking the "At the Double!" checkbox disabled both itself and the Heroic Move checkbox ... this wasn't correct - so that disabling feature has been removed. Just because a formation performed an "At the Double!" does not disqualify it from performing a Heroic move - and checking it by accident should not disallow unchecking the option.


          In the following figure, the "At the Double!" checkbox has been unchecked and the Difficult Terrain checkbox has been checked. From the rulebook on page 33, it mentions that Difficult Terrain movement counts as double (effectively meaning that the Move value is halved while in effect). Here we have the formation that still includes the Hornblower (7.00" Move Value) in Difficult Terrain - so the remaining Move Value has been reduced to 3.50" under these circumstances.


          Similarly, from page 33 - the same rules apply for the "Enemy Upon Us" condition. here the formation also has 3.50" Remaining Move Value due to those conditions.


          If you were curious, yes - Difficult Terrain and "Enemy Upon Us" modifiers do stack. In other words, if both the checkboxes are checked then the remaining Move Value would be 1.75" (one-quarter of the original baseline Move Value + Hornblower upgrade for the Unit).

          Note that this is a little controversial of a subject - some would suggest that the rule should not be quadrupled, but instead tripled - meaning if the Formation were moving forward 1", it would cost 1" for the Move, +1" for double cost due to difficult terrain, & +1" for the Enemy Upon Us rule = 3" total cost.

          The way that we have treated it is that if the Formation were moving forward 1", it would cost 1" for the Move and +1" for double cost due to difficult terrain = 2" subtotal cost; and then for double cost due to the Enemy Upon Us rule would be +2" = 4" total cost.

          Here we have the Formation with a Hornblower Upgrade that has called a Heroic Move via a Hero. According to Page 66 of the rulebook, this effectively triples the Move Value for the formation. So, in this case, the base move Value of 6.00" is upped by +1" for the Hornblower = 7.00" subtotal and then tripled for the Heroic Move = 21.00" Total Move Value.

          Now we are talking ... we can perform quite a few of the Reconfiguration Costs with a Move Value like that or we can take full advantage of rotating and translating!


          One nuance that we were trying to accommodate for was the condition where the "At the Double!" checkbox had been checked but then as an afterthought it was decided to spend the Might and perform a Heroic Move. In this case, we decided that checking the checkbox for a Heroic Move should "overwrite" the "At the Double!" - so it unchecks the checkbox and disables it (so that you cannot get into a situation where both are checked at the same time.


          However, if you then decide to go back and turn off the checkbox for the Heroic Move - the "At the Double!" checkbox is re-enabled and allowed to be re-selected if so desired.


          Here is a situation where the Formation started at the location above at the beginning of Round 1. They have a Hornblower, so they had 7.00" Move Value. As they begin to rotate and move to the left and back they expend the entire 7.00" of Move Value, so they decide to call an "At the Double!" (which they roll for [not modeled, yet] and pass). They then continue to move left and down to the current position, with using up 11.26" of their 14.00" of Move Value.


          Here is the same type of movement, but this time the Formation is within Difficult Terrain and has decided to use a Heroic Move to accomplish the full move of 10.50" (6" + 1" ==> 7" / 2 ==> 3.5" * 3 = 10.5" Total).


          Here we have a Formation of Moria Goblin Warband comprised of 9 companies in 1x9 Configuration. Their base Move Value is 8.00".


          Adjusting nothing else, if we attempt to reconfigure this Formation from 1x9 Configuration to 9x1 Configuration, as we saw from Part 5/10 the warning dialog will pop-up to indicate that there is not enough remaining Move Value to accomplish this reconfiguration. In fact, the cost to reconfigure is 25.64" - as indicated in the pop-up.


          To accomplish this, the formation has been upgraded to include a Hornblower (now has a 9.00" Move Value) and then uses a Might Point from a Hero to call a Heroic Move (it now has a 27.00" Move Value). This is enough to accommodate the reconfiguration cost of changing from a 1x9 Configuration to a 9x1 Configuration.


          Now that there is sufficient Remaining Move Value, the Formation can be Reconfigured!


          This led to the next change that I wanted to implement... Notice that the formation is so wide that it now goes off the left and right side of the view. To help with this problem, I added a zoom in/out capability. It is located off to the top right of the view. Clicking + zooms the view in, and clicking - zooms the view out. In the image below, I have zoomed out twice, so now the formation shows up in its entirety within the view again.


          Everything still works ... I can rotate and the zoom factor does not change any of the functionality.


          Here we have zoomed back in after performing the rotation.


          One more cosmetic change that I wanted to point out - if you look at the line for Rotation, I've change the degree symbol to actually be superscripted (instead of just an "o") - so it looks a little more pretty.

          So, there we have it. Hopefully everyone reading this is just as excited about this as I am ... It is really starting to come together - and become something that could be useful!


            LINKS TO OTHER PARTS OF THE WFMC PROGRESS SERIES


              LINKS TO OTHER PARTS OF MOVEMENT TYPES AND LIMITS SERIES


              • Movement Types and Limits Series - Reconfiguration Movement of Cavalry Formations Comprised of 2-3 Companies [Part 11/23]
              • Movement Types and Limits Series - Reconfiguration Movement of Cavalry Formations Comprised for 4 Companies [Part 12/23]
              • Movement Types and Limits Series - Reconfiguration Movement of Cavalry Formations Comprised of 5 Companies [Part 13/23]
              • Movement Types and Limits Series - Reconfiguration Movement of Cavalry Formations Comprised of 6 Companies [Part 14/23]
              • Movement Types and Limits Series - Reconfiguration Movement of Cavalry Formations Comprised of 7 Companies [Part 15/23]
              • Movement Types and Limits Series - Reconfiguration Movement of Cavalry Formations Comprised of 8 Companies [Part 16/23]
              • Movement Types and Limits Series - Reconfiguration Movement of Infantry Formations Comprised of 9 Companies [Part 17/23]
              • Movement Types and Limits Series - Cavalry Movement Example 1 from Page 33 of WotR Rulebook Analysis [Part 18/23]
              • Movement Types and Limits Series - Cavalry Movement Example 2 from Page 33 of WotR Rulebook Analysis [Part 19/23]
              • Movement Types and Limits Series - Cavalry Movement Example 3 from Page 33 of WotR Rulebook Analysis [Part 20/23]
              • Movement Types and Limits Series - Reconfiguration Summary of Cavalry Formations by Company Size [Part 21/23]
              • Movement Types and Limits Series - Cavalry Restrictions of Reconfiguration by Formation Name Summary [Part 22/23]
              • Using WFMC to Verify Movement Examples [Part 23/23]

              Friday, May 15, 2015

              The Misty Mountains (Moria) Epic Heroes' Special Rules [Part 8/10]


              The nice thing about the Misty Mountains is that there are only two Epic Heroes in the baseline version of the rules. This made the list nice and short and easy to compile! Let's get right to it … here is the list of Epic Hero Actions for Moria and the intended re-write of the rules and rule applicability.


              There we have it … In spite of being few in number - it looks like the majority are intended for Full Formations to be within range (i.e., the only one that isn't formation targeted is Iron Fist - although I guess you could argue that it would imply that other formations with Heroes would have to be at least close together).

              I guess that this makes sense given that Moria is typically a swarming Army and having multiple formations would thusly be implied.


              LINKS TO OTHER SPECIAL RULE EVALUATION POSTS
              1. Gondor & Arnor Epic Heroes' Special Rules [Part 1/10]
              2. The Kingdom of Rohan Epic Heroes' Special Rules [Part 2/10]
              3. The Elven Kingdoms Epic Heroes' Special Rules [Part 3/10]
              4. The Dwarf Holds Epic Heroes' Special Rules [Part 4/10]
              5. The Forgotten Kingdoms Epic Heroes' Special Rules [Part 5/10]
              6. Mordor Epic Heroes' Special Rules [Part 6/10]
              7. The Fortress of Isengard Epic Heroes' Special Rules [Part 7/10]
              8. The Misty Mountains (Moria) Epic Heroes' Special Rules [Part 8/10]
              9. The Fallen Realms Epic Heroes' Special Rules [Part 9/10]
              10. Angmar Epic Heroes' Special Rules [Part 10/10]

              LINKS TO OTHER UNIT COST ANALYSIS POSTS